Want delicious Japanese breaded chicken cutlets without deep-frying? Try my crispy and juicy Baked Chicken Katsu recipe with savory tonkatsu sauce. This lighter and healthier oven-baked method is so simple and easy, you‘ll want to make it tonight!
Both Chicken Katsu and Tonkatsu are popular Japanese recipes but if you avoid fried foods or don’t deep fry at home, today’s Baked Chicken Katsu (揚げないチキンカツ) is a total game changer.
This recipe is super easy, which makes it a perfect weeknight dinner. Since the chicken is oven-baked, you can enjoy these healthier Japanese chicken cutlets without any guilt.
Table of Contents
What is Chicken Katsu?
Just in case you haven’t heard of this dish before, Chicken Katsu is a Japanese version of fried chicken cutlets. Here are some of the characteristics.
- Chicken breasts are not pounded as thin as western-style chicken cutlets.
- Chicken katsu is coated with panko (パン粉), or Japanese breadcrumbs. They are white crumbs from Japanese milk bread (Shokupan) and they are lighter and airy.
- It is typically deep-fried, not shallow pan-fried (except for the home cook version).
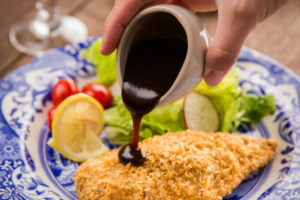
- Served with a sweet and savory tonkatsu sauce, a thicker version of Worcestershire sauce.
Now if you want to substitute chicken with pork, you can try the deep-fried Tonkatsu recipe or the Baked Tonkatsu recipe.
5 Tips for Making Baked Chicken Katsu
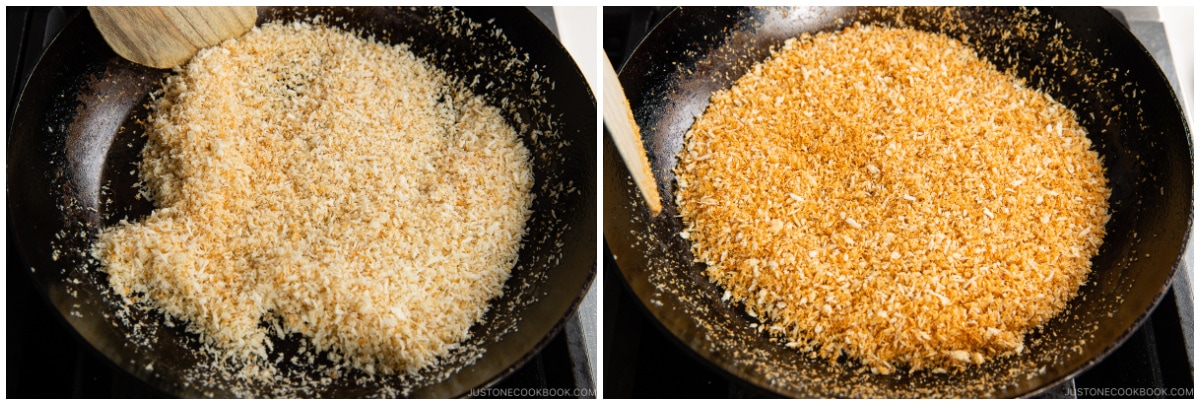
Tip 1: Toast the panko
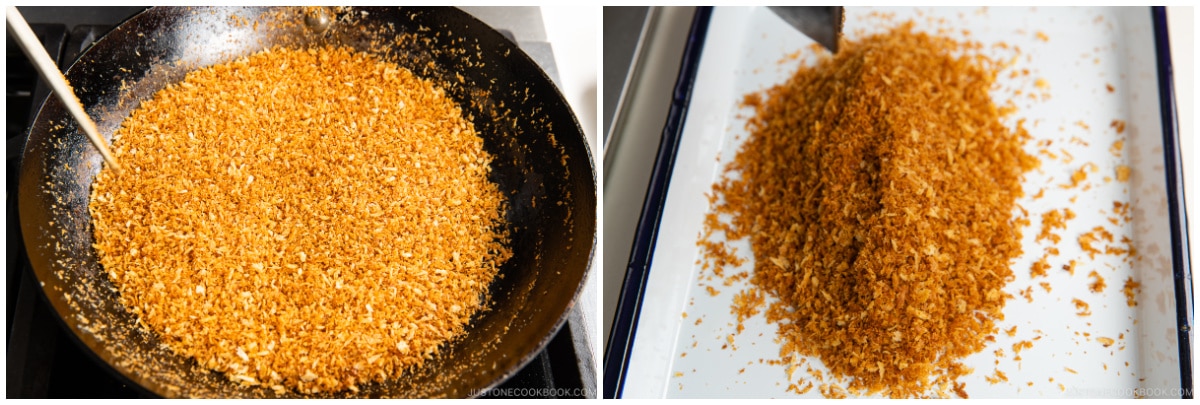
The most important tip to make the perfect baked chicken katsu is to toast the panko breadcrumbs first and then coat the chicken with the toasted panko. Why?
- The toasted panko gives the chicken katsu an even golden-colored crust. If you bake the chicken coated with uncooked panko breading, it is difficult to achieve a beautiful uniform color because the oven has hot spots. With the toasted panko, your baked chicken katsu will always look like the deep-fried ones.
- Toasting makes the panko extra crispy and crunchy. Toasting helps to remove any moisture in the panko and makes it extra crisp and crunchy.
Tip 2: Butterfly the chicken
Cooking juicy and moist chicken breasts can be challenging. Besides using organic chicken, I always make sure that the chicken pieces have even thickness. We’ll discuss more later.
Tip 3: Add oil to the beaten egg
Eggs and meat are like water and oil, so the batter and meat can potentially come off during or after deep frying. By mixing the beaten egg with oil in advance, the breading adheres to the meat, making it difficult to come off.
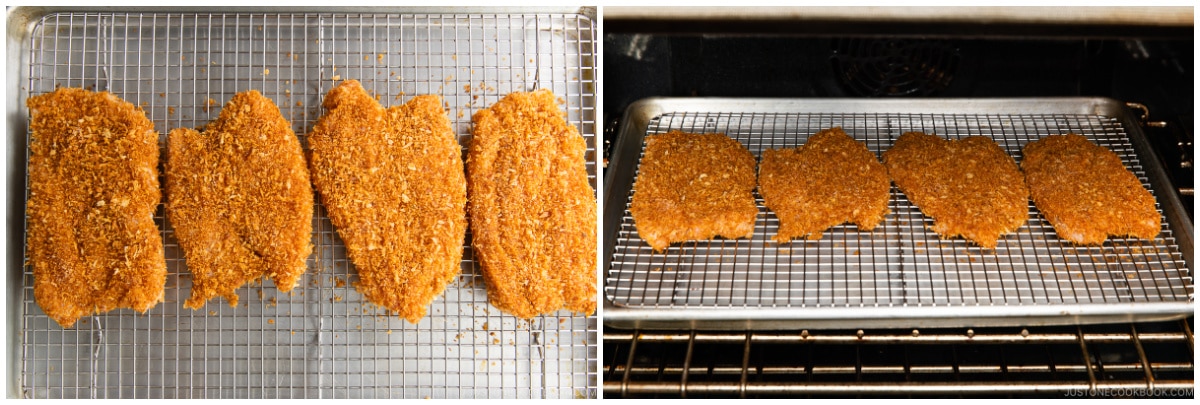
Tip 4: Use a wire rack
When baking the chicken, it’s important to use a wire rack so that the air circulates underneath the chicken. If you don’t have a wire rack, you may want to flip the chicken halfway to make sure the bottom side is also cooked through.
Tip 5: Don’t overcook the chicken
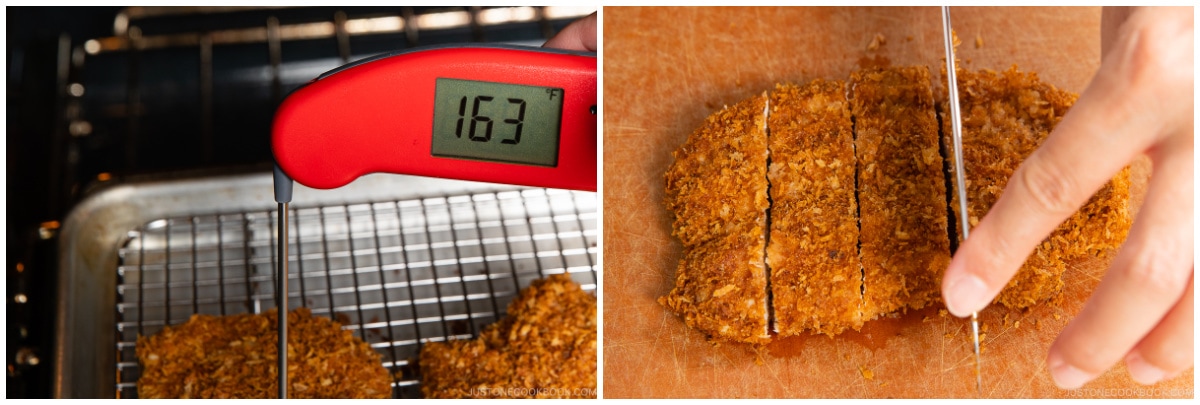
Chicken breasts can get dry easily when you over bake them as it has less fat (than chicken thighs). Measuring the internal temperature of the chicken is the best way to prevent this issue.
Once the temperature reaches 160ºF (71ºC) for 15 seconds or 165ºF (74ºC) instantly, you must immediately take out the chicken from the oven.
I highly recommend getting an instant-read thermometer such as this Thermapen from ThermoWorks.
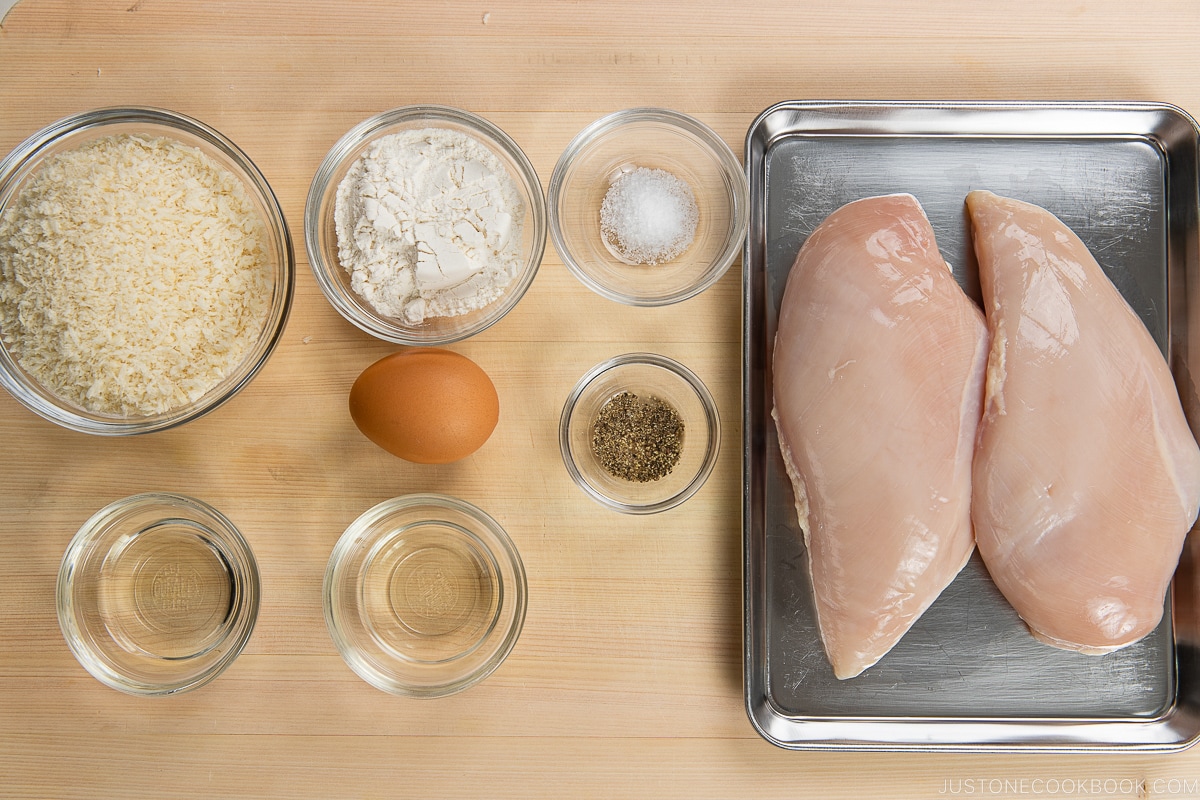
Ingredients for Baked Chicken Katsu
- Chicken breast
- Salt and pepper
- Flour (cake flour or all-purpose flour)
- Egg
- Panko (Japanese bread crumb)
- Cooking oil
How to Make Baked Chicken Katsu
- Toast the panko until golden brown and let cool.
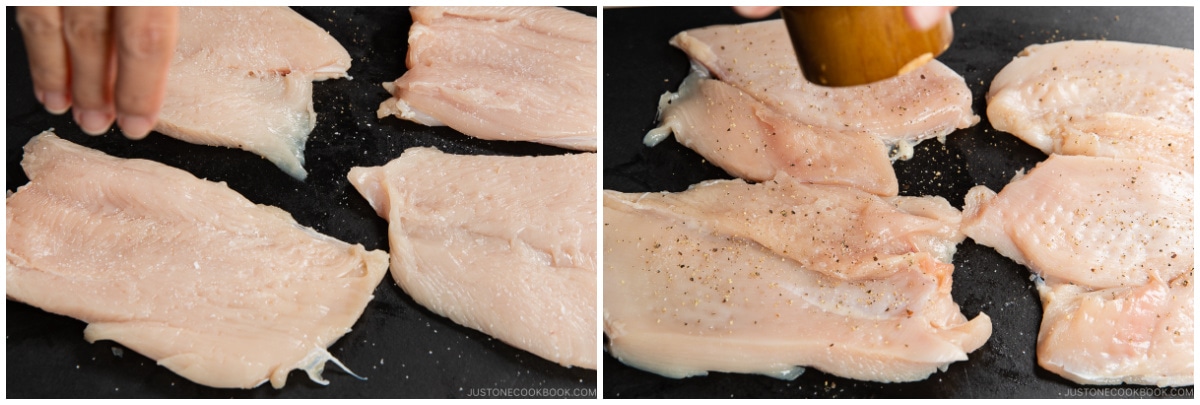
- Butterfly the chicken breast (or use the Japanese “Kannon Biraki” method) and season it lightly with salt and pepper.
- Coat the chicken with flour, beaten egg, and toasted panko.
- Lay the chicken on a wire rack over a rimmed baking sheet.
- Bake at 400ºF (200ºC) for 25-30 minutes, or until internal temperature reaches 165ºF (74ºC).
How to Butterfly the Chicken Breast (Kannon Biraki)
Chicken breasts are uneven and when you wait until the thick part of the chicken is cooked through, the thinner parts of the chicken are already overcooked, resulting in dry meat.
To prevent this from happening, it’s important to make sure the chicken breasts are even thickness. You can pound the meat with a mallet or you can butterfly (and pound) the chicken.
Typically, to butterfly the chicken breast, you would slice it in half horizontally. In Japan, we have a different way to butterfly the chicken, and this special cutting technique is called Kannon Biraki (観音開き).
Kannon Biraki – Japanese Cutting Technique
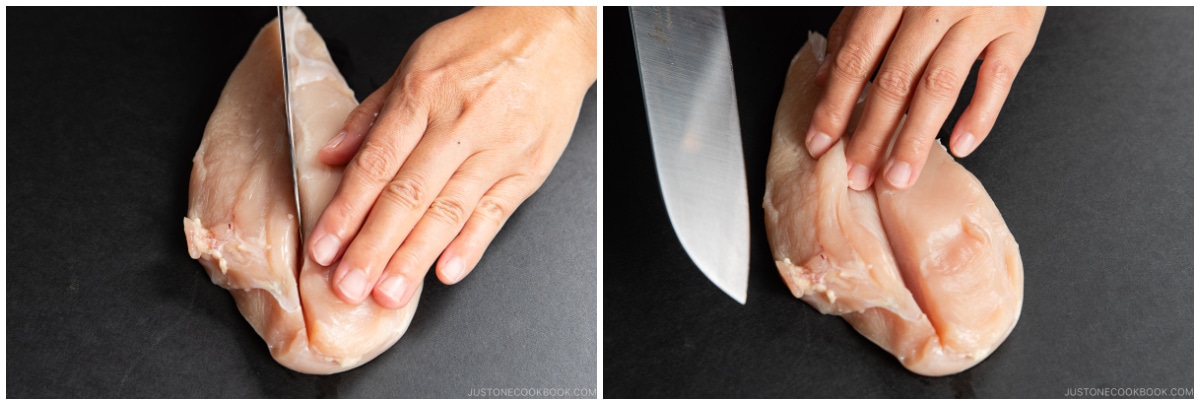
With a sharp knife, score the chicken breast lengthwise along the top center line, cutting about halfway through the thickness of the breast; do not cut completely through. Then, turn the knife parallel to the cutting board and slice the chicken breast from the center toward the left side (or the right side, if you’re left-handed) to make it evenly thin.
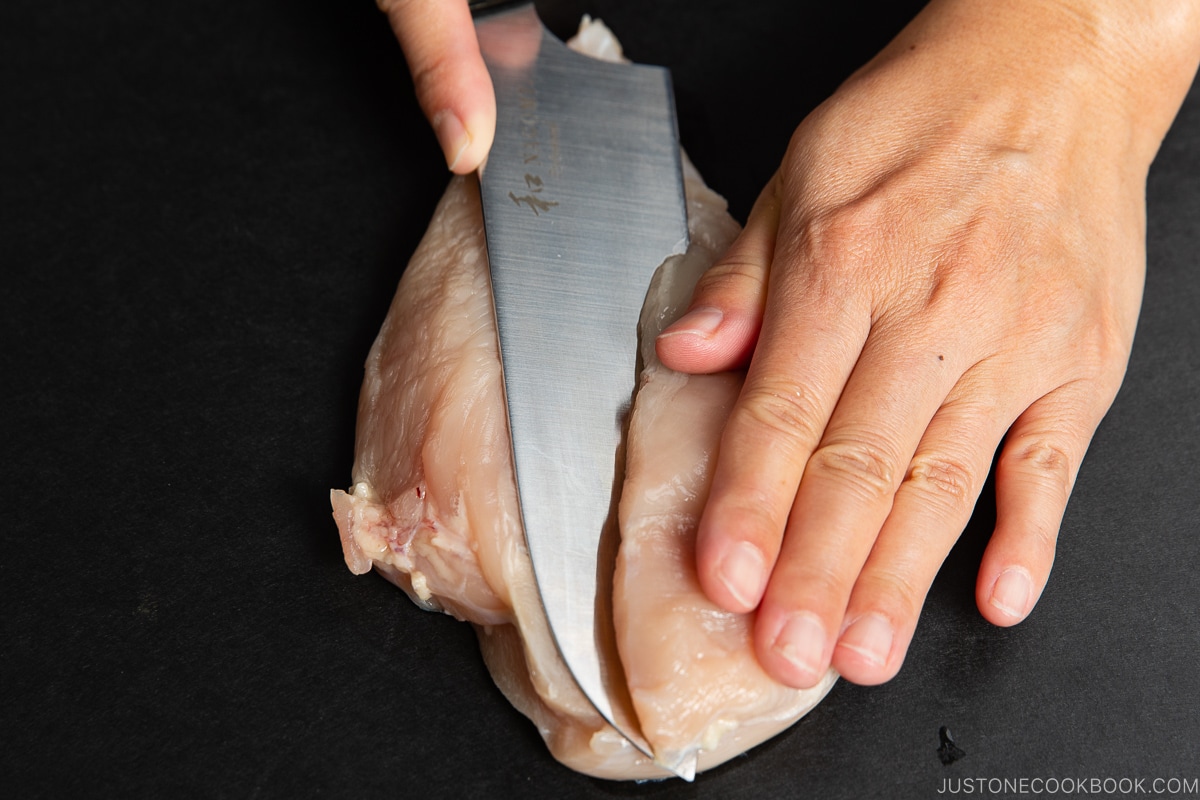
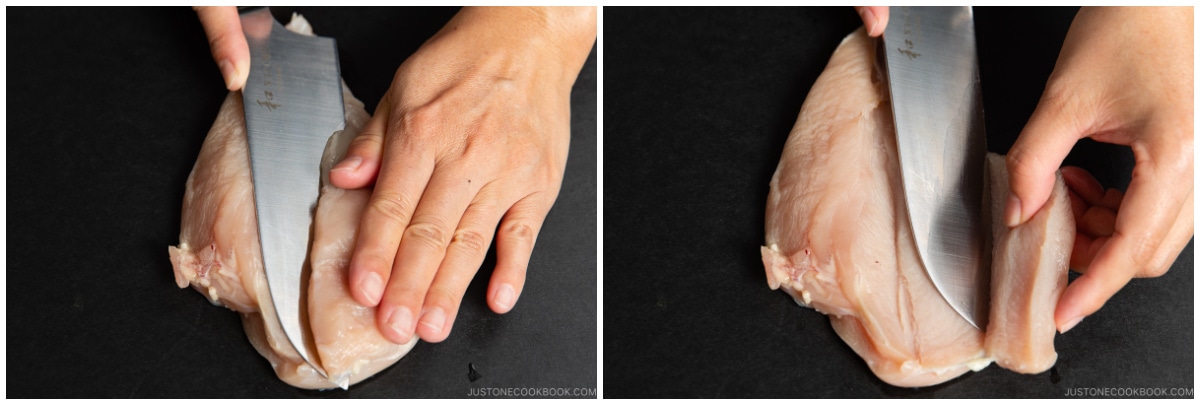
Stop before you cut all the way through the edge; then, open it like a book. Imagine we’re creating a French door here. Rotate the breast 180 degrees and butterfly the second side in the same manner from the center toward the left (if you hold the knife in your right hand), creating another “door.”
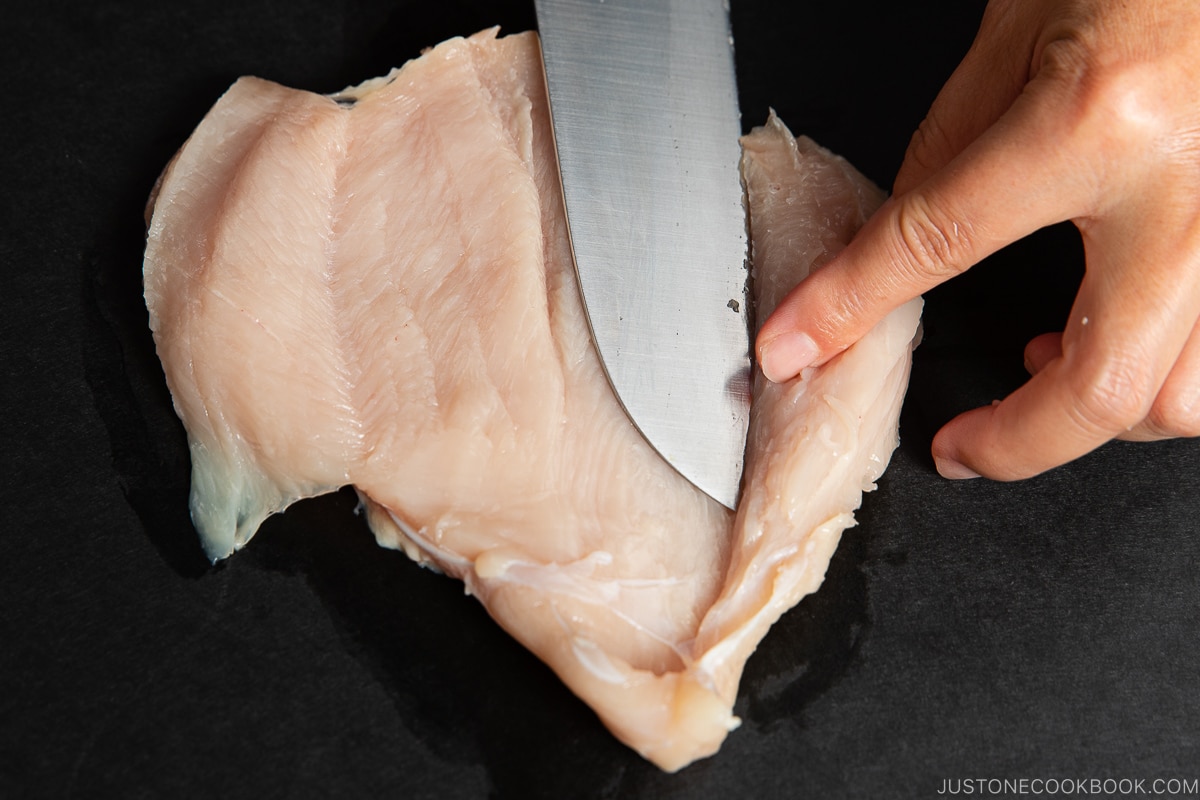
The term “Kannon Biraki” comes from the resemblance of the French-style hinged double doors that open to the front/back. This type of door was used for the Kannon Bodhisattva statue, and Biraki is the noun form of the word hiraku, meaning “to open” in Japanese.
Compared to the typical butterfly cutting technique, I find this Japanese butterfly technique more suitable for chicken katsu as it gives the typical “katsu” look. It’s up to you which butterfly methods you want to use.
Tonkatsu Sauce for Chicken Katsu
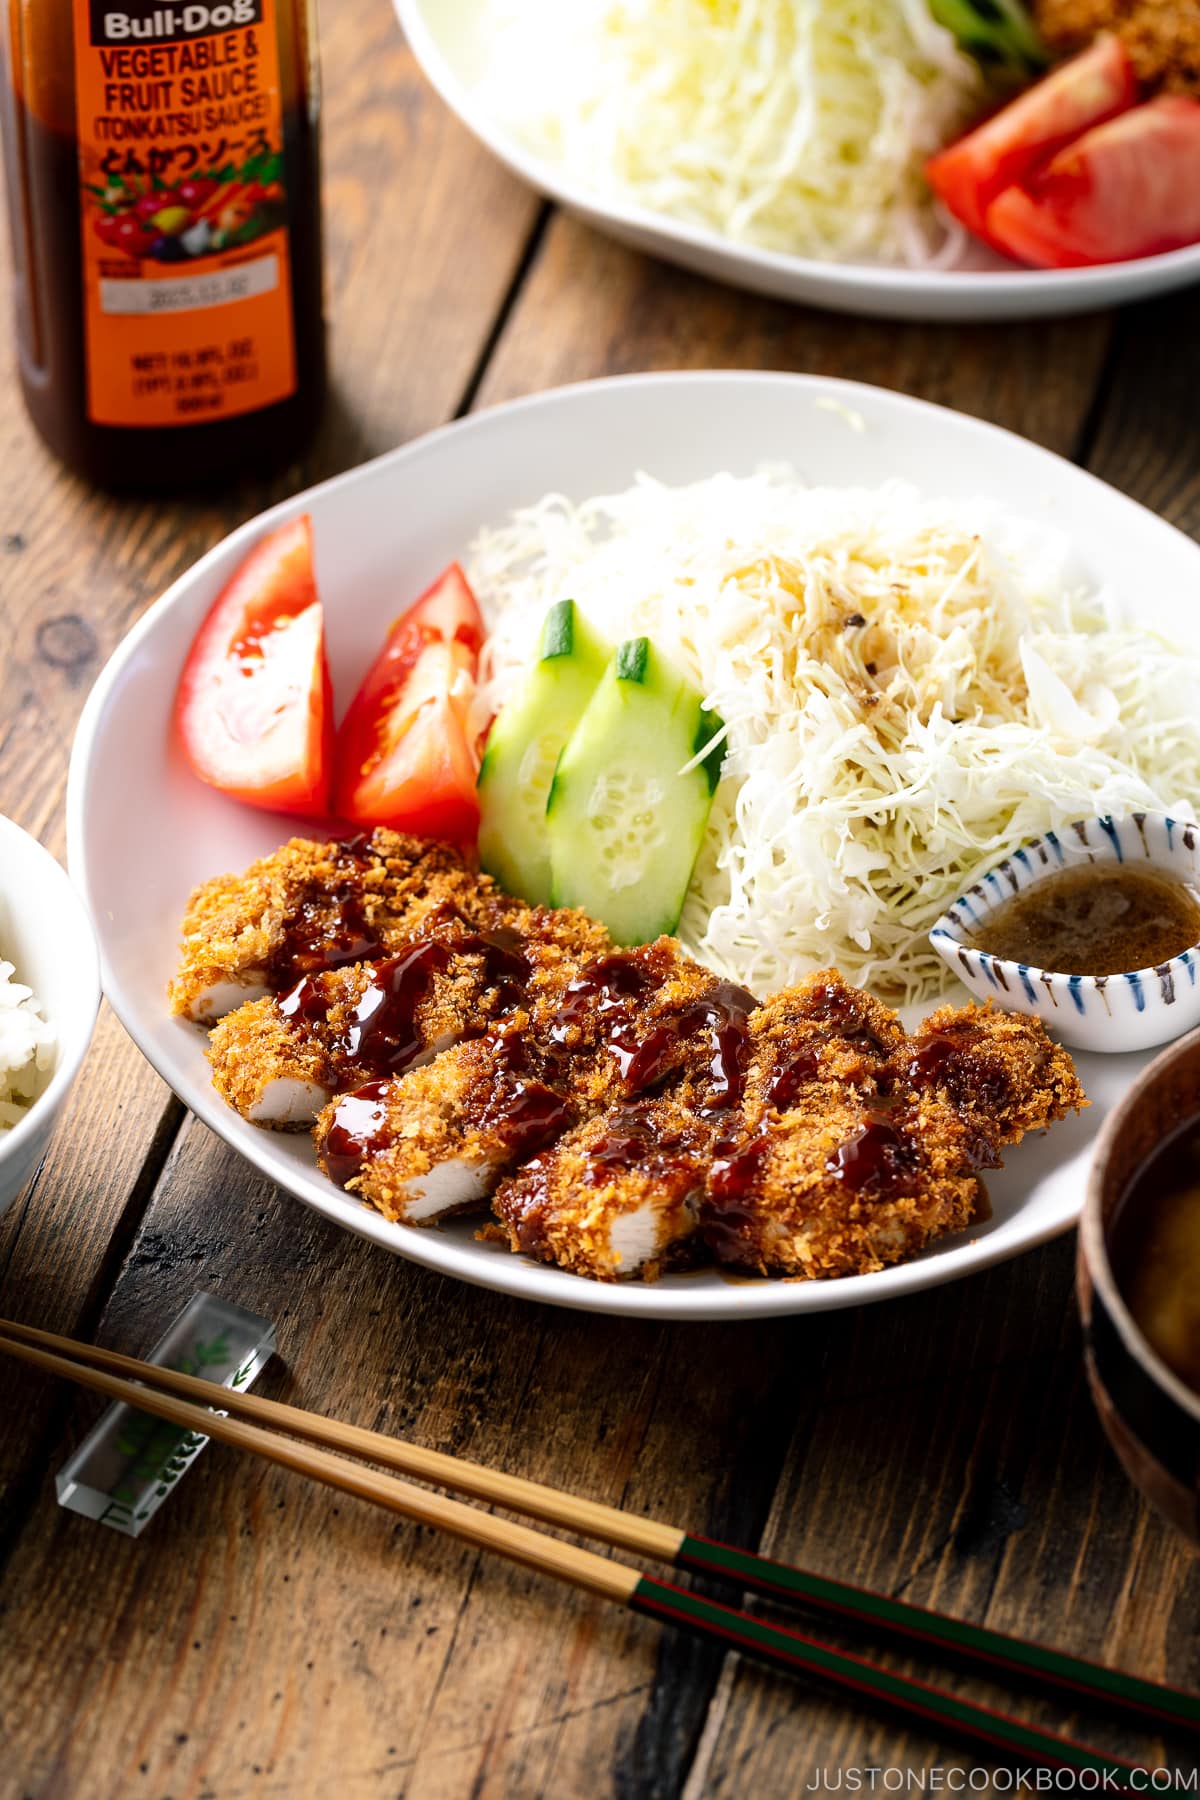
Tonkatsu sauce (some non-Japanese refer it as katsu sauce) is specifically used for all the katsu dishes. It has a tangy and sweet flavor, akin to Worcestershire sauce. The famous brand is the Bulldog Tonkatsu, which can be found at Japanese and Asian grocery stores.
I also have a homemade tonkatsu sauce made with simple ingredients of Worcestershire sauce, ketchup, sugar, and oyster sauce.
What to Serve with Baked Chicken Katsu
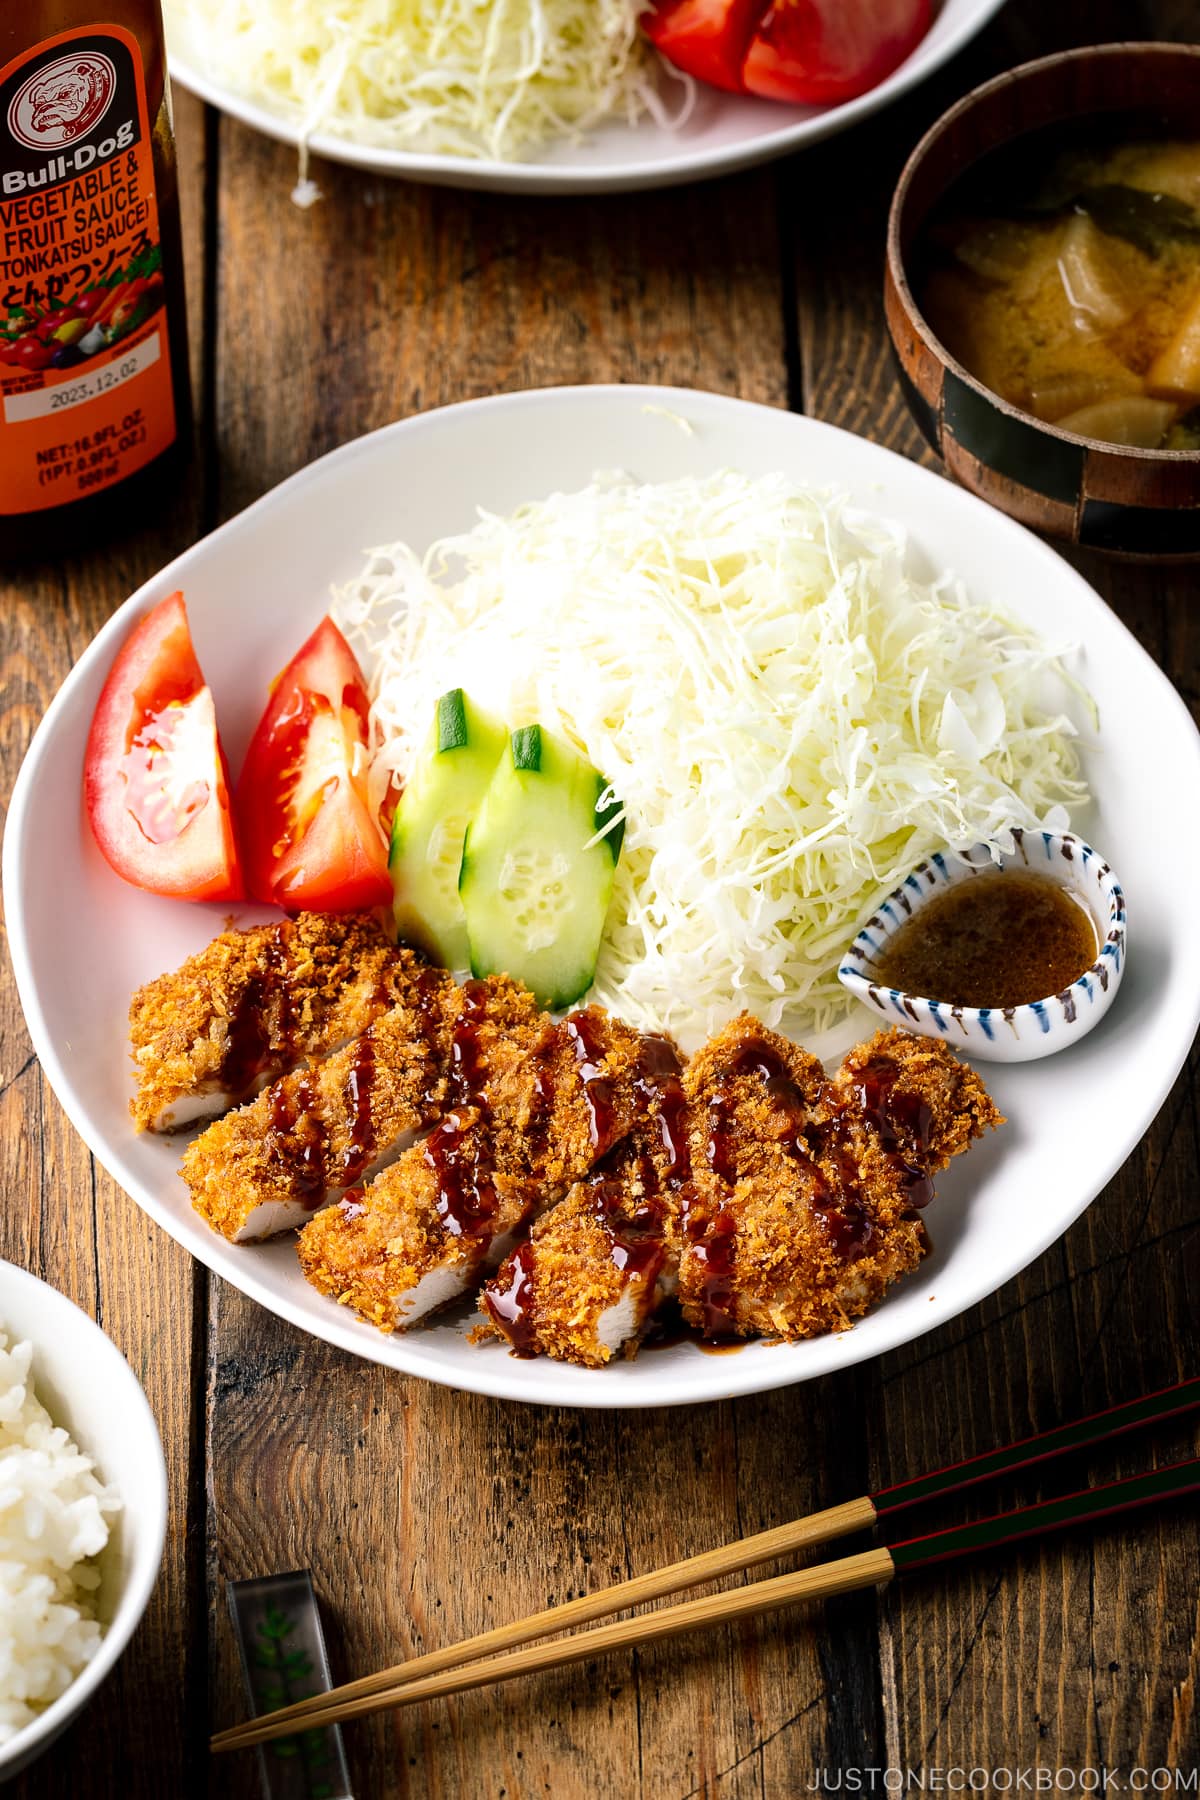
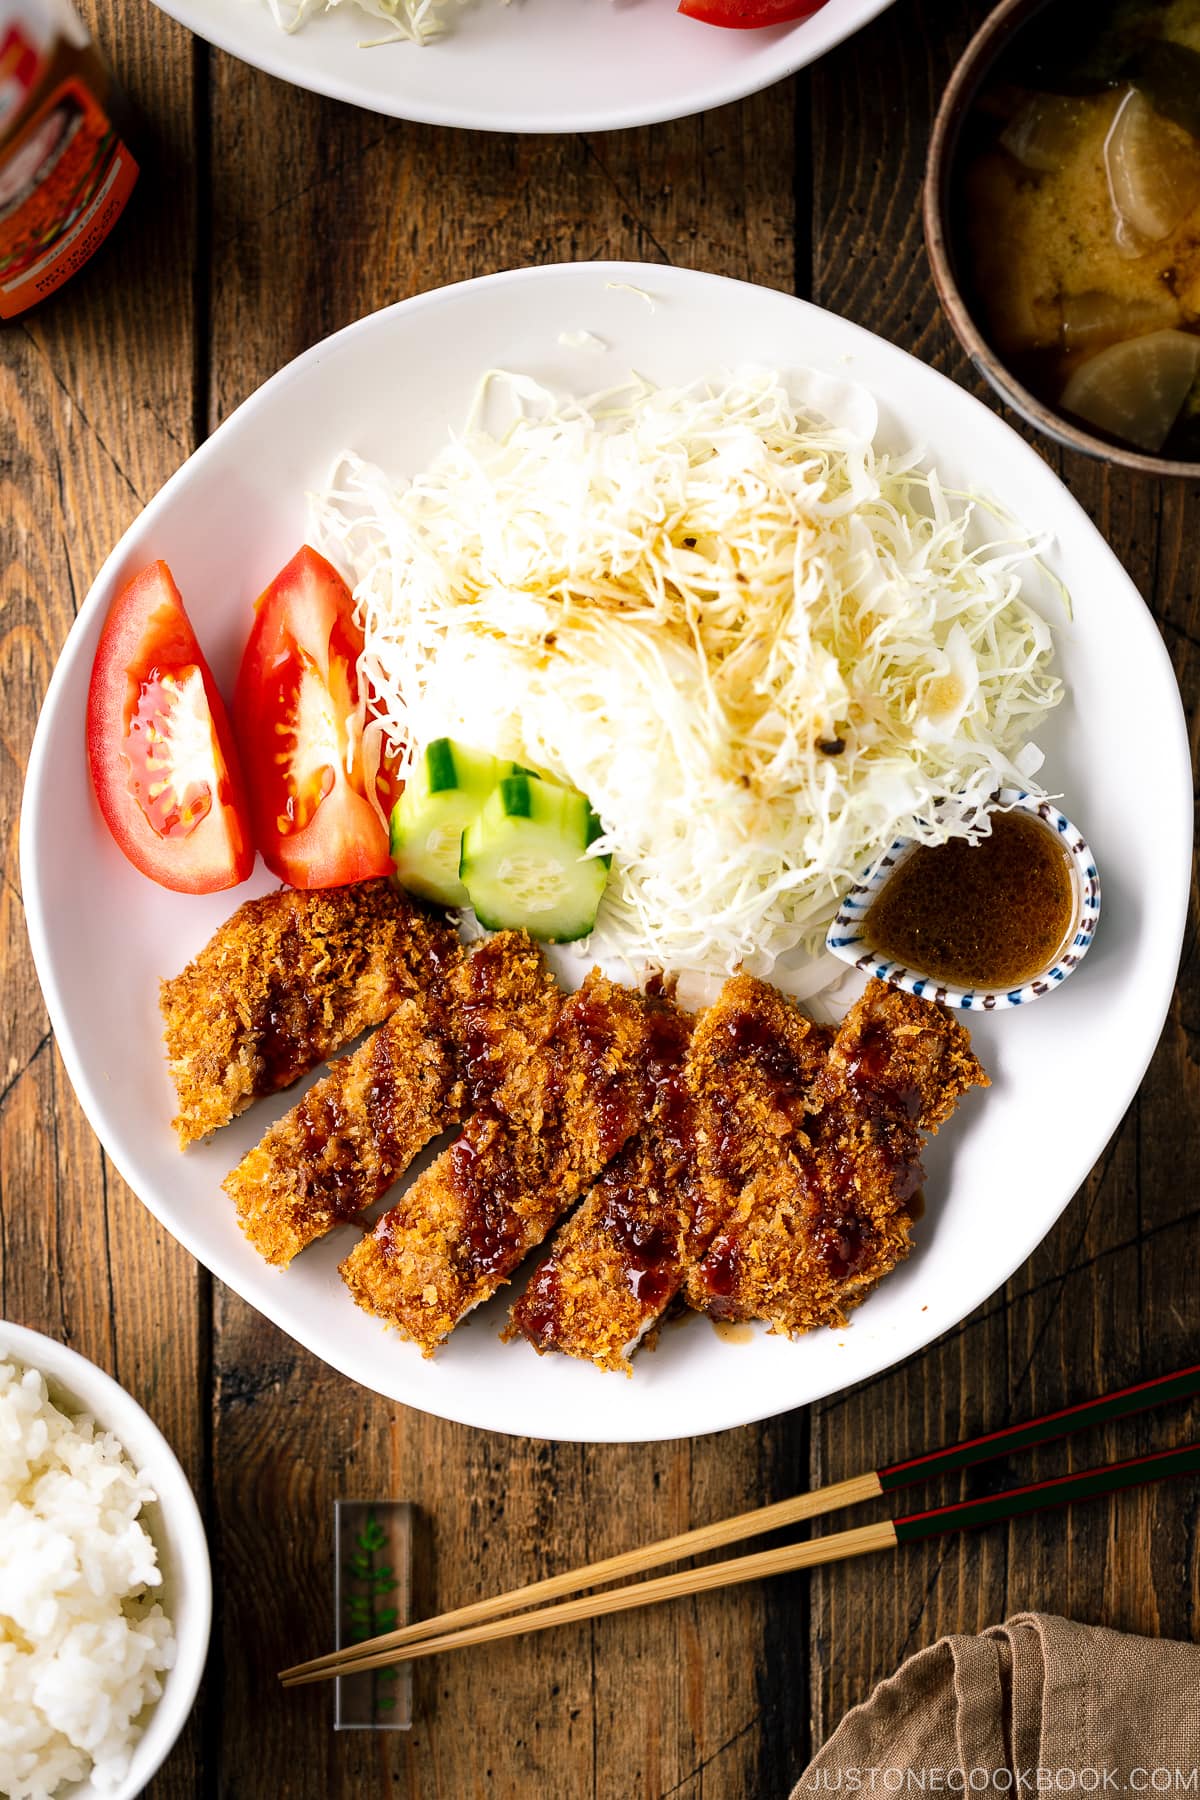
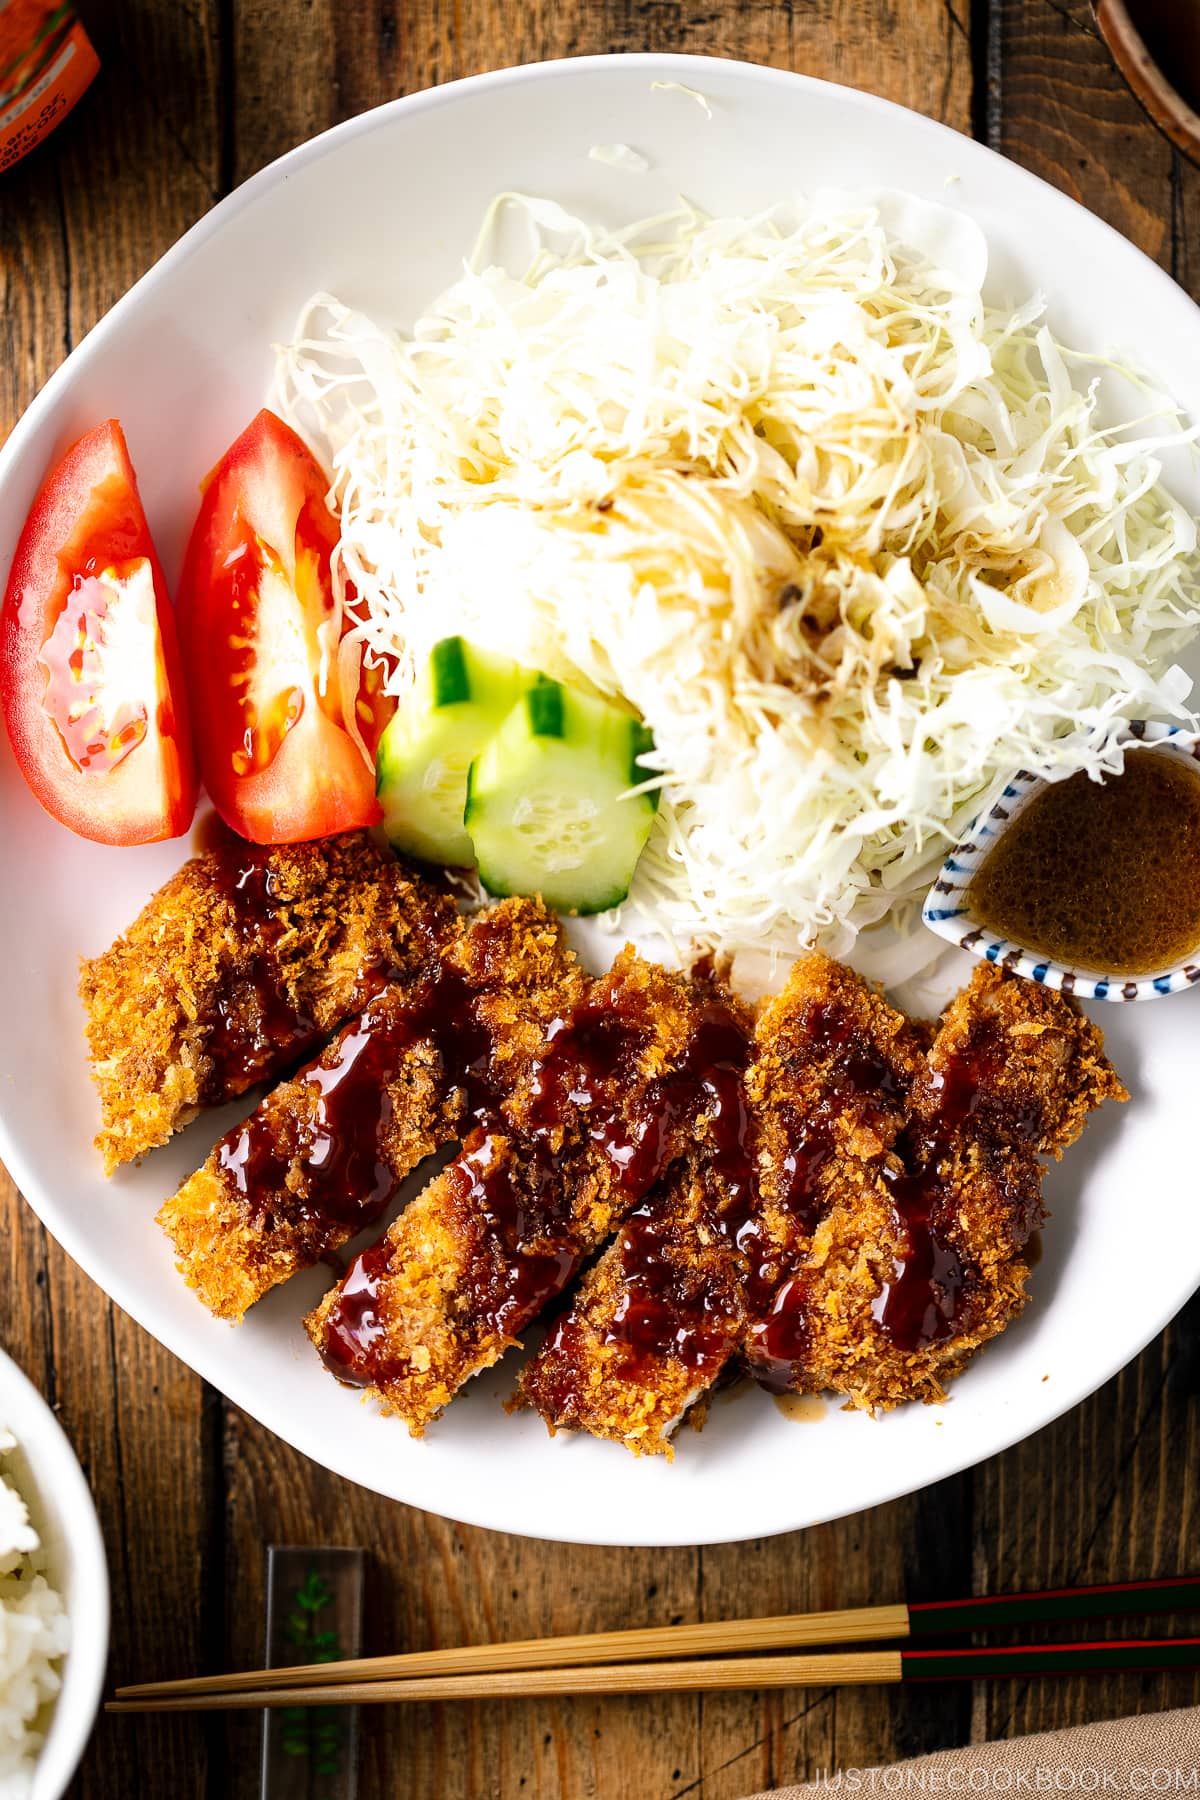
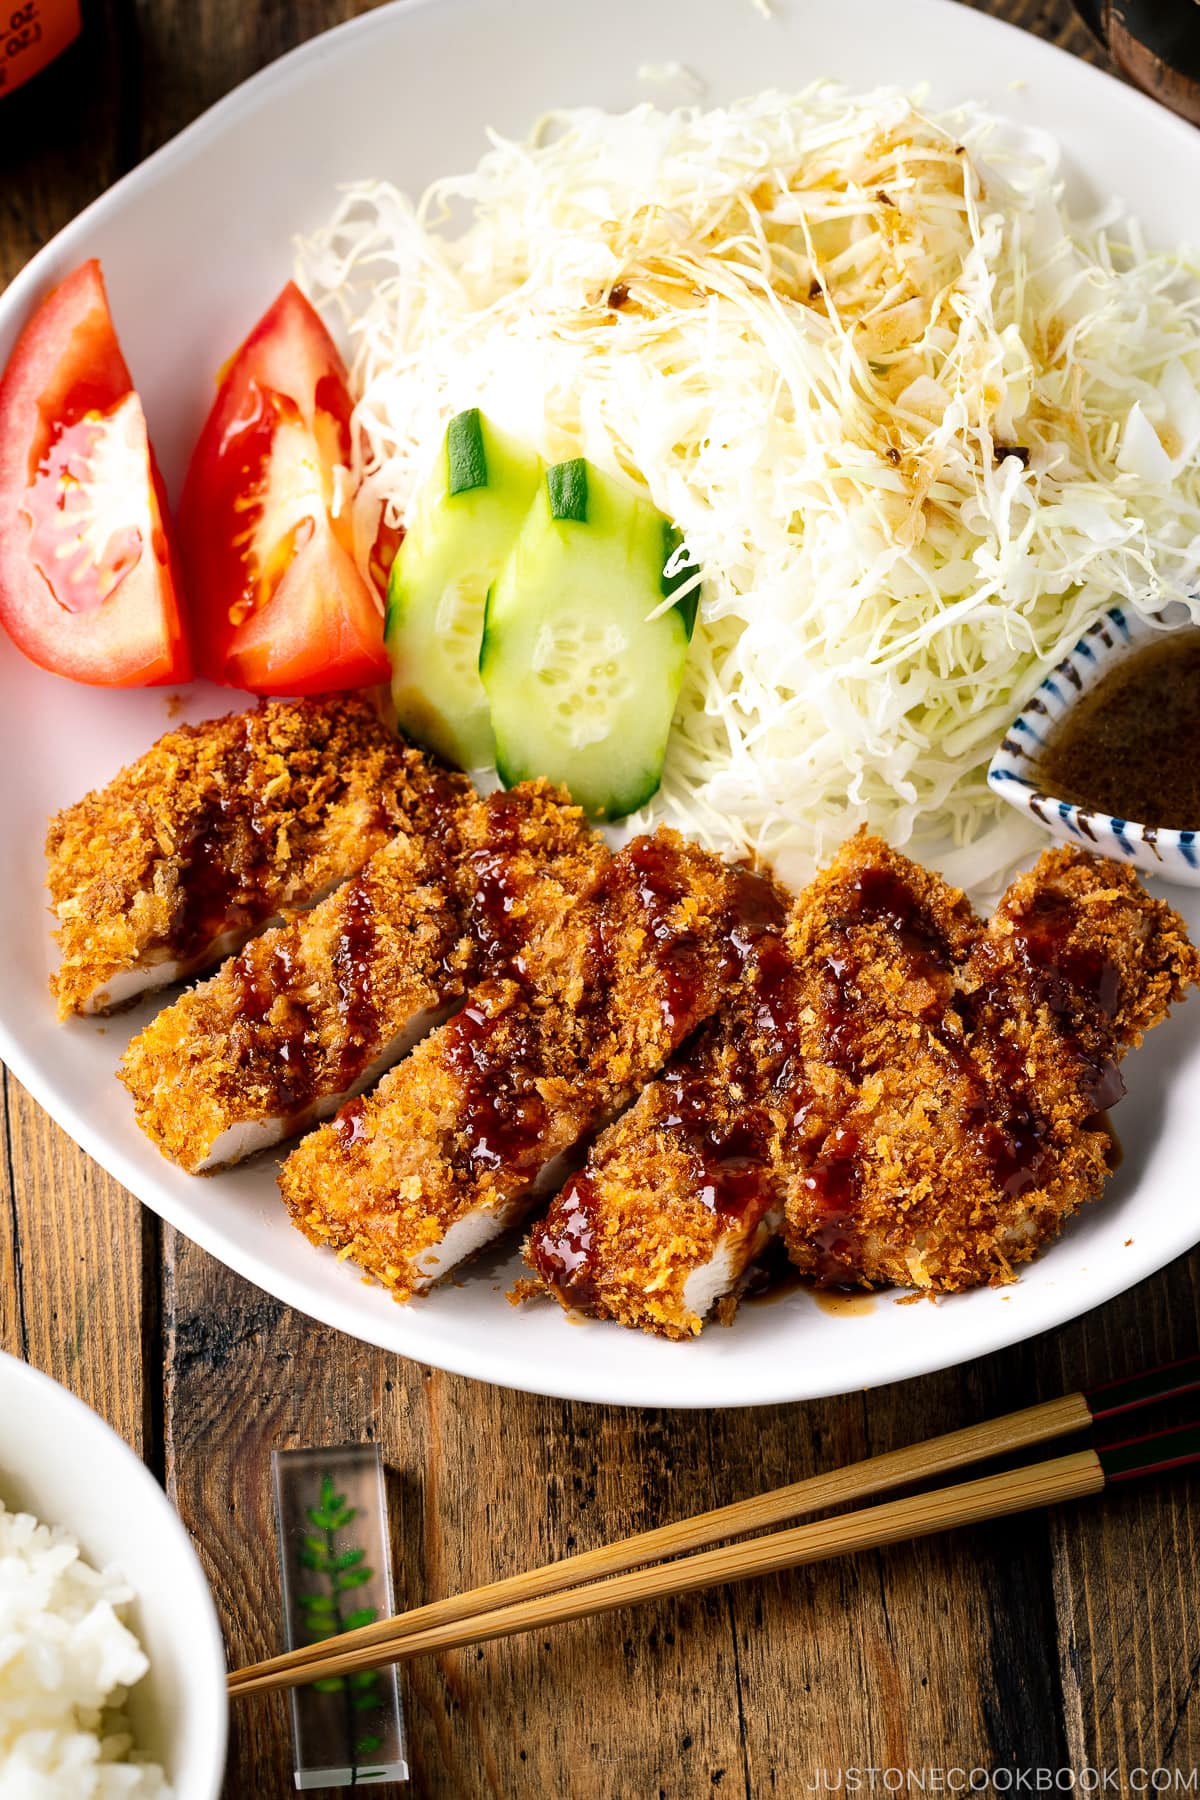
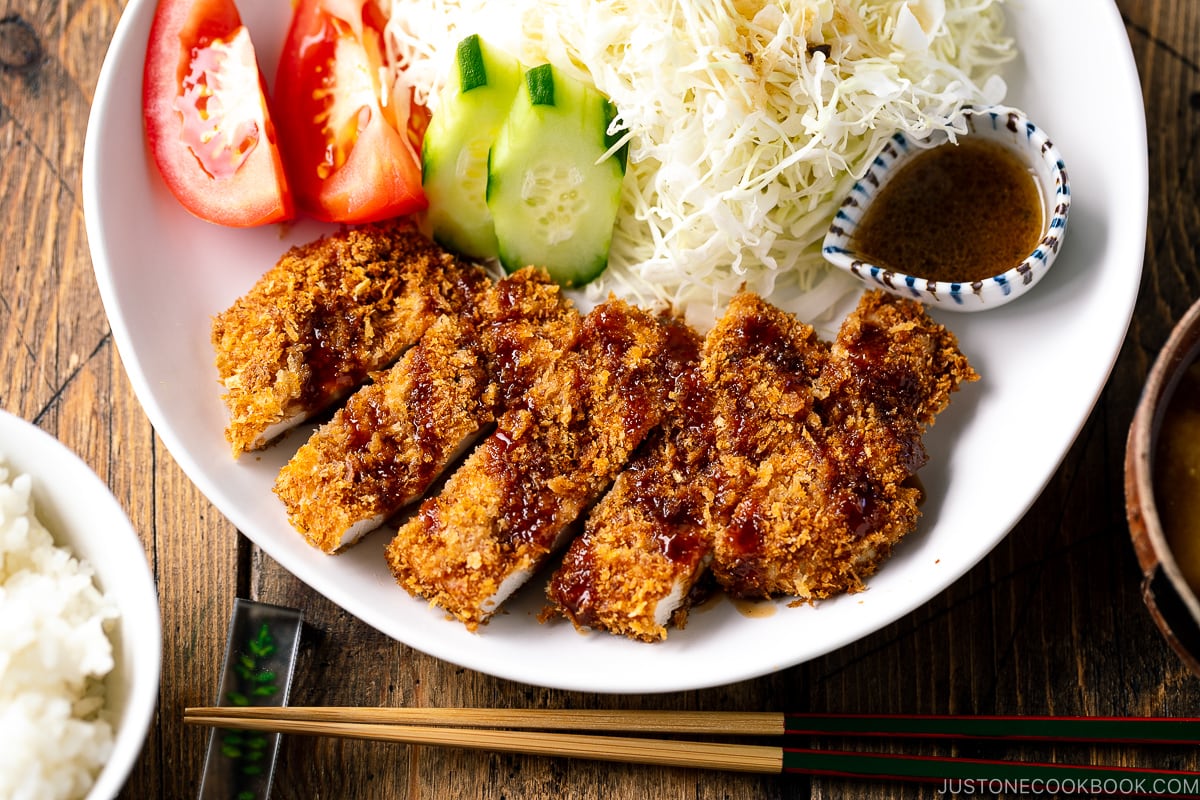
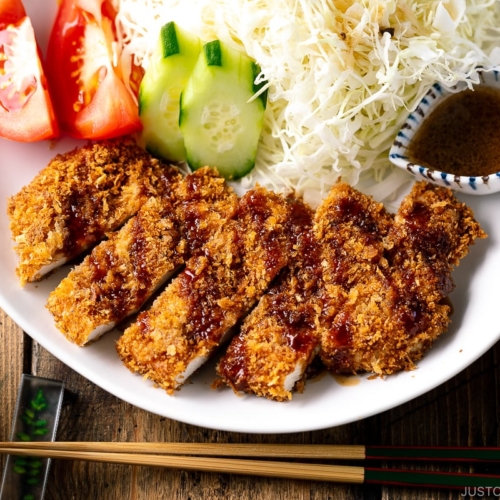
Chicken katsu is often served with a shredded cabbage salad, tomatoes, sliced cucumber, homemade or store-bought salad dressing, and tonkatsu sauce. To complete the meal, enjoy it with steamed white rice along with miso soup.
Japanese deep-fried foods are always served with shredded cabbage on the same plate. You can thinly slice the cabbage yourself with a sharp knife or use this cabbage slicer that I highly recommend! Serve with your favorite salad dressing like Wafu Dressing or Sesame Dressing.
If you make extra, you can repurpose the cutlet and make Chicken Katsu Curry the next day!
Other Katsu Recipes
Wish to learn more about Japanese cooking? Sign up for our free newsletter to receive cooking tips & recipe updates! And stay in touch with me on Facebook, Pinterest, YouTube, and Instagram.
Baked Chicken Katsu
Ingredients
For Toasting the Panko
- 1¼ cups panko (Japanese breadcrumbs)
- 1 Tbsp neutral oil
For the Chicken Katsu
- 2 boneless, skinless chicken breasts (1 lb, 454 g)
- Diamond Crystal kosher salt
- freshly ground black pepper
- ¼ cup all-purpose flour (plain flour)
- 1 large egg (50 g each w/o shell) (you may need another egg)
- ½ Tbsp neutral oil
For Serving
- tonkatsu sauce (or make my homemade Tonkatsu Sauce)
Instructions
- Gather all the ingredients. Adjust an oven rack to the middle position and preheat the oven to 400ºF (200ºC). For a convection oven, reduce the cooking temperature by 25ºF (15ºC).

To Toast the Panko
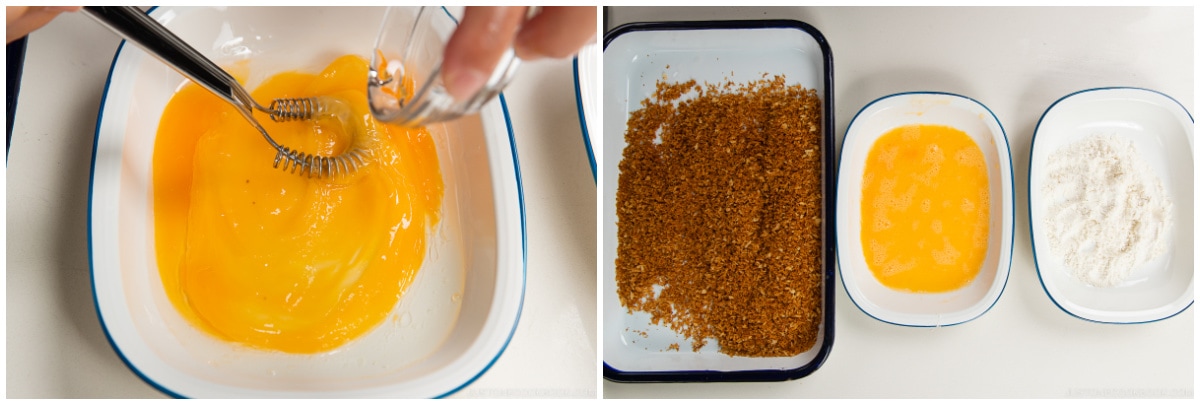
- Combine 1¼ cups panko (Japanese breadcrumbs) and 1 Tbsp neutral oil in a frying pan.

- Toast the panko over medium heat, stirring frequently, until golden brown.
- Transfer the toasted panko into a shallow dish and allow to cool.

To Butterfly the Chicken
- We‘ll butterfly 2 boneless, skinless chicken breasts using the Japanese cutting technique called Kannon biraki (観音開き). With a sharp knife, score the chicken breast lengthwise along the top center line, cutting about halfway through the thickness of the breast; do not cut completely through.
- Then, turn the knife parallel to the cutting board and slice the chicken breast from the center toward the left side (or the right side, if you‘re left-handed) to make it evenly thin. Stop before you cut all the way through the edge; then, open it like a book. Imagine we‘re creating a French door here.
- Rotate the breast 180 degrees and butterfly the second side in the same manner from the center toward the left (if you hold the knife in your right hand), creating another “door.“
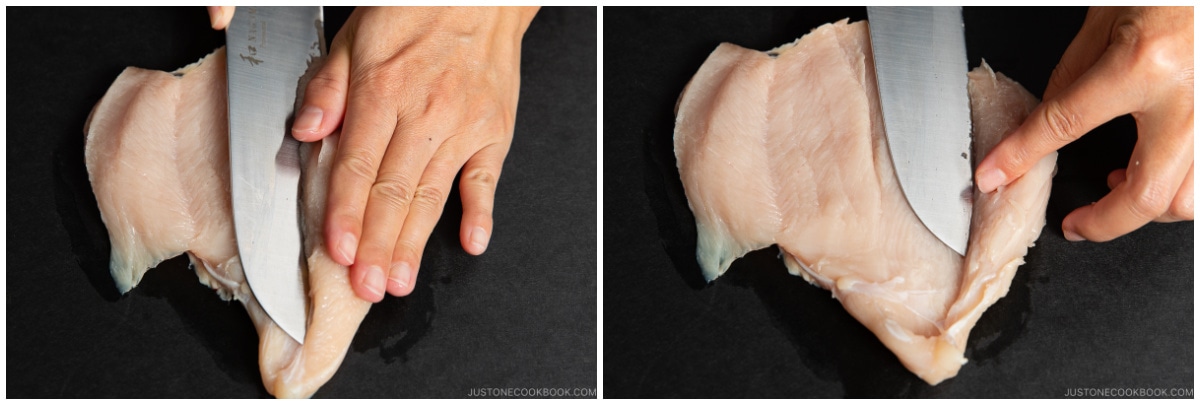
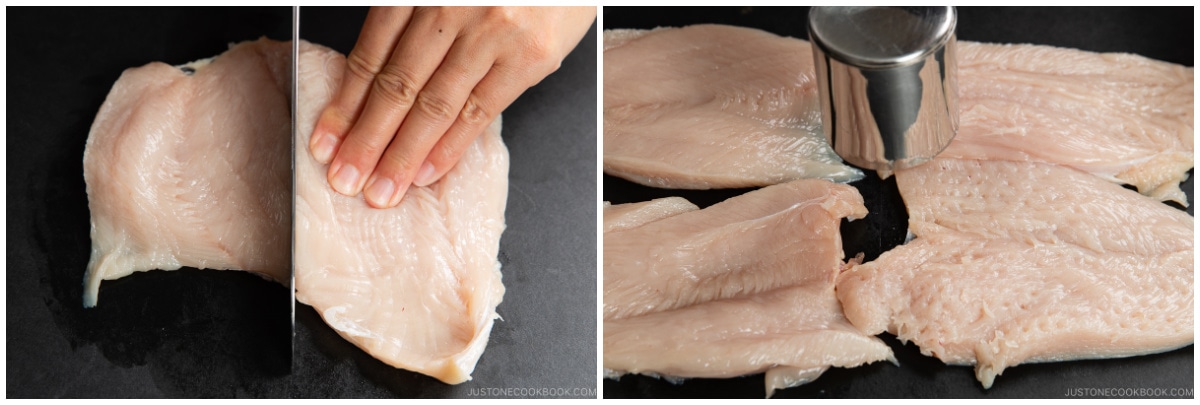
- Cut the butterflied breast in half down the center. Now you have two pieces. Butterfly the remaining chicken breast in the same manner. Then, using a meat mallet or rolling pin, pound the chicken cutlets to an even thickness, about ¼–½ inch (6 mm to 1.3 cm).
- Season both sides of the chicken cutlets with Diamond Crystal kosher salt and freshly ground black pepper.
To Bread and Bake the Chicken
- In a shallow dish, whisk together 1 large egg (50 g each w/o shell) and ½ Tbsp neutral oil. Place ¼ cup all-purpose flour (plain flour) in another shallow dish. Line up these two dishes along with the dish of toasted panko to prepare for breading the chicken. Tip: By adding oil, the meat and breading won’t detach from each other while cooking and the juice and flavor from the meat will not escape easily.
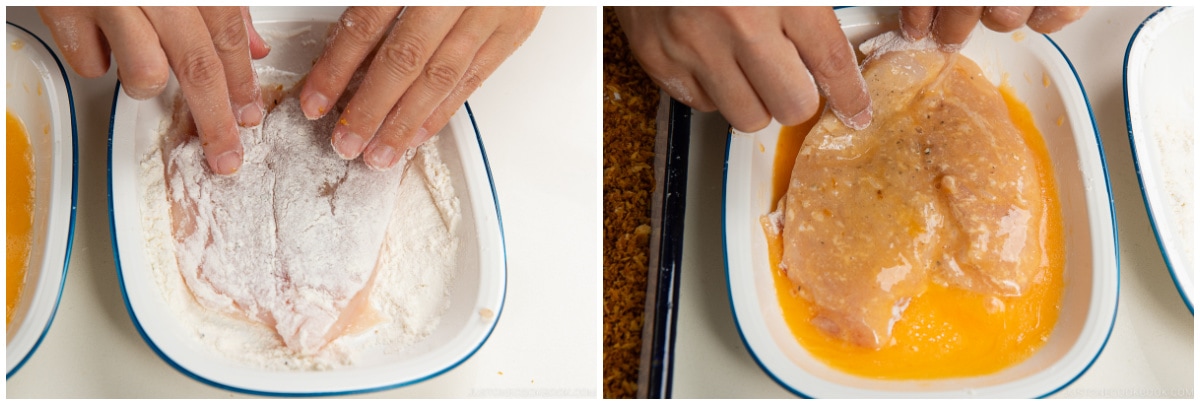
- First, dredge each chicken piece in the flour and shake off any excess. Next, dip the floured chicken piece into the egg mixture and coat well on both sides.
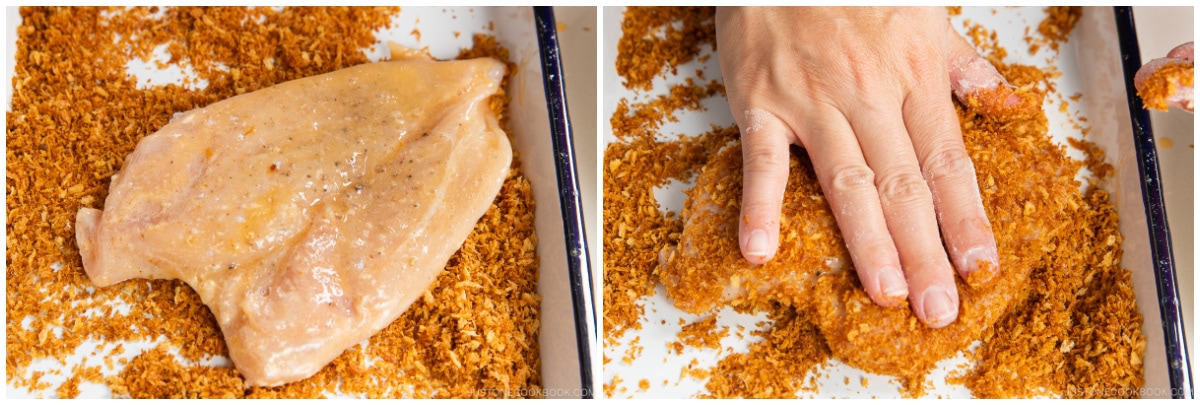
- Finally, coat the chicken with the toasted panko, pressing firmly to ensure the panko adheres to the chicken. Set aside. Repeat this process with the remaining chicken cutlets.
- Put the breaded chicken pieces on a wire rack placed over the rimmed baking sheet. Bake at 400ºF (200ºC) for about 25–30 minutes.
- When the internal temperature of the chicken reaches 165ºF (74ºC), it‘s done cooking. Remove from the oven and cut into ¾-inch (2 cm) slices.
To Serve
- Serve with a shredded cabbage salad (I use this cabbage slicer), tomato wedges, and cucumber slices, along with my Japanese Sesame Dressing or your favorite salad dressing. Drizzle tonkatsu sauce over the Chicken Katsu to enjoy!

To Store
- You can keep the leftovers in an airtight container and store in the refrigerator for up to 3 days and in the freezer for a month. To reheat, bake at 350ºF (180ºC) for 15–20 minutes for baked katsu that was thawed in the refrigerator overnight, or for 30 minutes if heating directly from frozen. Check that the inside is warm before serving.
Nutrition
Editor’s Note: This post was originally published on October 27, 2013. It’s been updated with new images and more helpful tips on September 26, 2022, and republished on July 12, 2023.


Hi Nami, can we do this in batch and keep in freezer? Should I bake first then keep?
Hi Wan! Yes, that’s what I would recommend. 🙂 Reheat in the oven or oven toaster when you are ready to eat. 🙂
Hi Nami-san, thanks for the wonderful sharing.
May I know can we bake the chicken in batch, and then keep in freezer when it has cooled down? Do we need to wrap each baked chicken and keep in freezer bag?
Thank you.
Hi Wan! What I do is to bake the chicken. Let cool, and wrap two pieces (I have 2 kids who bring bento) in aluminum foil. Then put aluminum wrapped katsu in a ziploc bag. When I make bento (or ready to eat), I take out, unwrap the foil and go straight into the oven to reheat. 🙂
thank you Nami !!
[…] know some of you are wondering if you can make this dish like my Baked Tonkatsu, Baked Chicken Katsu, or Baked Korokke. Trust me, I did try. But the result is not as good as the deep-fried […]
Nami-san –
We batch cook in our house so can I simply double or triple the ingredients evenly?
Hi Rob! Yes, you’re correct. 🙂 (Sorry about my late response. I was traveling…)
Nami – – Thank you! While waiting for your reply, I just decided to give it a try, in batch. Other than keeping the oil to panko ratio straight, I just had to make sure I had enough flour (to dredge) and egg (to cover). Have since made it twice and my kids (who happen to be half-Japanese) love it!!!!! They even take it for lunch in their bento. My wife is thrilled that not only are the kids (and us) eating healthier but the clean-up is a whole lot easier; no grease splatters, no frying pans to scrub, and no oil to have to dispose of. Thanks again. – Rob
Hi Rob! I’m so happy to hear your whole family enjoyed it! Thank you so much for your kind feedback. 🙂
Thank you for this recipe! My husband loves Katsu (mostly Tonkatsu though), but wants to watch his diet a bit – no more Ham Katsu (T-T) . At first he said, it’s not really Katsu, if it’s baked and he was really skeptical. Then he tried it and really liked it! He was happy he could eat his Katsu Curry 🙂
Today I try making an “italian” version with dried herbs and garlic powder in the crust. I’ll serve it with stewed zucchini, eggplant and tomato.
Thank you again for all the great recipes!
Hi Miya! Hahaha! I’m glad he came around and liked the baked version! And I love the Italian version. I also make a similar crust with garlic powder, herbs, and grated cheese in it too. I’d serve it with stewed vegetables like yours next time! Thank you so much for your kind feedback!
This was absolutely delicious! I followed the recipe to the letter, and I served thinly sliced cabbage, and steamed rice alongside. My husband and I greedily ate the whole thing!
Hi Meghan! Thank you so much for trying this recipe! I’m so glad to hear you and your husband enjoyed this recipe! Thank you for your kind feedback. 🙂
[…] method involves pre-toasting panko before baking. If you have tried my Baked Tonkatsu, Baked Chicken Katsu, Baked Korokke, Baked Salmon Katsu, etc, you know the […]
[…] need to deep fry the meat to achieve the crispy crust and tender, juicy texture. You can also try Crispy Baked Chicken or Crispy Salmon in replace of […]
Amazing! I love fried food, but it’s not that healthy no matter how healthy you try to make it. This was the perfect twist on traditionally fried Chicken Katsu. I added lemons on top when I baked them and they taste great!
Hi Shiann! Thank you so much for trying this recipe! I’m so happy you enjoyed it. Thanks for the kind feedback. 🙂
Thank you very much for this recipe I’ve cooked it a few times and it is amazing and healthy! My question is while you also have the recipe for salmon and pork, do you think it’ll work for beef katsu as well? Thanks again
Hi Kay! I’m glad to hear you enjoy this recipe and thanks for your kind feedback. Yes, you can use beef as well, but I think it’s slightly harder to control doneness. Use an instant-read thermometer may help to check the internal temperature. 🙂
I made this and it came out wonderfully! It had that wonderful crisp as I cut it. My husband can be a picky eater but we enjoyed this dinner and are now adding it to the list of meals we rotate through.
Hi Jessica! Thank you so much for trying this recipe and I’m so glad to hear you and your husband enjoyed this recipe! Yay! Thanks for your kind feedback. 🙂
[…] can use my pre-toasting panko technique to make Baked Menchi Katsu just like the Baked Chicken Katsu, Baked Tonkatsu, and Baked […]
[…] key to make my delicious Baked Tonkatsu or Baked Chicken Katsu recipes is to toast the panko first in a frying pan until golden […]
[…] like my Baked Tonkatsu, Baked Chicken Katsu, and Baked Croquette recipes, these panko-crusted oysters are also oven-baked. It’s the […]
I found an Italian recipe for baked chicken breasts that cuts a pocket in the thick part of the breast where you put in a baton of cheese (gouda or hard mozzarella) wrapped in a couple of slices ofprosciutto di parma, then crumb them with Saltines (whatever they are). I use the pan browned panko instead and the result is spectacular
Hi Angelo! So happy to use the pan-fried panko technique to create your Italian dish! In Japan, we have a version of chicken katsu filled with cheese too. I’ll share the recipe one day! Thank you so much for your feedback.