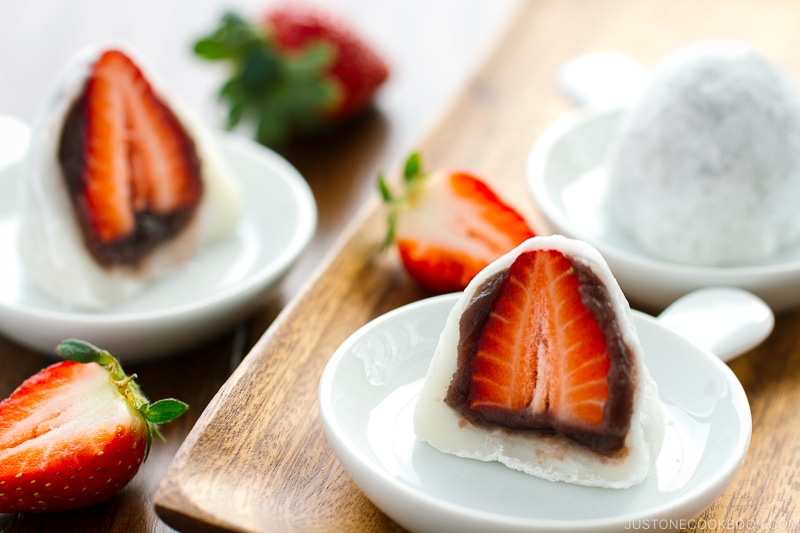
A popular classic spring dessert, Strawberry Mochi (Ichigo Daifuku) is soft and springy shiratamako mochi stuffed with a fresh whole strawberry and sweet red bean paste. Make my recipe at home and indulge in this beautiful and delicious Japanese delicacy!
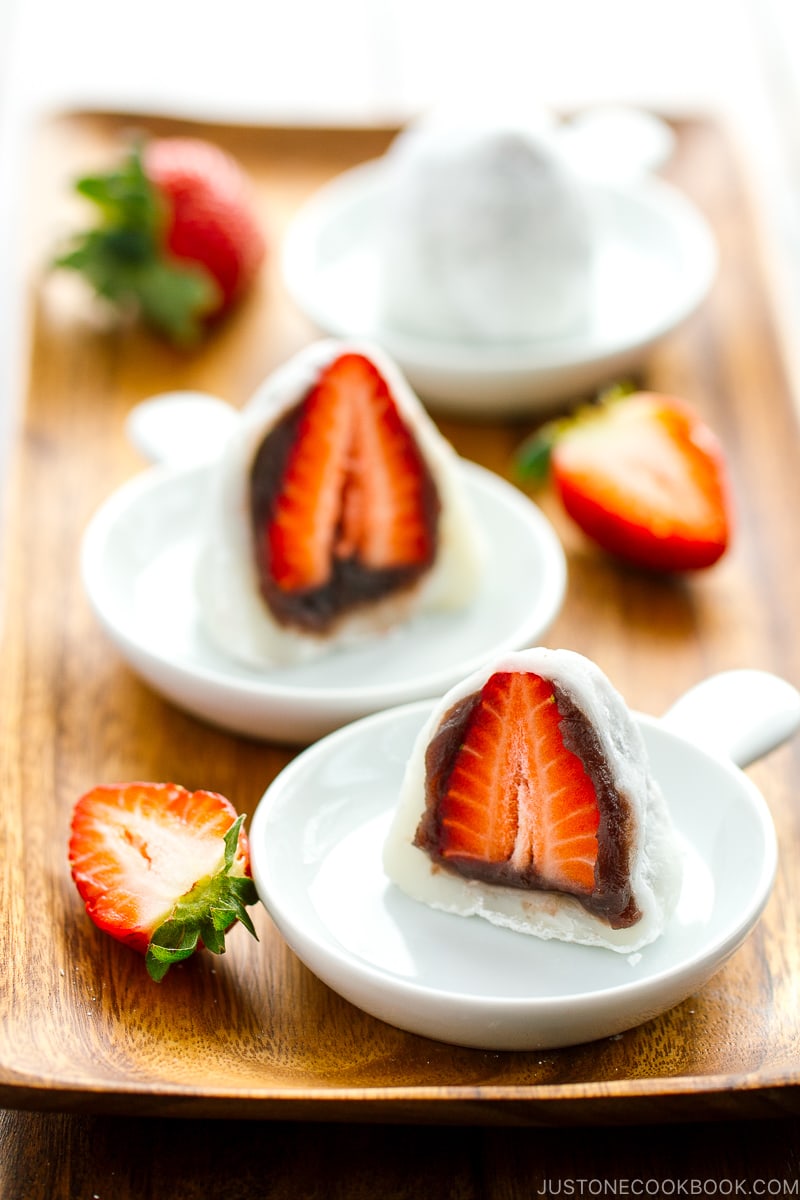
If you love juicy strawberries, sweet red bean paste, and chewy mochi, you will love this Japanese dessert Strawberry Mochi (Ichigo Daifuku) (いちご大福).
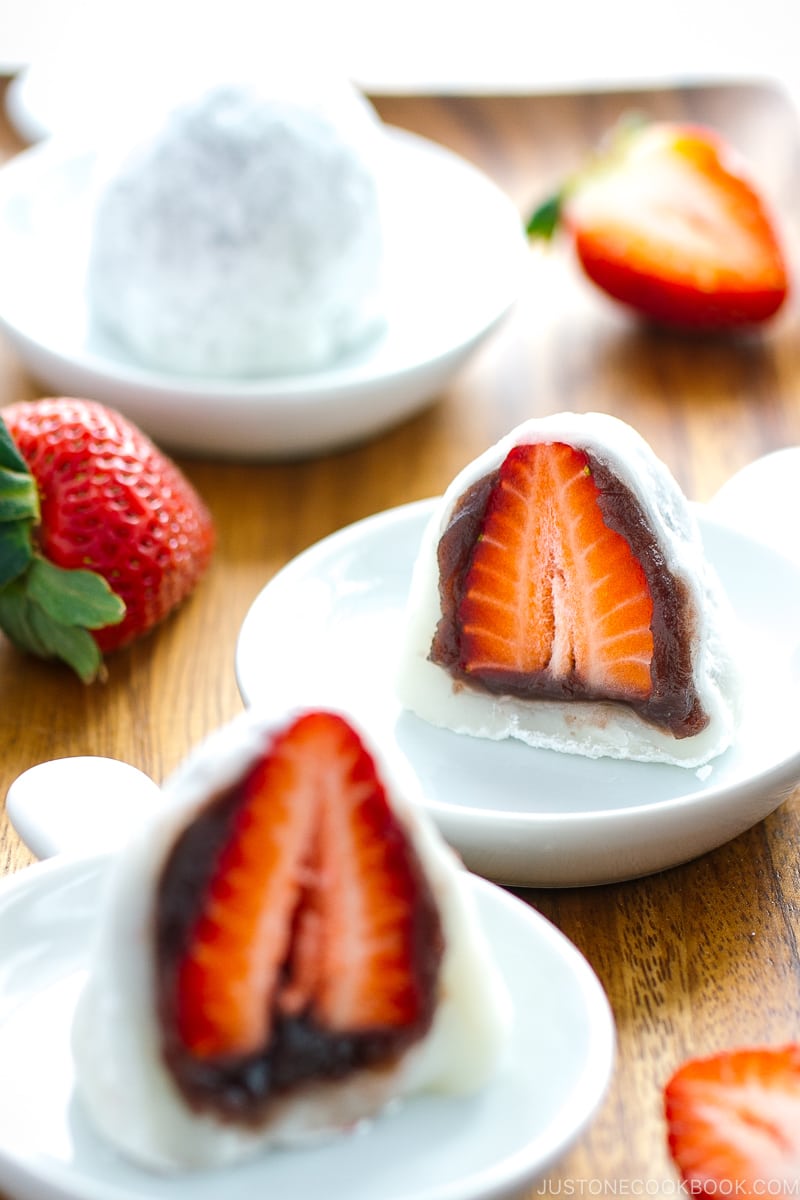
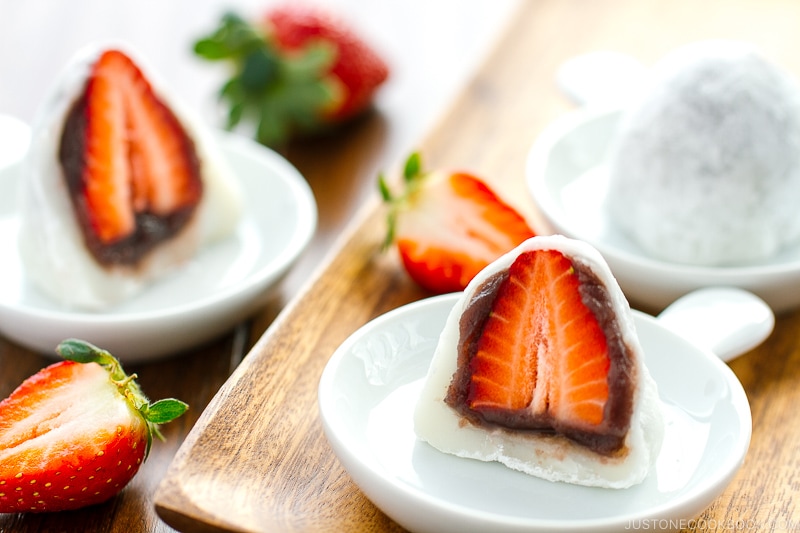
Daifuku (大福) is a popular traditional Japanese sweet; it is soft mochi stuffed with sweet red bean paste. There are many varieties of Daifuku. They usually come with the same soft and chewy mochi exterior with different stuffing.
Modern Twist – Strawberry Mochi (Ichigo Daifuku)
During the springtime, Japanese confectionery shops sell a seasonal Daifuku, Strawberry Mochi (Ichigo Daifuku いちご大福), with a whole strawberry as the filling. The combination of fresh soft mochi, sweet red bean paste, and juicy and tart strawberry is a match made in heaven!
Strawberry Mochi was first created during the ’80s, so it’s considered a relatively new wagashi, like a traditional Japanese confectionery with a modern twist. Depending on regions and stores, some strawberry mochi has red bean paste filling while others use Shiroan (white bean paste). Some mochi comes with whipped cream and strawberry inside, instead of red bean or white bean paste.
As this seasonal mochi includes fresh strawberries, it is only offered during the strawberry season in Japan between winter and spring.
To Make Strawberry Daifuku
Today’s recipe is a classic strawberry daifuku. You can make your own red bean paste (recipe here) or use store-bought bean paste for a shortcut. The other ingredients are simple: shiratamako (glutinous rice flour), sugar, water, and corn starch. And fresh juicy strawberries of course! Smaller ones are easier to work with.
Making daifuku is very much like a craft. The process can be fun and meditative. When working with mochi dough, make sure that you do not stretch it too thin to prevent tearing. My daughter loves giving me a hand when comes to wrapping the sticky, elastic mochi around the berries when I make daifuku for them. It’s like working with edible play dough to her. Although her shaping skill still needs much improvement, she usually thinks her daifuku are the prettiest and tastiest. What can I say?
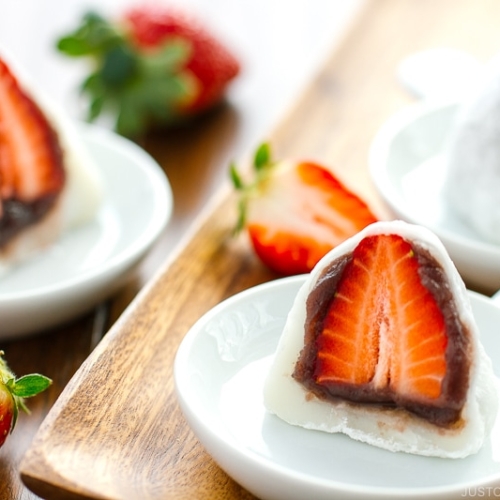
The daifuku keep well for a day or two in the refrigerator, although it can be hard to resist eating them all when made fresh. I hope you get to give these a try at home. Sweet, elegant, and delicate, Strawberry Daifuku is just another delicious way to celebrate the season.
Other Mochi Desserts Similar to Strawberry Mochi
Wish to learn more about Japanese cooking? Sign up for our free newsletter to receive cooking tips & recipe updates! And stay in touch with me on Facebook, Pinterest, YouTube, and Instagram.
Strawberry Mochi (Ichigo Daifuku)
Ingredients
- 6 strawberries (smaller ones are easier to work with)
- 5.3 oz sweet red bean paste (anko) (I used store-bought koshian; you can make my recipe for homemade Anko or Pressure Cooker Anko)
- potato starch or cornstarch (for dusting)
For the Mochi Using a 100 g Shiratamako Package
- ¾ cup shiratamako (glutinous rice flour/sweet rice flour)
- 1½ Tbsp sugar
- 150 ml water (⅔ cup minus 2 tsp)
For the Mochi Using a 120 g Shiratamako Package
- 120 g shiratamako (glutinous rice flour/sweet rice flour) (1 cup minus 2 Tbsp)
- 2 Tbsp sugar
- ¾ cup water
Instructions
- Before You Start: If you want to make more than 6 pieces, I highly recommend you to work in batches. If you do not have a microwave, please see Notes for other options to cook the shiratamako.
To Prepare the Strawberries
- Rinse, dry, and hull 6 strawberries. Divide 5.3 oz sweet red bean paste (anko) and roll into 6 same-size balls. Anko gets sticky on your hands, so wash and completely dry your hands each time you make a ball.

- Wrap each strawberry with the anko from one ball. Leave the tip of the strawberry uncovered. Wash your hands and dry completely each time you wrap a strawberry with anko.


To Cook the Shiratamako
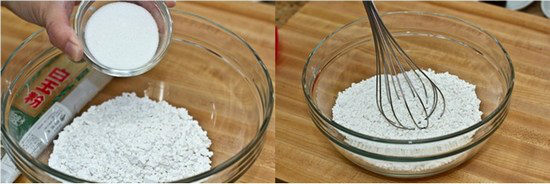
- In a medium microwave-safe glass bowl, mix the shiratamako and sugar with a whisk. For a 100 g bag, mix 100 g or ¾ cup shiratamako (glutinous rice flour/sweet rice flour) and 1½ Tbsp sugar. For a 120 g bag, mix 120 g shiratamako (glutinous rice flour/sweet rice flour) (or 1 cup minus 2 Tbsp) and 2 Tbsp sugar.

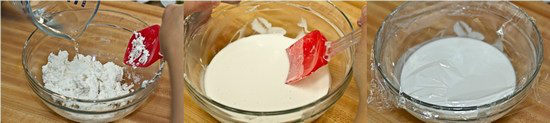
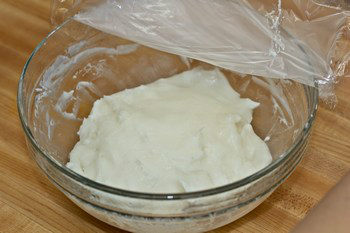
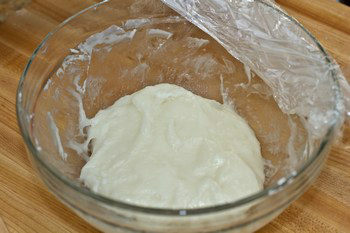
- Using a silicone spatula, slowly add the water in 3 parts—a total of 150 ml water (⅔ cup minus 2 tsp) for the 100 g shiratamako bag and ¾ cup water for the 120 g bag. Stir until the mixture has reached a thick consistency. Cover loosely with plastic wrap.

- First, microwave the mixture for 1 minute (for 1100W microwave). Mix well with a wet silicone spatula. The mixture is still whitish and floury.
- For a second time, microwave 1 minute again, and mix well with the wet silicone spatula. Now it starts to resemble mochi, but there are still some floury parts.

- For the last time, microwave only 30 seconds. Now the mochi mixture should look translucent.
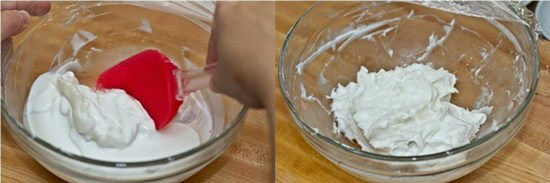
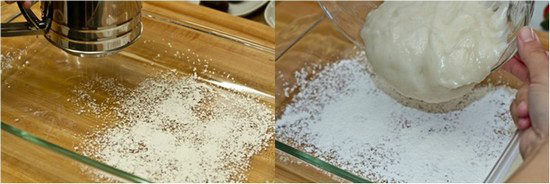
- Sift the potato starch or cornstarch on the tray and put the mochi on top.
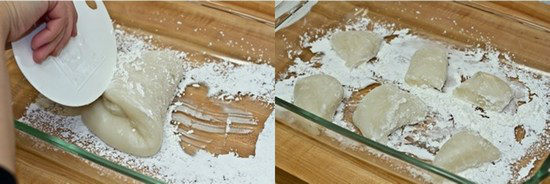
- With the silicone spatula or a kitchen scraper, fold the mochi in half one time so it won’t be as sticky. Then, divide into 6 equal pieces.
To Shape the Strawberry Daifuku
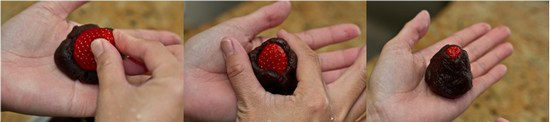
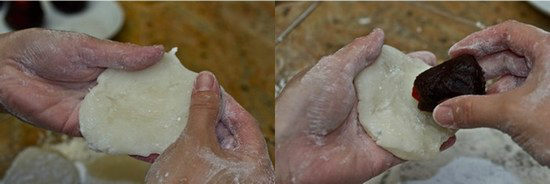
- Put some potato starch or cornstarch on your hands. Flatten and expand each mochi into a 3-inch (7.6-cm) round or square. Then, put the anko-covered strawberry on top of it, with the tip pointing down.
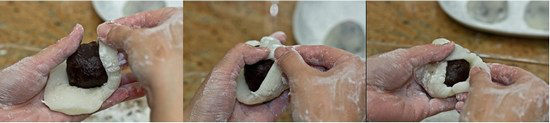
- Start gathering the mochi edges to cover the strawberry from all sides. Use your thumb to hold the gathered mochi on top.
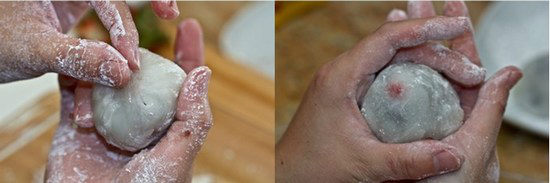
- When all edges of the mochi meet at the top, twist and close the seam. Hold the mochi with both hands and form into a nice round shape. Place the daifuku seam side down on a plate with the strawberry tip pointing up. Repeat the process for the remaining mochi.
To Serve
- Serve at room temperature.

To Store
- Keep the leftovers in an airtight container and store at room temperature. Do not put in the refrigerator as the cold temperature makes the mochi hard. Consume within 2 days.
Notes
- Rice cooker: Put the ingredients in the bowl of the rice cooker and mix well. Cook for 10-12 minutes or until the mixture is translucent. Mix with silicon spatula at least 2 times during cooking.
- Steamer: Put the ingredients in a heatproof bowl that fits inside your steamer. Mix well and cover with a thin kitchen towel or heatproof plate. Cook for 10-12 minutes or until the mixture is translucent. Mix with silicon spatula at least 2 times during cooking.


[…] Just One Cookbook — Strawberry Mochi […]
[…] is translucent. Mix with silicon spatula at least 2 times during cooking. Recipe Source : Strawberry Mochi (Ichigo Daifuku) いちご大福 @ ustonecookbook […]
[…] 17. Strawberry Daifuku […]
[…] [HANBEE]: “Things I love, hmm~. Like my favorite strawberry daifuku?” […]
[…] soup, or inside Okonomiyaki. For sweet dishes, you will find Mochi Ice Cream, Zenzai (Oshiruko), Strawberry Daifuku and so on. So for Japanese New Year, you have the perfect excuse to enjoy them […]
[…] and chewy Mochi (餅) is irresistible. Whether it’s Mochi Ice Cream, Strawberry Daifuku Mochi, or mochi enjoyed during traditional Japanese New Years, these elastic wonders of glutinous rice […]
[…] מחכה לעונת התותים בחורף כדי לצלם ולהוסיף לפוסט. הנה מתכון מצולם, ועוד אחד נפלא בוידאו למי שרוצה לנסות. בקיץ מקובל […]
Hi Nami-san, any idea if I can add cocoa powder/matcha powder to the shiratamako mix?
Hi Anita! Yes you can do that. 🙂
Hi, I’d like to try out ur recipe but I’m thinking to replace the red bean paste with chocolate to adjust it to the taste of my foreign friends. It would be really nice if you could tell me how I can do this. 😀
Hi Jovie! I guess you can melt the chocolate and dip the strawberries? The part that I’m not sure is that how does the wrapping would work if the chocolate is harden. It seems like it’s a lot easier if it’s softer chocolate (like spreadable texture) so it will snug inside the mochi. I have never tried it so without testing I can’t give the correct method… sorry…
First time making daifuku, it definitely is not the prettiest to look at (will keep making this to get better at it ;)), but this was a really easy and tasty recipe! So happy I found your website and I really appreciate you have the measurements in US measuring sizes (cups, tsp, etc.). I also really like how you explain different ingredients – your experience with using them, comparing them to similar ingredients, other recipes to use them in. Will continue to try different things and I’m sure they’ll all taste just as good as they look on your website! 🙂 Thank you thank you thank you!
Hi Ann! Thank you so much for your kind feedback and compliments. I’m happy to hear you like my recipe. Thank you! I practiced a lot for this recipe so I can make a smooth video. After testing this recipe so many times, my skill got improved because you know what to be careful and what I can do to improve the look, etc. So you’ll get there! 🙂
Naimi-san,
I made these for the first time this evening. They are delicious! The first couple even turned out looking fairly nicely, but then they started moving into barely passible to ugly messes. Each one would start out with the stickiness in control, but as I stretched the mochi around the strawberry it would become very sticky and everything would just start pulling apart and get out of control. I tried to give my hands, as well as the mochi, a good dusting of potato starch. They are so delicious I want to make them again, but do you have any suggestions for controlling the sticky problem when stretching and trying to close the bottom?
My apologies for the extra letter in your name, Nami-san.
Hi Mark! Don’t worry about spelling. 🙂
When you pull the mochi to wrap, fresh sticky part comes out. So your hands have to be well coated with potato starch, and/or you can roll over sticky mochi area on starch too. But when you close the mochi, you have to to make sure that area has to be sticky. You can remove the dust with brush or try to pull so fresh sticky mochi part comes out. Basically… you have to know when to show sticky mochi to seal.. It’s easy to say and harder to do it… I think practice helps, as each time you learn tricks. 🙂 So happy to hear you like this recipe! Once you get used to it, try Mochi Ice Cream (recipes are similar)! 🙂
Thank you for your site! A recipe of daifuku with a lot of details, it’ll help me.
Hi Marlène! Thank you so much for your kind words! Hope you have fun making this! Enjoy! 🙂
Can you use this recipe to make mochi ice cream? I see that you have a recipe for that already, but if I want to just make using this recipe, what would the difference be? (like should I add more sugar to ensure that the mochi is softer in the freezer?)
It would be easier to use one recipe to make both because I want to try to make ice cream with half the batch, and the other 3 pieces with the strawberry and anko!
Thank you!!
-Casey
Hi Casey! I’m sorry, but I haven’t made mochi ice cream with this recipe, so you have to give it a try… The more sugar will definitely help to keep it soft. 🙂 Let us know if you try! Maybe other readers would like to know too. 🙂
So sticky! I’ve tried everything… I followed your recipe, but the mochi was too sticky to handle. Did I miss something? Do you let the mochi cool down first?
Hi Angelique! If you dust every surface of mochi and hands with potato/corn starch, it should not be sticky. Which means, if you lift or bend mochi and sticky part is exposed, you have to dust with potato starch. It’s the only way to keep your hands sticky-free. I think 2nd time will be better as you know what to expect and avoid the problem (if you are willing to try…). 🙂 Sorry, but it’s mochi’s nature to be sticky, so we have to work around it. 😉
Oh! Thank you, Nami! I will try it again! ^ u ^
I love ichigo daifuku! These are so tasty and reading this post makes me want to make some again sooner than later!
Thank you so much Elaine! 🙂