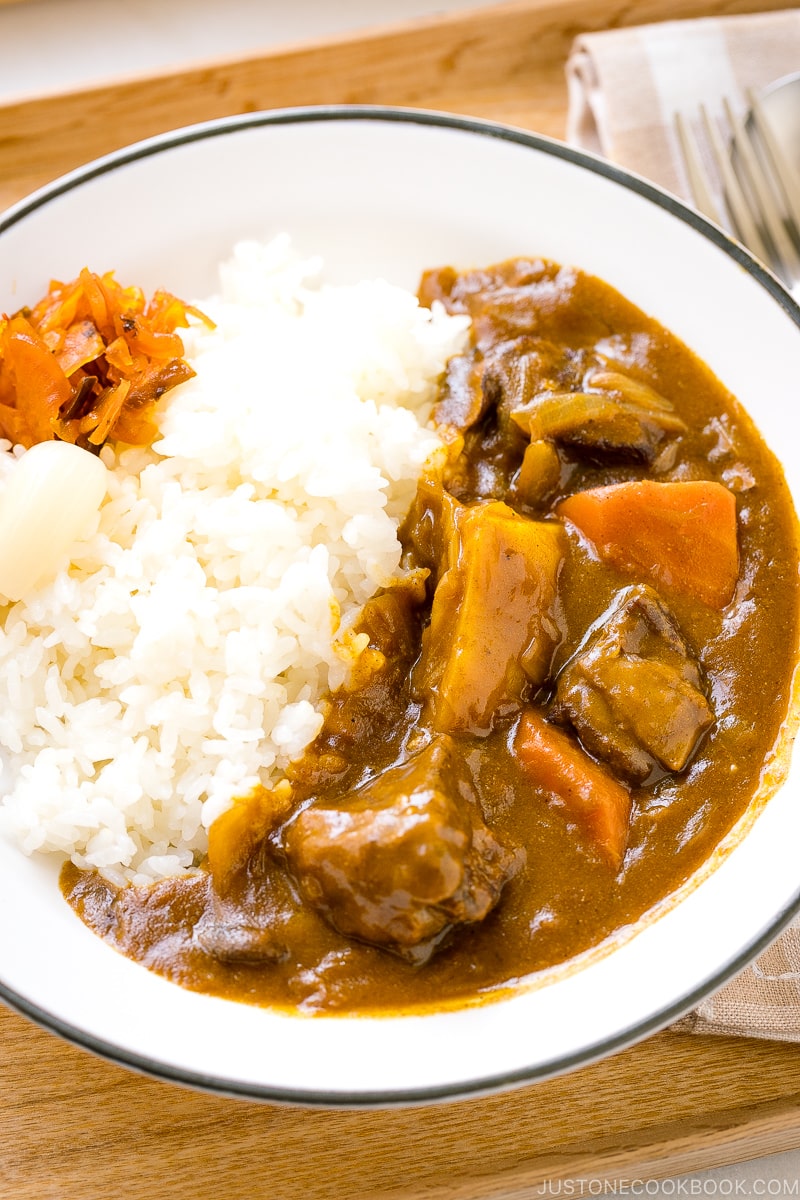
With tender beef, potatoes, carrots, mushrooms, and curry roux, this savory and hearty Japanese Beef Curry makes for a fabulous introduction to new curry rice eaters. Adapted to Japanese tastes, it’s mild and sweet with a stew-like consistency. Even children enjoy it thoroughly! You have to give this easy recipe a try.
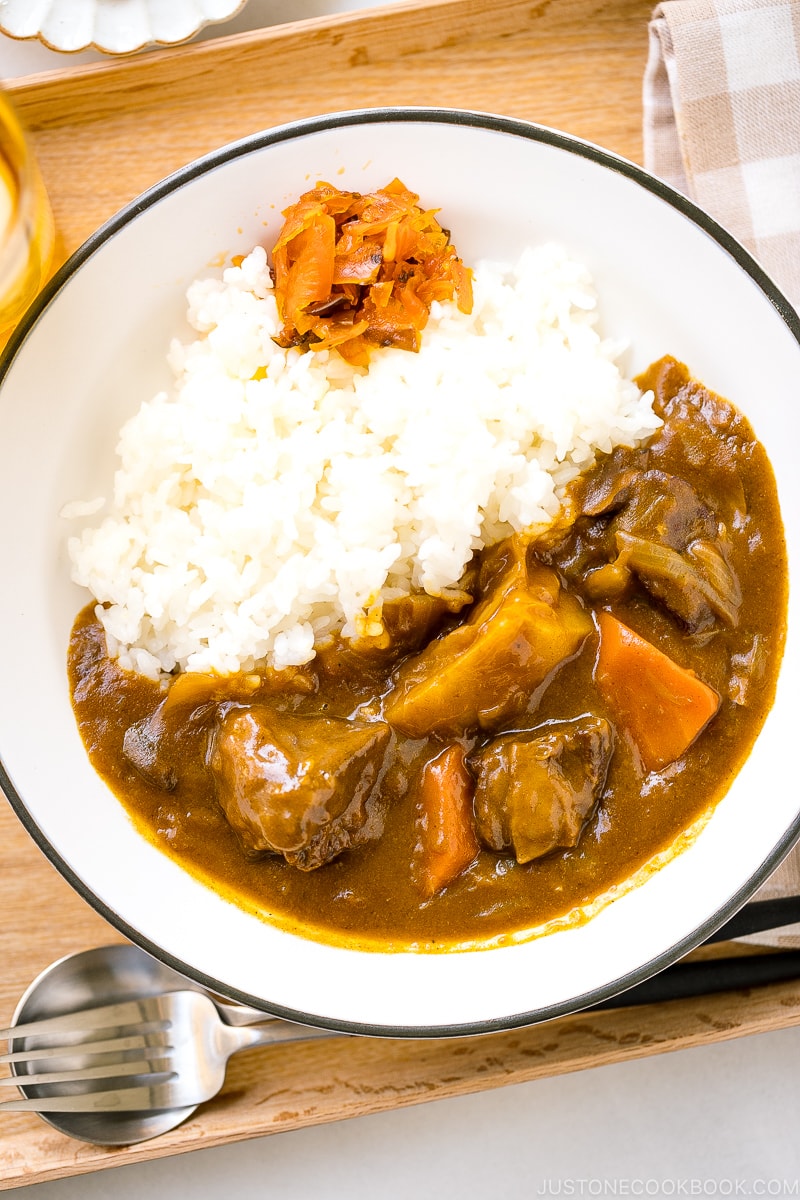
Japanese Curry Rice or Karē Raisu (カレーライス) is an extremely popular dish for all ages in Japan. We adore our curry so much that it is considered one of the country’s national dishes along with ramen and gyoza! Today, I’m bringing you a most comforting Japanese Beef Curry (ビーフカレー).
This takes a bit of preparation compared to the Japanese Chicken Curry but the end result is totally worth the effort and time. It’s a hearty stew that will satisfy your deepest craving.
Table of Contents
What is Japanese Curry?
In case you’ve never tried Japanese curry, I want to quickly introduce it to you as it is quite different from Indian or Thai curry or any other rendition of curry for that matter.
The dish has a long history in Japan and was in fact introduced by the British Royal Navy during the Meiji Restoration 150 years ago. However, it was not until the early twentieth century that curry became a mainstream staple in Japanese households.
A classic Japanese curry commonly features tender morsels of meat, potatoes, sweet bites of onions and carrots, and a thick brown sauce that whispers in a gentle sweetness.
Although most spice aficionados would describe Japanese curry as mellow, the degree of spiciness varies depending how you’d make it. One can always bring up the chili heat if preferred.
These days you can find many versions of Japanese curry, with some featuring unique local ingredients and produce.
The Key Ingredient: Japanese Curry Roux
To make Japanese curry, the recipes almost always include a box of Japanese curry roux, which can be found at Japanese and Asian supermarkets or in an Asian food aisle at your local grocery stores.

All the curry spices are packed in a form of solid roux resembling a block of baking chocolate. You can find them being labeled according to the spice levels of mild, medium hot, or hot.
Younger children can easily enjoy the “mild” level and now that my kids are older, I mix the mild and the medium-hot for my curries. For those who have toddlers, there is even a Japanese curry roux for toddlers that you may find at Japanese grocery stores.
For those who prefer tingling heat, the “hot” might not be enough for you, but you can certainly punch things up by adding in some cayenne pepper and black pepper.
Adding Flavor Boosters
To avoid “out of the box” taste, it’s very common to mix 2-3 different brands of the Japanese curry roux and add different condiments to enhance the flavor for the curry sauce. We’ll talk more about it in the cooking tip section below.
Homemade Curry Roux
Not a fan of store-bought curry roux? No problem! You can make it from scratch.
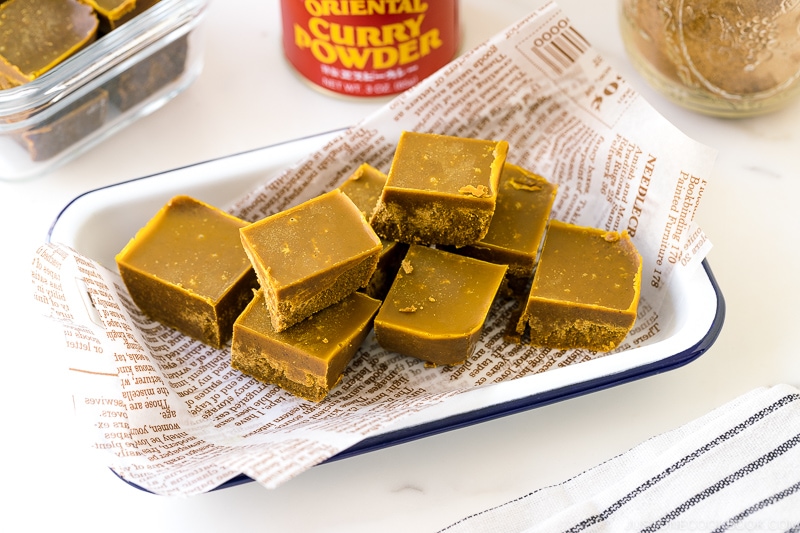
You need 4-5 ingredients to make this curry roux: Butter, flour, Japanese curry powder, and garam masala (and cayenne pepper for the spicy version).
When you have time to make curry roux, make a double batch, and store it in the freezer for later use!

How to Make Japanese Beef Curry
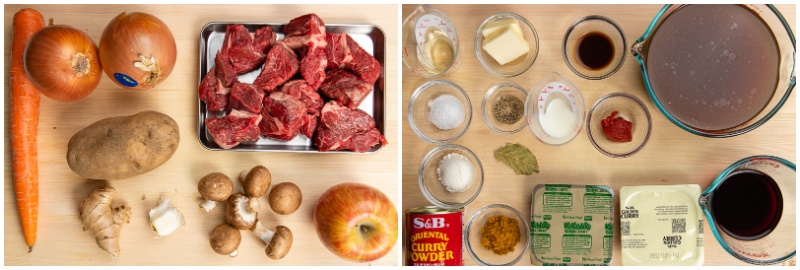
Ingredients You’ll Need
- Beef (My top choice is chuck roast; read more later)
- Veggies: onions, potatoes, carrots
- Mushrooms
- Garlic and ginger
- Wine
- Beef stock/broth
- Seasonings: tomato paste, Japanese curry powder, Japanese curry roux, bay leaf, etc
- Optional add-ins: grated apple, milk, Worcestershire sauce
Overview: Cooking Steps
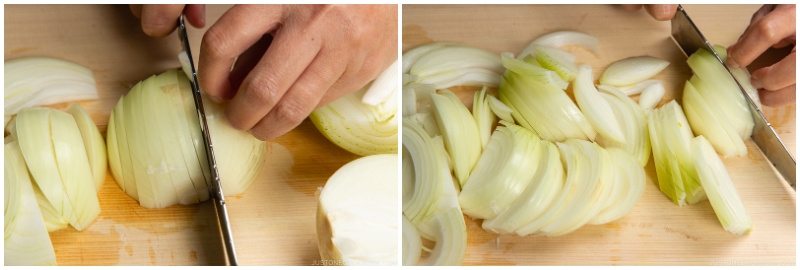
- Cut the onions and start sautéing them until tender and caramelized.
- Meanwhile, cut all the vegetables and beef.
- Sear the beef and add it to the caramelized onion.
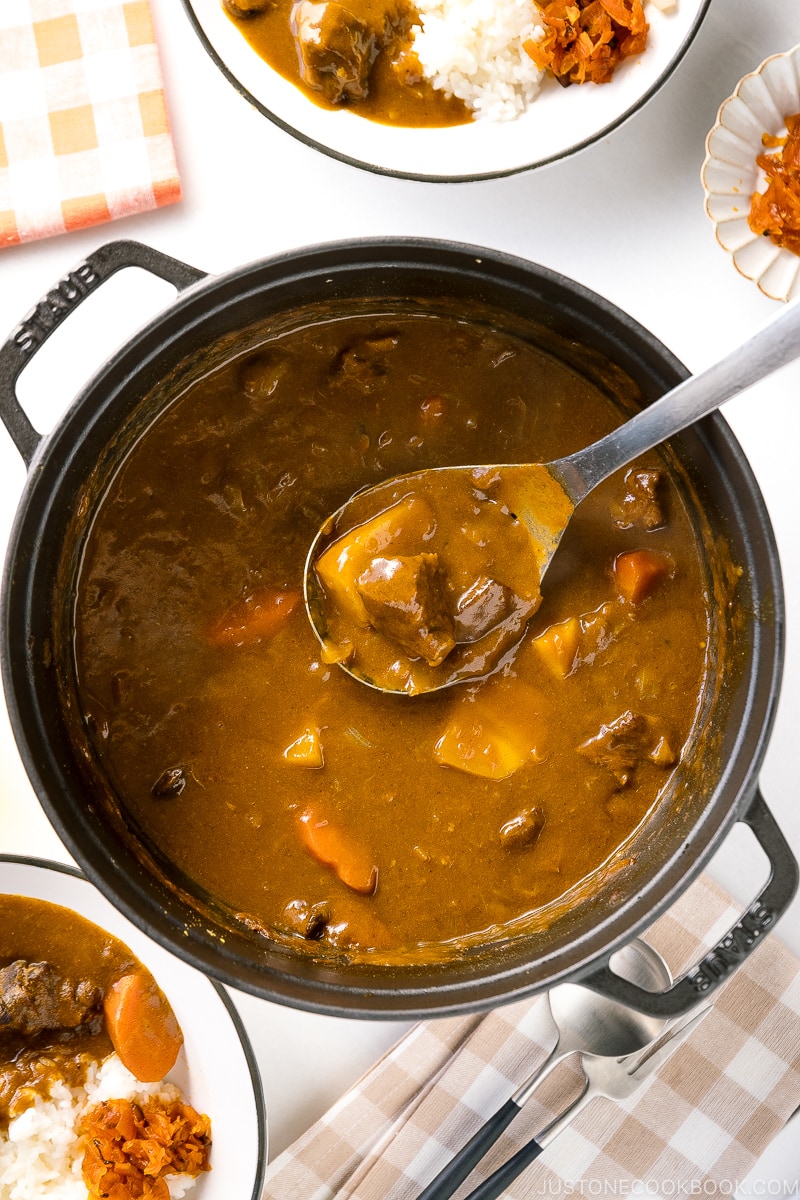
- Add the wine, stock, carrots, mushrooms, and seasonings, and cook for 2 hours (add the potatoes 15 minutes prior to finishing cooking in order to save their shape).
- Add Japanese curry roux and serve with rice!
Read the recipe card below for the full ingredient list and more detailed step-by-step instructions.
5 Important Cooking Tips
1. Get Chuck Roast instead of Stew Beef
Butcher counters sell pre-cut stew beef. This cut is more economical because it’s made up of the odds and ends from other different cuts. Chuck roast, on the other hand, is from the shoulder muscles, and while initially quite tough, cubes of chuck roast can break down into tender, succulent, flavorful meat after cooking low and slow.
So, for a delicious Japanese curry (and of course any beef stew recipe), I strongly recommend getting chuck roast.
For really tender meat, it usually takes two hours. Do not rush the cooking process. Otherwise, the beef will be tough and chewy. Make sure there’s enough liquid and keep an eye on the dish.
If you can’t get chuck roast, try round roast, rump roast, or pot roast.
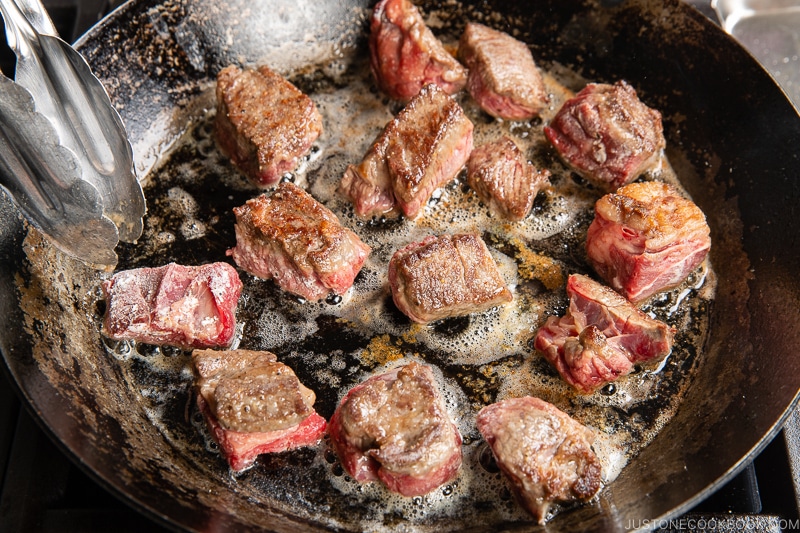
2. Sear the Meat
This is an essential step if you want to make the most flavorful meat. Searing caramelizes the natural sugars in the meat and browns the proteins, forming a bronze crust on the surface that amplifies the savory flavor of the finished dish.
Once the sauce is thickened, you will be rewarded with a delicious curry with tender pieces of meat in a rich, velvety sauce.
3. Caramelize the Onions
When you slow cook the onions over an extended period of time, the natural sugars in the onions caramelize, bringing out their sweetness and making them extremely flavorful. It takes time, but you can always get the other prep work done while sautéing the onions.
4. Personalize Your Curry with Flavor Boosters
The beauty of curry is its room for customization. Every cook has the freedom to enhance and personalize the flavors with different ingredients (some can be unexpected). You can see the full list in my Japanese Chicken Curry recipe, but here are some of my favorite ones:
- Grated apple
- Honey
- Ketchup
- Butter (Add with roux)
- Garlic (Add while sauteeing)
- Ginger (Add while sauteeing)
- Milk
- Red wine
- Soy sauce
- Tonkatsu sauce or Worcestershire Sauce
Pair one or two of the above with the main ingredients of your curry. For example, I don’t use red wine unless it’s for a beef curry. Try out different combinations or change up the proportions to see what you like.
5. Add the Potatoes 15 Minutes Before Finishing
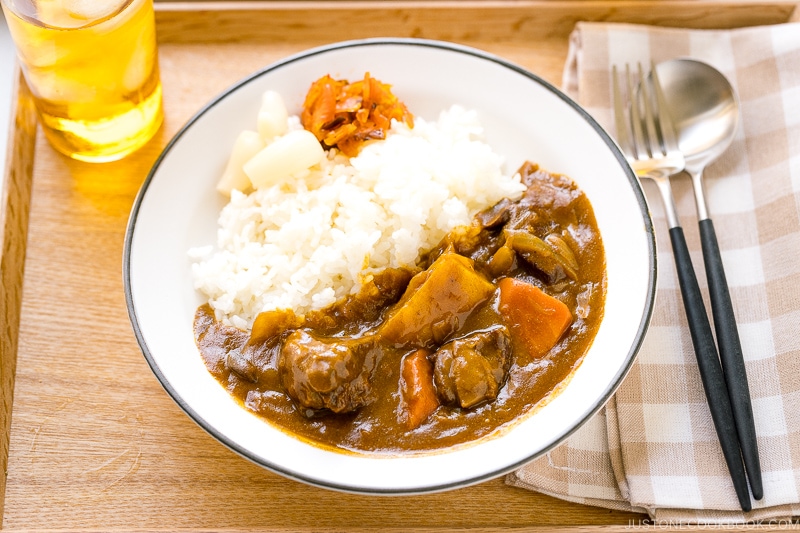
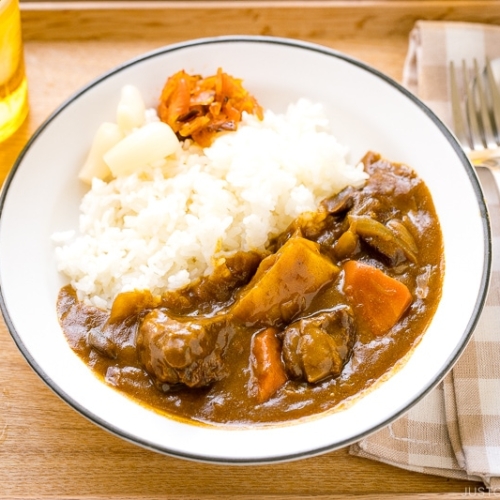
Because the beef needs to be simmered for about 2 hours, I like to add the russet potatoes toward the end of simmering. That way, we’ll retain the shape of the potatoes instead of them being dissolved into the curry sauce.
You can use Yukon gold potatoes, which tend to keep their shape. But I like the floury, light, and fluffy texture of russet potatoes for the curry.
How to Serve the Curry
Japanese curry is almost always served with steamed rice. I have detailed instructions on how to cook Japanese short-grain rice in a pot over the stove, a rice cooker, an Instant Pot, or a donabe (Japanese clay pot).
Serve the steamed rice in half of a shallow bowl, and then add piping-hot curry sauce to fill up the other half of the bowl.
Typically, the Japanese curry is garnished with fukujinzuke (red pickled radish) and rakko (pickled shallots). Put the extra pickles in a bowl/plate on the table so you can add more as you eat.
How to Store Japanese Beef Curry
You can keep the leftovers in an airtight glass container and store them in the refrigerator for up to 3 days or in the freezer for a month. The texture of the potatoes will change in the freezer, so I recommend removing them before freezing.
Defrost the frozen curry in the refrigerator for 24 hours and reheat in a pot to serve. If needed, add ¼ to ½ cup (60-120 ml) of water to dilute the curry when reheating.

FAQs
I don’t have 3 hours to make curry. Are there any other recipes that are quicker?
If you want to cut down on the simmering time for beef curry, you can make my Instant Pot Pressure Cooker Japanese Curry recipe.
Or try my Japanese Chicken Curry or Japanese Seafood Curry!
My broth disappeared while cooking!
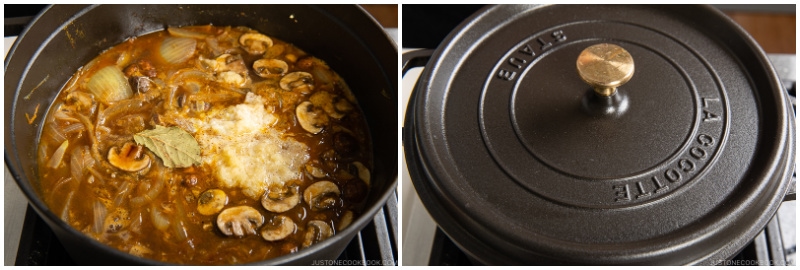
When you simmer stews like this for a long period of time, it’s very important to use a heavy-bottomed pot with a tight-fitting lid. The pot I use is Staub brand and their lid seals perfectly. Le Creuset is okay, but I still see some evaporation from the gap between the lid and the pot.
Can I make a vegetarian version?
Japanese curry usually includes a protein of your choice (usually beef, chicken, pork, or seafood), onions, potatoes, and carrots. For a vegetarian option, you can add firm tofu right before you serve just to heat it through. Or make my Vegetarian Japanese Curry that is packed with a colorful medley of veggies!
Why is my meat tough and chewy after cooking?
First, I recommend getting chuck roast instead of stew beef. Beef stew meat is typically made up of the odds and ends from other different cuts. Chuck roast is a pretty tough cut, but after cooking low and slow, it becomes melt-in-your-mouth tender.
Secondly, you do need to cook it for 2 hours as all the beef stew recipes do. Do not rush it. Otherwise, the beef will be tough and chewy. Make sure there’s enough liquid and keep an eye on the dish.
What to Serve with This Japanese Beef Curry Recipe
More Japanese Curry Recipes You’ll Love
- Curry Udon
- Curry Bread (Curry Pan)
- How to Make Japanese Curry Roux
- 15 Japanese Curry Recipes You’ll Love
Wish to learn more about Japanese cooking? Sign up for our free newsletter to receive cooking tips & recipe updates! And stay in touch with me on Facebook, Pinterest, YouTube, and Instagram.
Japanese Beef Curry
Video
Ingredients
- 2 onions (large; 1¼ lb, 567 g)
- 2 Tbsp unsalted butter (divided)
- 2 Tbsp neutral oil (divided)
- 1 russet potato (11 oz, 309 g)
- 1 carrot (large; 8 oz, 230 g)
- 6 cremini mushrooms (2.6 oz, 80 g)
- ½ tsp ginger (grated, with juice)
- 1 clove garlic (minced)
- 1¼ lb boneless beef chuck roast
- ¼ tsp Diamond Crystal kosher salt
- ¼ tsp freshly ground black pepper
- 1 Tbsp all-purpose flour (plain flour)
- ½ cup red wine
For the Curry Sauce
- ½ Tbsp Japanese curry powder
- 1 Tbsp tomato paste (or ketchup)
- 4 cups beef stock/broth (1 QT; for lower sodium, use water only or half stock and half water)
- ⅛ apple (plus more for sweetness; I use Fuji apple; or substitute 1 Tbsp honey or mango chutney)
- 1 Tbsp Worcestershire sauce
- 2 Tbsp milk
- 1 bay leaf
- 1 package Japanese curry roux (7–8.4 oz, 200–240 g; or make my Japanese Curry Roux)
For Serving
- 8 servings cooked Japanese short-grain rice (1–1½ cups, 180–270 g per serving)
- fukujinzuke (Japanese red pickled vegetables) (optional; make my Homemade Fukujinzuke)
- rakkyo (Japanese pickled scallion) (optional)
Instructions
- Gather all the ingredients.

To Prepare the Ingredients
- Cut 2 onions into thin slices.
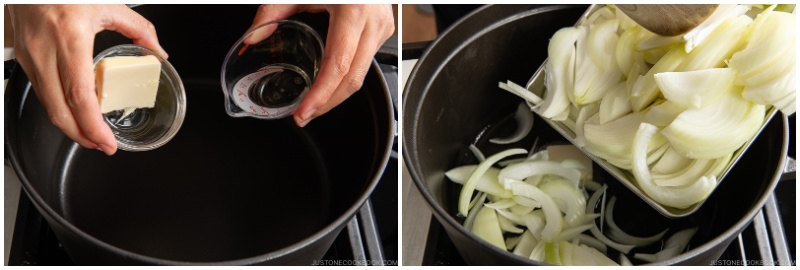
- Preheat a large heavy-bottomed pot (I used a 5.5 QT Staub Dutch oven) on medium heat. When the pot is hot, add half of the 2 Tbsp unsalted butter, half of the 2 Tbsp neutral oil, and the onions to the pot. Stir to coat the onions.
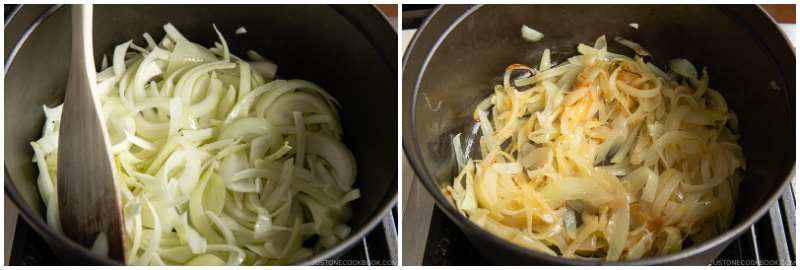
- Sauté the onions, stirring once in a while, for about 20–25 minutes. Meanwhile, move on to the next step (but stir the onions and keep an eye on them). When the onions are wilted, reduce the stove‘s heat to medium low (as they tend to burn quickly). Once the onions are tender, translucent, and a bit caramelized, remove the pot from the heat and set aside until the beef is done searing.
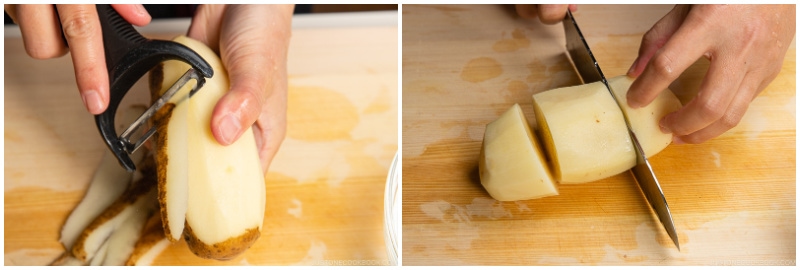
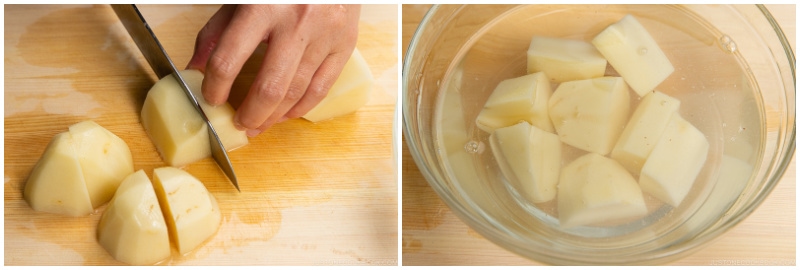
- Peel and cut 1 russet potato in thirds.
- Then, cut each piece in half or quarters. Soak the pieces in water for 15 minutes (or until added to the pot later on) to remove the starch. Drain and set aside.
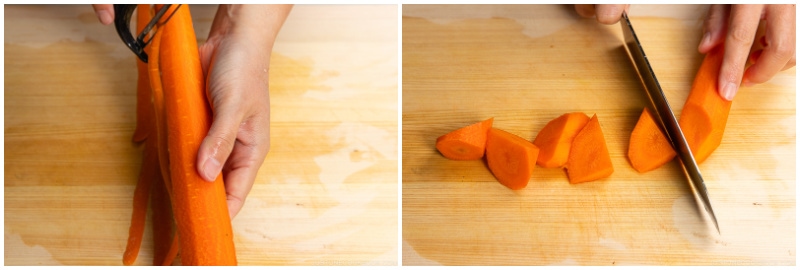
- Peel and cut 1 carrot diagonally while rotating it a quarter turn between cuts (we call this cutting technique rangiri in Japanese).
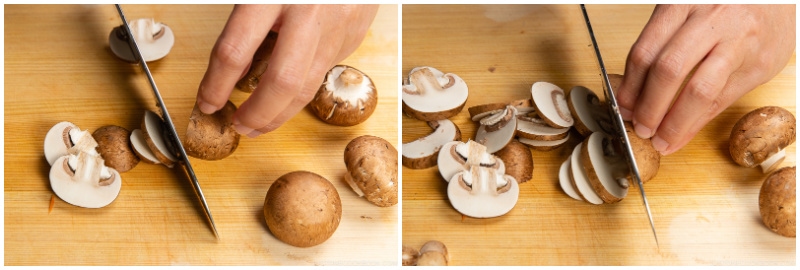
- Clean 6 cremini mushrooms and cut them into thin slices. Tip: I use a pastry brush and avoid washing mushrooms as they absorb moisture. However, it‘s okay to quickly rinse them.
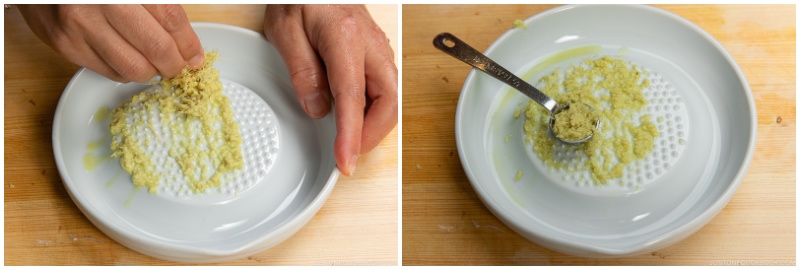
- Grate the ginger (I use a ceramic grater) and measure ½ tsp ginger (grated, with juice). Set aside. Then, mince 1 clove garlic (I skip it here as I use a garlic press later).
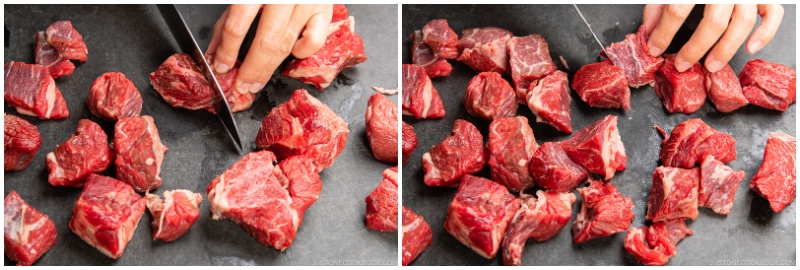
- Cut 1¼ lb boneless beef chuck roast into 1½-inch (3.8 cm) cubes. Tip: I recommend chuck roast for its tenderness and higher quality. You could use stew beef since it‘s slightly more economical; however, it‘s made up of bits and pieces leftover from carving the chuck roasts, so the meat is not as tender.
- Lightly sprinkle the beef with ¼ tsp Diamond Crystal kosher salt and ¼ tsp freshly ground black pepper. Then, lightly coat the meat with 1 Tbsp all-purpose flour (plain flour).

To Sear the Beef
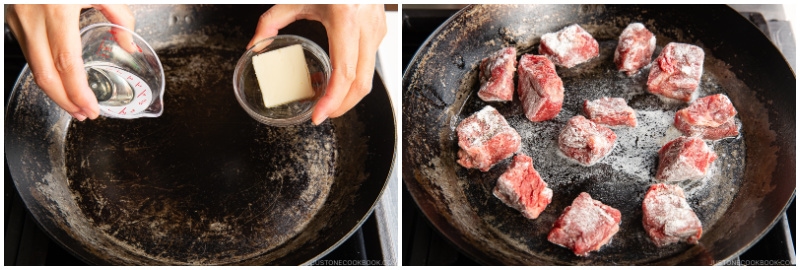
- Preheat a carbon steel pan (or cast-iron skillet) on medium-high heat. When the skillet is hot, add the remaining half of the oil and butter. Cook the beef in 2 batches. Add the beef cubes in a single layer, making sure not to crowd the skillet; otherwise, the excess moisture in the pan will end up “steaming“ the meat.
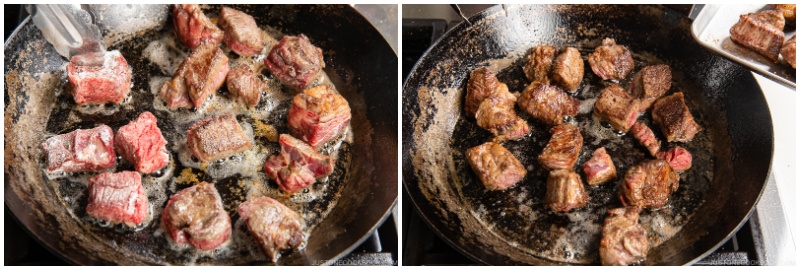
- Sear the beef cubes (do not move them) on one side until brown and crusty, about 3–4 minutes, then turn them over to cook all sides. The meat will release itself from the pan when the surface is seared nicely. Transfer the seared meat to a plate and work on the next batch.
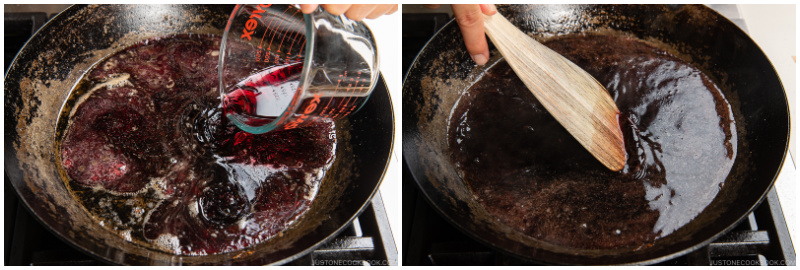
- Once you‘ve seared and transferred all the meat, deglaze the pan. Add ½ cup red wine to the pan and use a wooden blunt-end spatula to release the flavorful browned bits (called the “fond“) that are stuck to the bottom of the pan. Turn off the heat and set aside this deglazed pan liquid temporarily.
To Cook the Curry
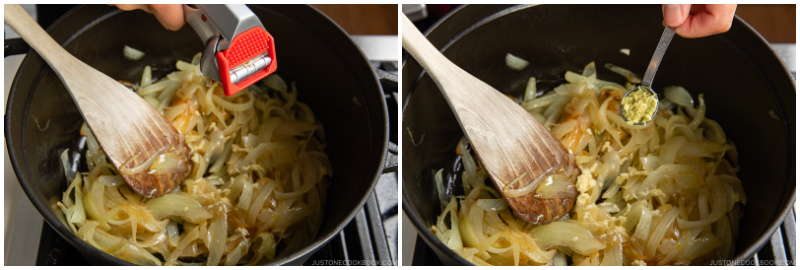
- By now, the onions in the pot should be caramelized and ready for the next step. Reheat the pot on the stove over medium heat. Add the minced garlic (I use a garlic press) and grated ginger.
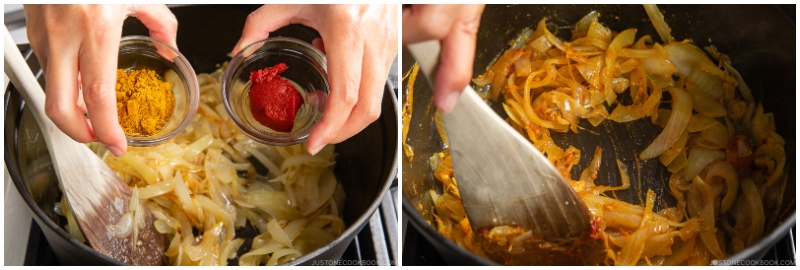
- Add ½ Tbsp Japanese curry powder and 1 Tbsp tomato paste and sauté for 1 minute.
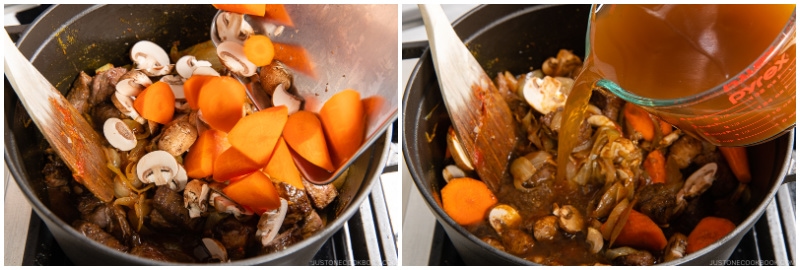
- Add the seared beef, any juices from the plate, and the deglazed pan liquid to the pot and mix them all together. Cook, stirring occasionally, for 3 minutes, letting the alcohol from the wine evaporate.
- Add the carrots and mushrooms and mix them all together. Add 4 cups beef stock/broth (or half stock/half water) to just cover the ingredients. Cover the pot with a tight-fitting lid and bring it to a boil. Tip: Compared to Le Creuset, I think Staub has a great seal on the lid and prevents evaporation.
- Once boiling, skim off the scum and fat from the broth. I prepare a 2-cup measuring cup with water in it and clean my fine-mesh skimmer in the water. It’s easy to remove the scum/fat from the skimmer this way.
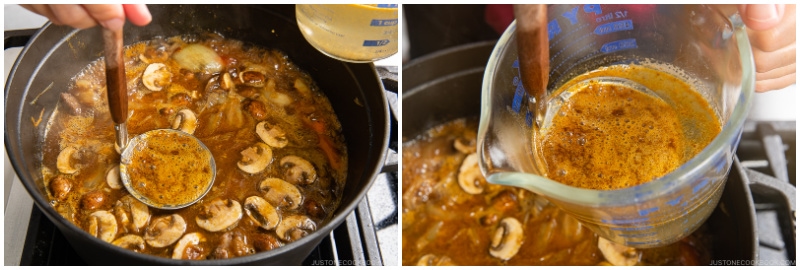
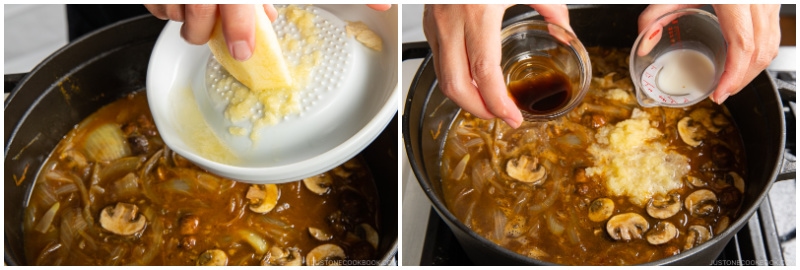
- Grate ⅛ apple and add it to the broth. Then, add 1 Tbsp Worcestershire sauce and 2 Tbsp milk.
- Add 1 bay leaf and cover the pot with the tight-fitting lid. Simmer on low heat until the meat is tender, about 1 hour and 45 minutes. If you do not have a tight-fitting lid, you may need to add more beef stock or water, enough to just cover the ingredients. Tip: To get tender beef, 2 hours of simmering is standard.
- When the beef is tender, add the potatoes, close the lid, and simmer for 15 minutes until the potatoes are cooked through.
- When the potatoes are tender (and a wooden skewer can pierce through the potato), turn off the heat and discard the bay leaf.
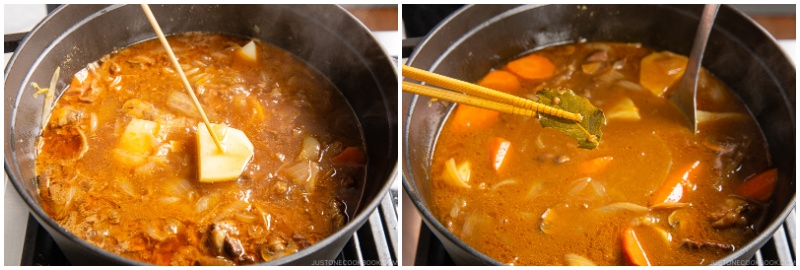
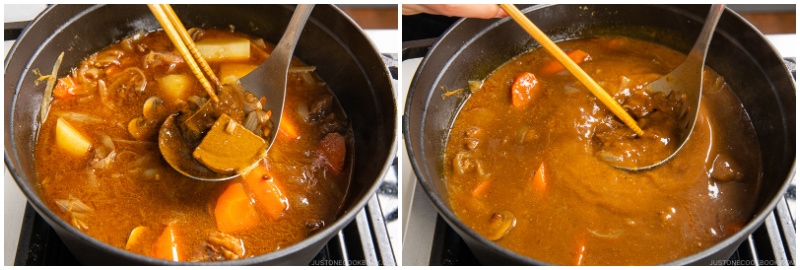
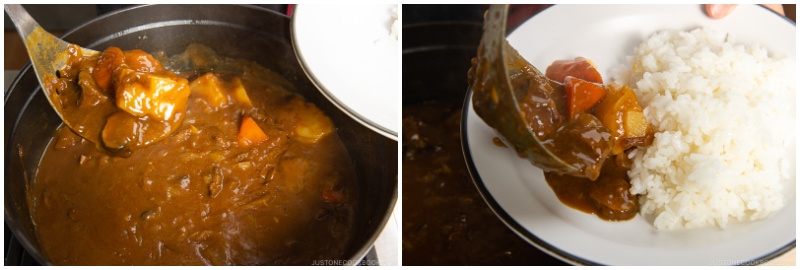
- Now, add 1 package Japanese curry roux: Put 1–2 cubes of roux in a ladleful of cooking liquid, slowly let it dissolve with a spoon or chopsticks, and stir it into the broth to incorporate. Repeat with the rest of the roux, 2 cubes at a time. Adjust the amount to your taste. You may not need to use all of it; reserve the extra for another use. After adding the curry roux, simmer on the lowest heat, stirring often, for 3–5 minutes until the sauce thickens. Be careful not to burn the curry sauce! If it‘s too thick, add water to dilute. If it‘s too thin and soupy, uncover the pot and simmer a bit longer.


To Serve
- Serve the curry on individual plates over 8 servings cooked Japanese short-grain rice and top with optional fukujinzuke (Japanese red pickled vegetables) and rakkyo (Japanese pickled scallion).
To Store
- Keep the leftovers in an airtight glass container and store it in the refrigerator for up to 3 days or in the freezer for a month. The texture of the potatoes will change in the freezer, so remove them before freezing. Defrost the frozen curry in the refrigerator for 24 hours before you want to reheat it. If you have any extra roux, keep it in an airtight container and store in the refrigerator or freezer for 1–3 months.
To Reheat
- Leftover curry sauce will thicken into a paste as it cools, so it tends to burn while reheating. To avoid this, stir ½ cup (120 ml) water or more into the leftover sauce until loosened. Then, gently reheat it on low heat. If the sauce seems thin, continue heating with the lid off to reduce the sauce.
Nutrition
Editor’s Note: This post was originally published on April 15, 2011. It has been updated with new pictures and video and the recipe instruction was slightly revised on May 15, 2022.


This was really great, thank you for sharing!
Oh, and I added a can of corn (my daughter loves corn) and it was perfect!
Hi Sunnie! Aww I’m so happy to hear your daughter enjoyed this recipe! Great idea to add corn. My kids love it too! 🙂
Macaroni salad is indeed typical in Hawaii! I came to your website because I am making macaroni salad and wanted chicken katsu curry as well! Thank you for sharing your recipes.
Hi Wika! Interesting! We eat Macaroni salad sometimes too. Japanese people love mayo based salad too! 🙂
Hello. I made you curry recipe tonight. It came out delicious. It was the perfect spiciness, creaminess, and thickness. I also made the homemade roux. Although I followed that recipe as written, after cooking the roux for 20 minutes mine never thinned out like yours did in the photo where you add the curry, garam masala, and cayenne. Either way the end result was delicious. My fiancé and I and both had seconds. Thank you for sharing such a wonderful recipe
Hi Keke! I’m so happy to hear your fiance and you enjoyed this recipe! I’ll make a video for the curry roux one day. 🙂
Hi Nami,
Can I make this with tofu? I’m not a big meat eater generally.
Thanks
Nisha
sorry, just saw the description!
Thanks for this site. I love Japanese cuisine so much and this site is like a dream come true!
Hi Nisha! No problem. Sorry for my late response. I’m happy to hear you like Japanese food! 🙂
Hi! Making this for the first time this evening. I’ll need to find another box of curry, as I did not notice that it was only a 100 gram size box when I purchased it yesterday while in another city. I’m certain I can get it locally though. 🙂 BTW: I asked you on YouTube about making Udon noodles with a pasta machine. I can report that the Atlas Trenette attachment makes noodles that are almost exactly the same size and shape after cooking as the packaged pre-cooked Udon noodles I’ve bought. 😀
Hi Jim! I am so sorry for my late response. Were you able to find it last minute? American grocery stores carry the Japanese curry roux in Asian/International food isle but maybe because I’m in California…
Oh! I remember your comment on YouTube! Thank you so much for feedback. It’s on my wish list… I have so many cooking gadget that I have to make sure I’ll use it… he hee. Hope I can make pasta with that too! Good to know I can use it for udon too. I really appreciate your feedback. Thank you!!!
Hi Nami,
Am I able to freeze the leftover curry? If I can, how long will it keep in the freezer? Thank you!
Hi Kim! Yes! If you put it in an air-tight container, I’d say it’ll still taste great for at least a month. However, potato will change the texture. So I usually take it out (or try to finish eating) before freezing. If you don’t mind, you can of course freeze potatoes too. 🙂 Hope that helps!
Just tried your recipe, and it totally hit the spot! Definitely worth the extra time, and it made enough for me to eat for the rest of the week!
Hi Jasmine! I’m so happy to hear that! Thank you for trying this recipe! Make curry udon with your leftover too! 🙂
Hi Nami, I just wanted to tell you, that I love your recipes. Its difficult to find good japanese recipes in Germany, most of them are “germanized”.
Since I live near Düsseldorf, I have the luck to have various japanese grocery stores around me.
I bought a box of S&B curry roux last week and found your recipe, so I decided to make your version today, the curry on your pictures look soo mouth watering that I can’t wait to be home and start to prepare this.
I tried a few of your recipes now and all of them were awesome.
Im trying your Won Tons this sunday 😉
Greeting from Germany.
Hi Sunny! Thank you so much! I’m so happy to hear you enjoy my recipes and thanks for your kind feedback. I know, a lot of Japanese food here in the States is Americanized too. It’s hard to bring very authentic food without having the customers who can appreciate it, and I still think it’s good that more Americans try Japanese food (even though it’s a bit different)…and I hope that one day they will crave for the REAL thing! And it’s wonderful that you have good Japanese grocery stores near you! Hope you enjoy wontons next! Thanks again! xo
Hi Nami! I just wanted to thank you for this wonderful recipe. I made it for my family last summer and they absolutely loved it. This week, my Japanese teacher is moving on to other pursuits, so my classmates and I wanted to throw her a party with her favorite curry (she likes vermont). Anyways, I’ll be making this recipe, since it was so amazing. Thanks again!
Hi Joey! So happy to hear you liked this recipe! I hope your Sensei will enjoy this curry as well! 🙂
Do I have to add beef stock and red wine? Or can I use water for beef stock and cooking wine for red wine?
Hi Minh! It’s good to use them for more flavors – add more dimension and depth. But you can try with replacement if you can’t get them. Try with beef stock and wine next time and compare. 🙂
Terrific results & a hit with the family but I need clarification; I doubled your recipe for your homemade curry roux because the beef curry calls for 8 cups broth & the roux recipe says it yields enough for a 4 cup liquid curry dish. Using taste as a guide, I ended using about 1 roux batch for the stew as it was plenty strong. Now I have more roux for another curry dish, yum!
Hi Priscilla! Even though we use 8 cups of broth, it should reduce a lot during the simmering process. The Japanese curry is thicker, and the roux for the curry is not enough to thicken more than 4 cups of liquid to the thickness most people prefer. But this is really a personal preference, so it is okay that you are okay with the thickness. Thanks so much for trying this recipe. So happy you and your family enjoyed it! 🙂
Made your curry a few hours ago and loved it!! Will kee this recipe whenever i need to do it again!! For how long can you conserve the curry if you made a lot?
So happy to hear that! Thanks for trying my recipe! I’d recommend to freeze it. It tastes better than keeping in the fridge. Put it in a glass container (plastic – curry will stain) and freeze for up to a month. Remove potato because it will be different texture once frozen and defrosted. Hope this helps!
After adding the bay leaves, how long do you typically let it simmer before adding the roux? The first time I made this, the curry turned out perfectly, and I can’t remember how long I let it simmer… and the second time I made it, it had a hard time thickening after I added the roux. I’m wondering if I didn’t let it simmer long enough. I tried adding more roux, and ended up having to add some cornstarch to get it to thicken some. Still tasted great though.
Hi Rebekah! The amount of liquid changes based on the stock and vegetables. Vegetables release water too, so it can be more than usual sometimes. Cook until the vegetables are tender – then you can add curry roux (don’t add the roux before – it’ll take a long time to cook, and curry tends to burn on the bottom, so not recommend to cook for a longer time after curry is added). So, if you’re worry, start with minimum amount of liquid that coves enough for the ingredients to cook. Then once vegetables and beef are tender, add the curry. If specified curry is added and too thick, you can always add more broth to dilute. It takes a longer time to evaporate when curry is loose. So that’s one trick you can do. Soon you’ll kind of know how much curry roux and broth you’ll need based on ingredients. Hope this helps!
Hi Namiko,
Thanks a lot for sharing the recipe! I made this and it was awesome!!!!
I used the old recipe last time and It’s great to see a new recipe that has less cooking time 🙂 I’d love to try this out some time, but have some questions:
1. The old recipe only uses 2 cups of beef broth and 2 cups of water while the new recipe calls for 8 cups of beef and with less cooking time. Was wondering if the the curry is more runny and salty with the updated recipe?
2. Is 10 minutes enough to caramelize the onions ? Just asking this because it used to be an hour before and want to make sure it still gives the same taste 🙂
Thanks again for sharing this great recipe!
ChelC
Hi ChelC! So happy to hear you liked this recipe!
1) I don’t remember the amount of beef and veggies I used for the old version of this recipe. Was it less, or same? As you see, this recipe requires quite a bit of ingredients, and 2 QT is what I used (added more liquid while cooking). It’s hard to say about how runny it can be – as it is based on how much water veggies release and how much water evaporated during cooking process, but 8 cups is what was required to cook this time. If you cook for a longer time, the curry will be reduced and thicker, so it depends on when you stop cooking as well.
2) I love how I spend hours to slowly caramelize the onions. SO good. If you have the time, I’d highly recommend that. But I know most people don’t want to spend that much, so I updated with shorter cooking time (I wrote: “sauté the onion until it’s soft and translucent.”, not caramelize it). If you have time, please take extra time…. adds wonderful flavors!
Hi Nami,
I was surprised to see this comment down here. I’m making this now, and had I not read through all the comments I wouldn’t have known about this additional caramelization step I could’ve used to improve my curry.
I understand you want people to not feel the time constraint, but I believe people also want to make great curry. I feel like it would be best to mention these kinds of things somewhere in the recipe, perhaps as an addendum, note, whatever – anything better than a sub-comment
Hi Richard! Thank you so much for your feedback and I really appreciate it. I’ve added the option in the recipe step by step so if someone has extra time to spend, they can saute until the onions are caramelized. Thanks again for writing! Hope you enjoyed the curry! 🙂
If we already have the curry roux, why do we need to add curry powder? Can I skip the curry powder then?
Hi Minh! You don’t have to – but if you just follow the directions of curry roux box, everyone using it has the same flavor of curry. But instead, you can personalize it by adding spices, seasonings and other ingredients to make it to your own curry, even with using curry roux. 🙂
Can i just skip the red wine part, nami? Because, well, i’m a muslim and alcohol is forbidden for me. Or can i replace it with something similar? Good quality cranberries juice maybe? Hehe.. anyway, i’d always wanted to taste japanese kare, since it always looks delicious in manga or anime.. and yours really looks appetizing ,way more what i’ve imagined… .. thank you again nami for sharing this great recipe to us ☺
Hi Hikari! Sure! Alcohol (in this case, wine) is for beef and umami in the flavor. You can’t really replace the alcohol without non-alcohol in this recipe, but you’ll be okay without it. 🙂 It’s just good to have. 🙂
There are other Japanese curry recipes on my blog (search “curry”), and I hope you get to see how we eat Japanese curry! 🙂
I also don’t drink or use alcohol. I’ve used grape juice as a substitute for the red wine and I think it’s worked really well. Still tastes just as amazing! 🙂 Hope that helps!