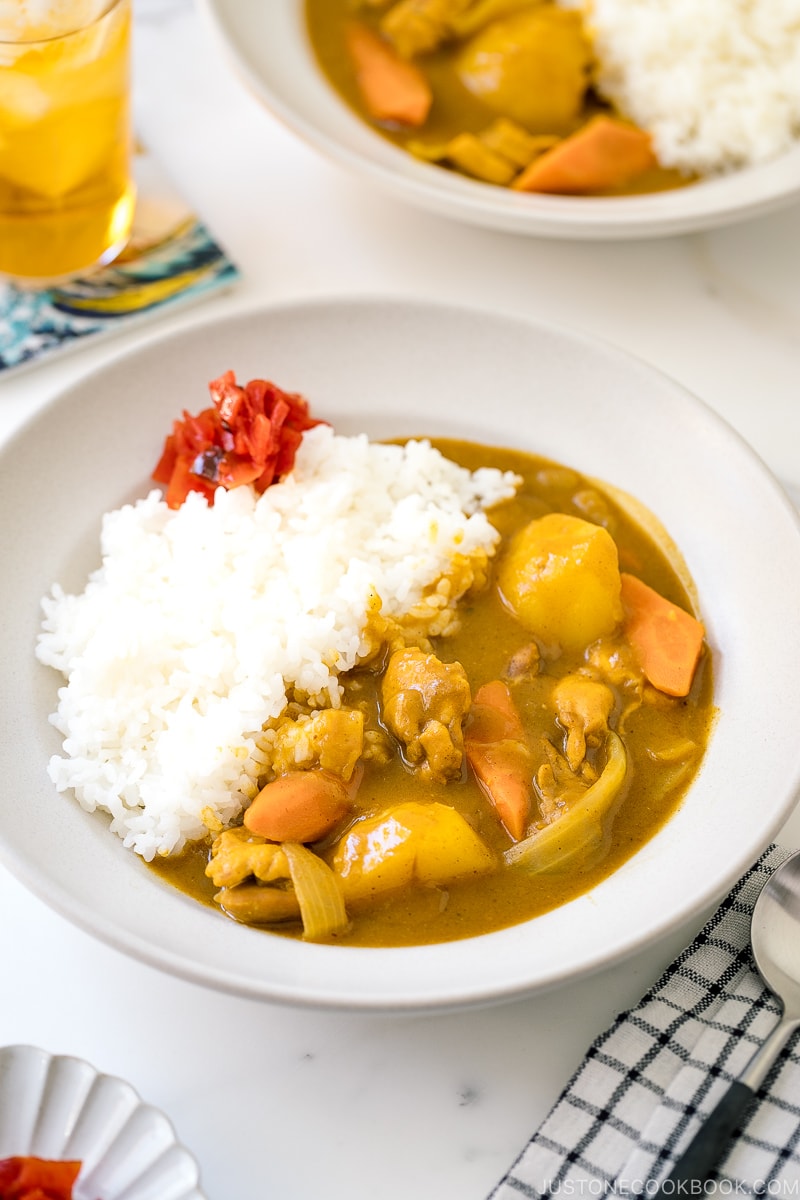
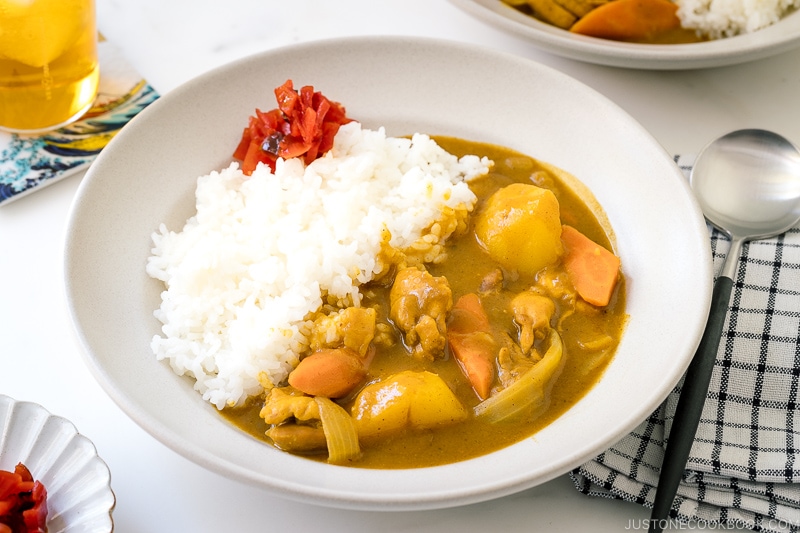
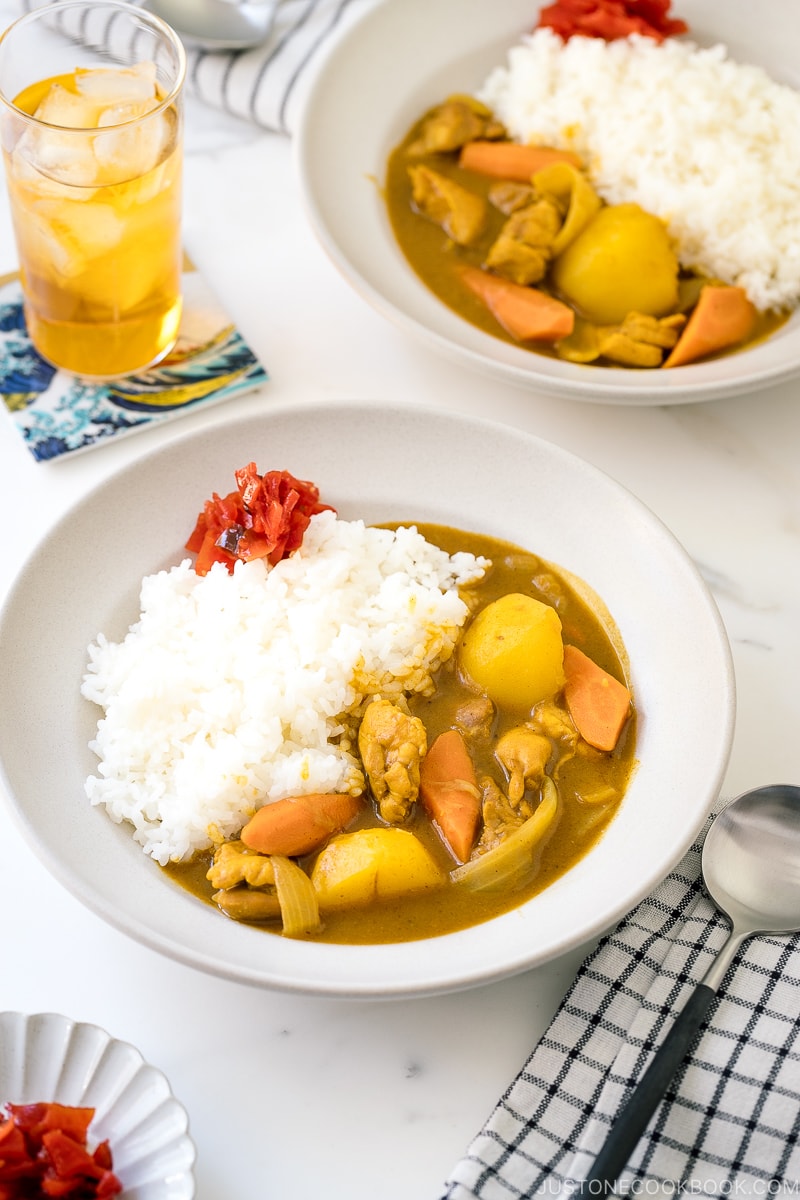
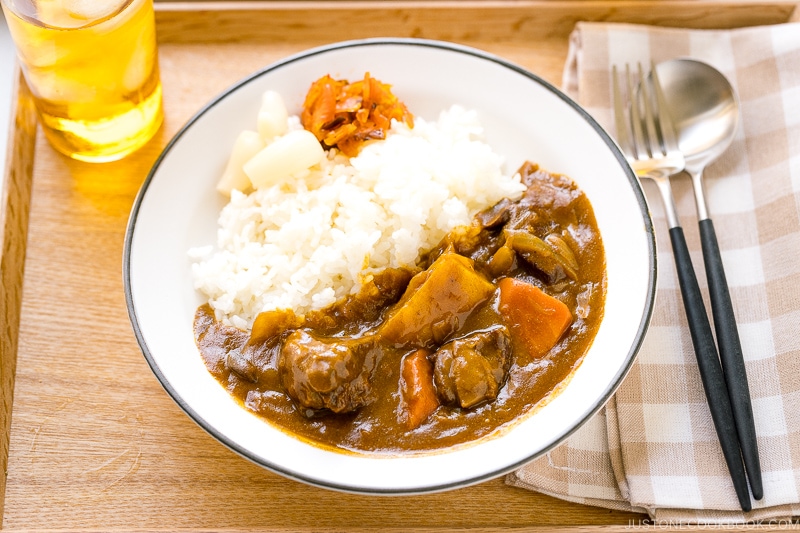
Delicious Japanese chicken curry recipe for a weeknight dinner! Tender pieces of chicken, carrots, and potatoes cooked in a rich, savory curry sauce, this Japanese version of curry is a must-have for your family meal.
This may come as a surprise, but Japanese Curry, aka Curry Rice (Kare Raisu, カレーライス), is an exemplary comfort food and one of the most-loved home-cooked dishes in Japan. I grew up on curry rice, as my mom would make it as frequently as I can recall.
The bite-sized chunks of meat, the thick-cut vegetables, the rich and creamy brown curry sauce, and the fluffy rice make every bite so comforting and exciting. Not only is it a meal that’s easy to make on busy nights, but it also tastes better on the second day.
So, if you wish to master Japanese home cooking, you must add Japanese curry to your repertoire. Let me show you how to make Japanese Chicken Curry (チキンカレー) today!
Table of contents
What is Japanese Curry?
Japanese curry is a thick curry with a stew-like consistency and commonly includes protein, sweet onions, carrots, and potatoes. The sauce is thickened by a roux (a mixture of fat and flour and an addition of curry spices).
You can find many variations of Japanese curries, ranging from regions to households, but the most basic one uses chicken, which is the recipe I’m sharing here.
Don’t miss my Japanese curry recipes roundup, which includes vegetarian curry and more!
History of Japanese Curry
Curry was introduced to Japan in the late 1800s by the British, and they were initially Western-style stews mixed with curry powder. The Japanese adapted curry to their own version, and ‘Curry Rice’ (Kare Raisu, カレーライス) was born soon after. By the 1950s, S&B Foods developed a convenient instant mix — known as curry roux — in block form so everyone could make curry rice easily at home.
Today, curry has become a staple of the Japanese home and is widely available in restaurants and food halls in departmental stores. The popularity extends beyond Japan; you can find its presence in many other Asian countries.
What Makes Japanese Curry Different from Other Curries
Japanese curry is quite different from most other curries worldwide — it has a thicker consistency, and the taste leans on the sweet and savory side. The unique sweetness comes from onions, carrots, and other additions like honey and grated apples.
The sauce resembles a rich, thick demi-glace layered with spices and earthy flavors. Some would describe Japanese curry more like a hearty stew than a typical curry like Thai or Indian. It isn’t spicy, so it is suitable for children.
It’s also served with Japanese short-grain rice, which is sticker than basmati rice or long-grain rice. The rice grains also soak up the curry.

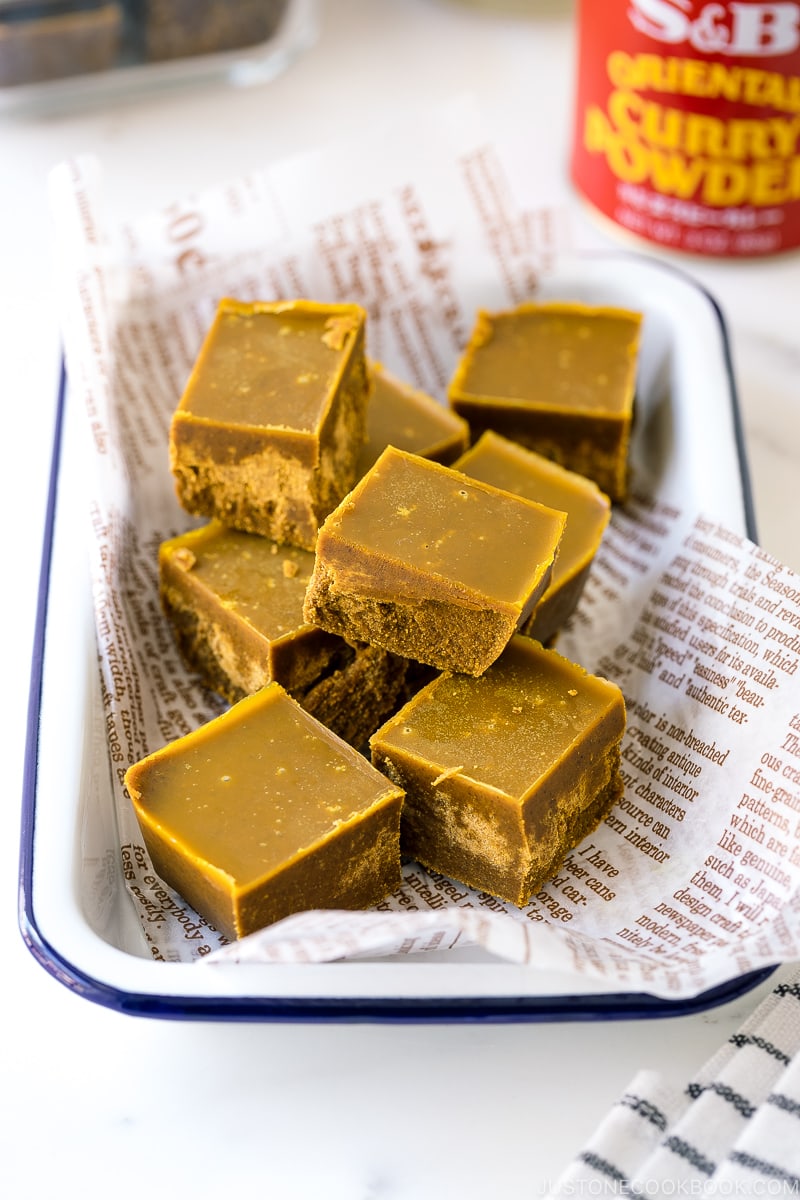
The Base Flavor – Japanese Curry Roux
The reason why we can make Japanese curry in a short time is that we use the convenient Japanese Curry Sauce Mix (curry roux カレールー) that comes in a box. The curry roux imparts a unique depth of aromatic spice flavor and creaminess to the dish. I’m not a big fan of “instant” or boxed food, but I have to say Japanese Curry Roux is an exception!

Spice Level
Each brand of curry roux usually comes with three levels of spiciness — Mild, Medium, or Hot. Since these are packaged for Japanese taste, the hot level is not nearly as spicy as Thai or Indian curry.
Too Salty?
Some of you may find the pre-boxed curry roux salty, and I agree. It does have a strong (salty) taste, which is why it goes well with plain steamed rice. The Japanese palate, in general, is gravitated to salty, savory foods.
Here are my suggestions:
- Make my homemade curry roux.
- Use water or half water half chicken stock instead of all chicken stock (because the saltiness of the stock varies).
- Use less curry roux.
- Add more water to dilute the roux, but note that the curry sauce will be more watery.
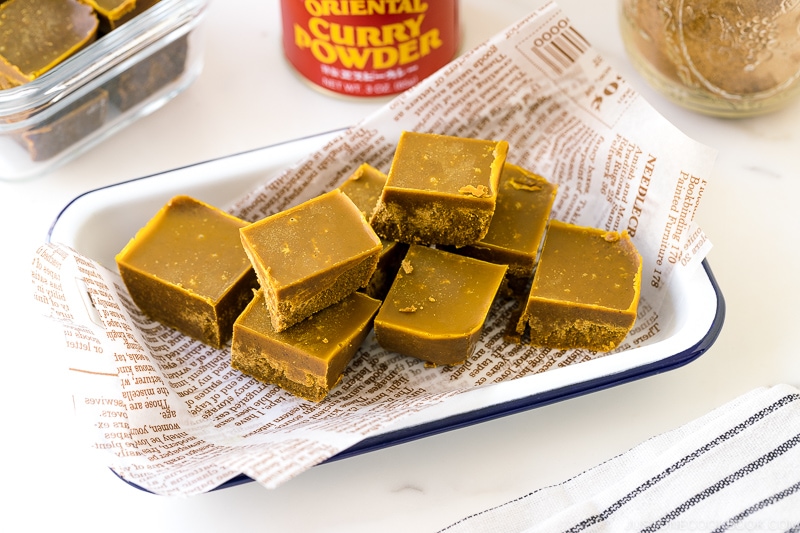
Homemade Japanese Curry Roux
Although the boxed stuff may spare you some time in the kitchen, you’ll be surprised at how easy it is to make your own Japanese Curry Roux at home. And just like all curries, curry roux is best made from scratch. What are the other good reasons for homemade roux?
- No MSG, artificial flavors, or other food additives are commonly found in boxed mixes.
- You can customize the flavor, spice level, salt level, and thickness.
- You can also make it gluten-free or vegetarian/vegan-friendly.
If you decide to make the Curry Roux from scratch, it only takes 30 minutes. Click here for the recipe.
Secret Ingredients – Personalize Your Curry
My mom always adds some grated apples and different condiments to the curry. She says, “If you use just the boxed curry roux, your curry will always taste the same. It will not be different from your neighbor’s curry.”
So she taught me two tricks. 1) Use two different brands of curry roux – you can even mix the spice levels, like mild and medium spicy. 2) Use additional seasonings.
My mom and I would use a few combinations of the following ingredients to enhance the flavor and give some complexity to the curry.
* Bold items are our frequently used condiments.
* Use 1-3 tsp of secret ingredients to start. These are supposed to be “secret” ingredients and you don’t need to add a lot of it.
* Add the secret ingredients with the broth/water and cook together.
Sweet Taste
- Chutney
- Grated apple
- Honey (Amylase in honey breaks starch and causes viscosity loss; therefore, add honey with broth and cook it. Do not add it after the curry roux as the curry will become watery.)
- Ketchup
- Mashed banana
- Mirin
- Orange/Apricot jam
Refreshing/Sour Taste
- Lemon (Add right before serving)
- Tomato
- Yogurt
Spicy Taste
- Red chili pepper
- Black pepper
- Cayenne pepper
Fragrance
- Cumin
- Bay leaf
- Cinnamon
- Curry leaves
Umami and Depth
- Butter (Add with roux)
- Chocolate (Add with roux)
- Garlic cloves (Add while sauteeing)
- Fresh ginger (Add while sauteeing)
- Instant coffee
- Milk (Add with roux)
- Oyster sauce
- Red wine
- Sake
- Soy sauce
- Tonkatsu sauce or Worcestershire Sauce
8 Helpful Tips to Make Japanese Chicken Curry
Tip #1: Cut ingredients into uniform shape
This helps to cook everything evenly at the same time.
- Chicken: I recommend a Japanese cutting technique called sogigiri (そぎ切り), which slices the ingredient at an angle for more surface area.
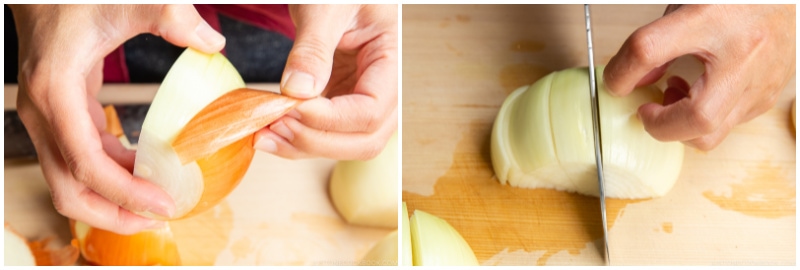
- Onions: I cut into thick wedges for additional texture.
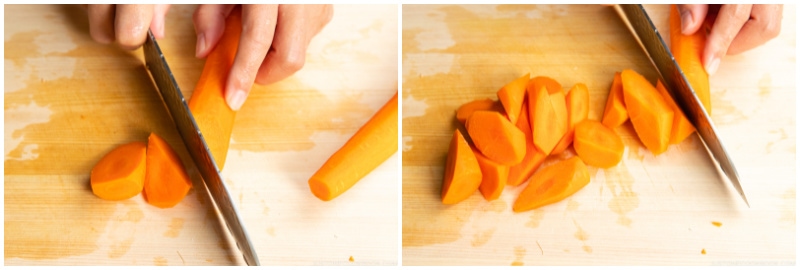
- Carrots: It takes time to cook carrots, so I recommend another Japanese cutting technique called rangiri (乱切り), which is a rotating cut. You rotate the ingredients as you cut. This creates a more open surface.
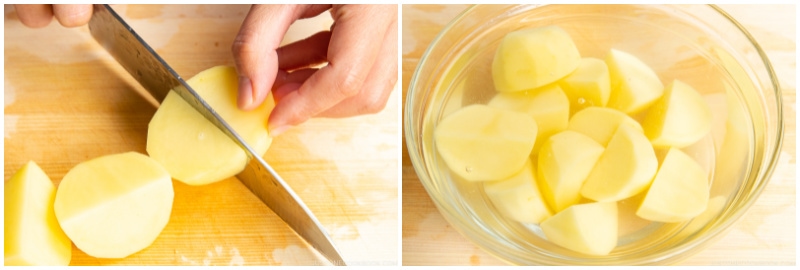
- Potatoes: I recommend Yukon gold potatoes for curry if you prefer to keep the potato shape in the final presentation. Russet potatoes tend to get dissolved by the end of cooking. Cut into 2 inches (5 cm) size, which is ideal.
Tip #2: Cook the onion till tender and golden
The nicely browned onions add a ton of flavor to the final curry. If you have an additional 5-10 minutes, caramelize the onion.
Tip #3: Cover the ingredients with just enough broth (or water)
When you add the broth/water, be sure the ingredients are covered with enough water and not submerged completely. The “barely covering” situation is called hita hita (ひたひた) in Japanese. The ingredients will release more moisture into the cooking liquid as you simmer.
Tip #4: Add “Secret Ingredients” to the broth
Add your ‘secret ingredients’ with the broth before you bring everything to a simmer, before adding the curry roux.
Tip #5: Do not forget to skim
Skimming is a significant step in Japanese cooking. We skim the scum and impurities to achieve a refined taste.
Get a fine mesh skimmer and fill up the measuring cup with water. Skim the impurities and dunk the skimmer in the water to clean. Repeat until the broth is clean.
Tip #6: Add two cubes of curry roux at a time
Make sure all the curry roux cubes are dissolved completely. You don’t want to bite into a chunk of curry cube while eating!
Fill up a ladle with broth and add two cubes. Using a spoon or chopsticks, let the roux dissolve completely. Then, add two more cubes and repeat.
Tip #7: Watch out when simmering curry
Always watch the curry after you add the roux. The thick curry sauce gets burnt easily at the bottom of the pot.
- Need to simmer uncovered for 10 minutes after adding curry roux.
- Use low heat to simmer.
- Stay in the kitchen, and keep stirring!
Tip #8: Make a big batch and store
Japanese curry is ideal for freezing. I often cook up a big batch of leftovers and keep them in the refrigerator for a few days or in the freezer for up to a month.
Oh, one more thing! Starches like potatoes and sweet potatoes will change their texture after freezing, so remove them if you plan to freeze the curry.
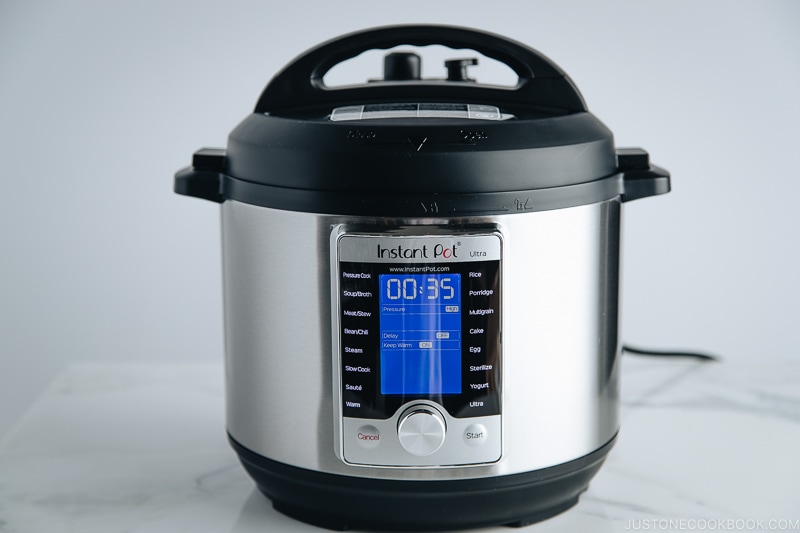
Make Japanese Curry in a Pressure Cooker
Do you own an Instant Pot or a pressure cooker? You can also prepare this comfort dish using my Instant Pot (Pressure Cooker) Japanese Curry recipe.
What to Serve with Japanese Curry

We typically serve the Japanese curry over rice alongside fukujinzuke, a relish made of finely chopped vegetables such as daikon, eggplant, and lotus root, pickled in a soy sauce-based liquid. It will warm you right up!
I hope you enjoy this delicious Japanese Chicken Curry recipe!
More Delicious Japanese Curry Recipes
Wish to learn more about Japanese cooking? Sign up for our free newsletter to receive cooking tips & recipe updates! And stay in touch with me on Facebook, Pinterest, YouTube, and Instagram.
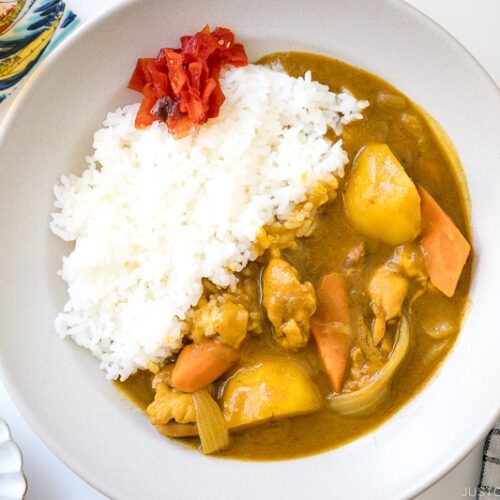
Japanese Chicken Curry
Video
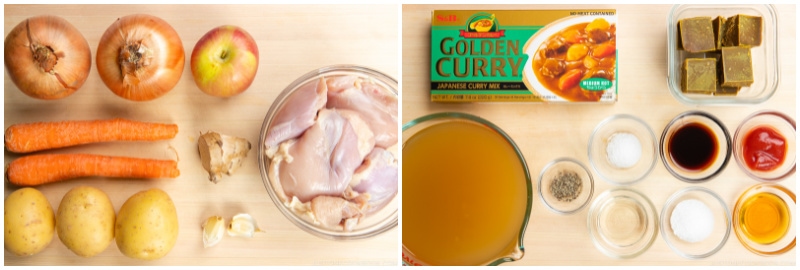
Ingredients
- 2 onions (large; 1.5 lb, 670 g)
- 2 carrots (6.7 oz, 190 g)
- 3 Yukon gold potatoes (15 oz, 432 g)
- 1 tsp ginger (grated)
- 2 cloves garlic
- ½ apple (6 oz, 170 g)
- 1½ lb boneless, skinless chicken thighs (see Notes for substitutions)
- freshly ground black pepper
For the Curry Sauce
- 1½ Tbsp neutral oil (for cooking)
- 4 cups chicken stock/broth (for lower sodium, use water only or half stock and half water)
- 1 Tbsp honey
- 1 Tbsp soy sauce
- 1 Tbsp ketchup
- 1 package Japanese curry roux (7–8 oz or 200–230 g; or make my Japanese Curry Roux)
For Serving
- 8 servings cooked Japanese short-grain rice
- fukujinzuke (Japanese red pickled vegetables) (optional; or make my Homemade Fukujinzuke)
Instructions
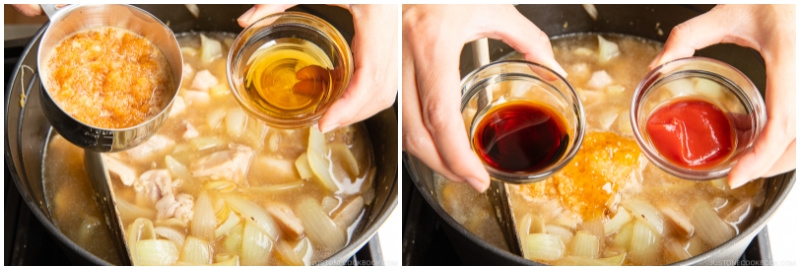
- Gather all the ingredients. Please read my blog post on the “secret ingredient” we add to the curry. For this recipe, I add ginger, garlic, apple, honey, soy sauce, and ketchup.

To Prepare the Ingredients
- Cut 2 onions into wedges. I like to have the texture of the onions in my curry, so I cut them into thick wedges. If you prefer, you can mince or thinly slice the onions so they disintegrate into the sauce.
- Peel 2 carrots and cut them into rolling wedges (it‘s called rangiri in Japanese). This type of cut creates more surface area, which helps the carrots absorb more flavor and cook faster.
- Peel 3 Yukon gold potatoes and cut them into quarters. Soak them in water for 15 minutes to remove excess starch. Tip: Yukon gold potatoes hold their shape well. You can use russet potatoes, but they tend to disintegrate into the broth during cooking, so cut them into 6 pieces each and add to the pot toward the end of cooking.
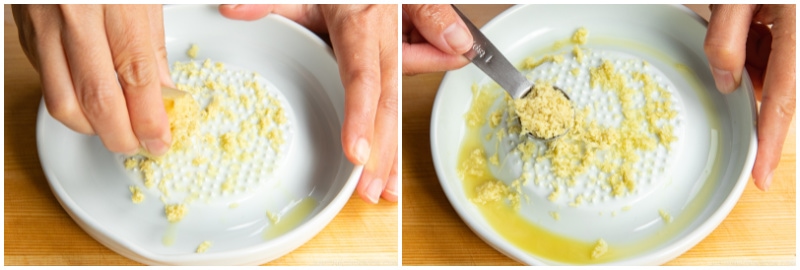
- Grate the ginger (I use a ceramic grater) and measure 1 tsp ginger with the juice. Set aside. Mince 2 cloves garlic and set aside (I use a garlic press later when adding to the pot).
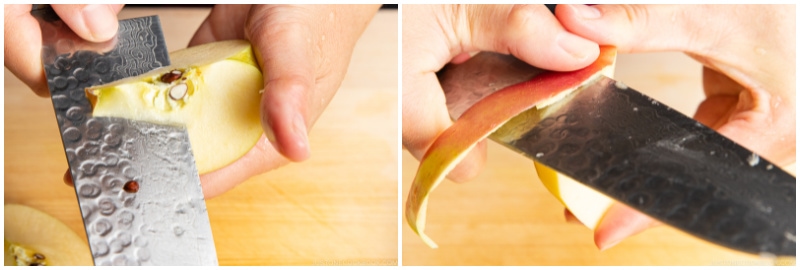
- Cut ½ apple into quarters, remove the core, and peel the skin.
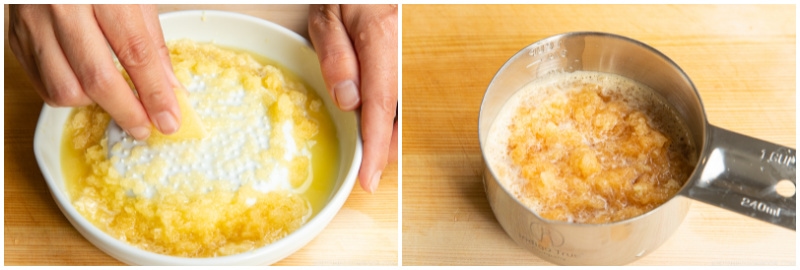
- Grate the apple and set aside. Note: You also could use 1 small lunchbox apple for 8 servings.
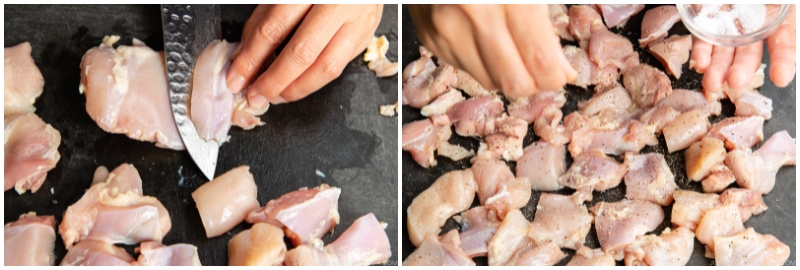
- Cut off the extra fat from 1½ lb boneless, skinless chicken thighs and discard it. Then, cut the chicken into bite-sized pieces. I recommend cutting it diagonally (it‘s called sogigiri in Japanese) to create more surface area and flatten each piece so it cooks faster. Season with freshly ground black pepper. Tip: If you will use homemade curry roux, you can lightly season the chicken with kosher salt as well.
To Cook the Curry
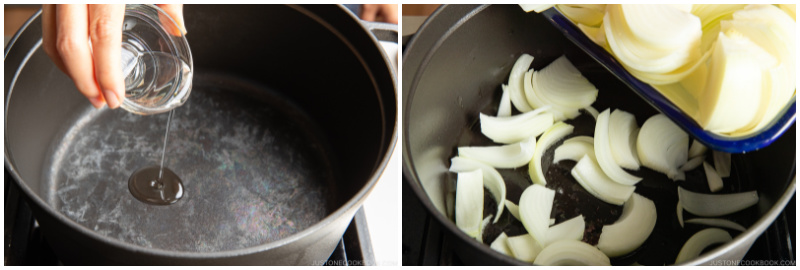
- Heat 1½ Tbsp neutral oil in a large pot over medium heat and add the onion.
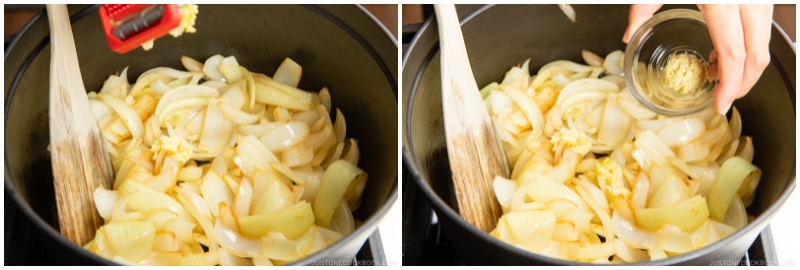
- Sauté the onions, stirring occasionally, until they become translucent and tender, about 5 minutes. Don‘t stir the onions too often because they won’t develop a golden color. Cooked onions add amazing flavor, so we do not want to skip this step. If you have an extra 5 minutes, definitely caramelize the onions!
- Add the minced garlic (I pass it through a garlic press for a finer texture) and grated ginger and mix well together.
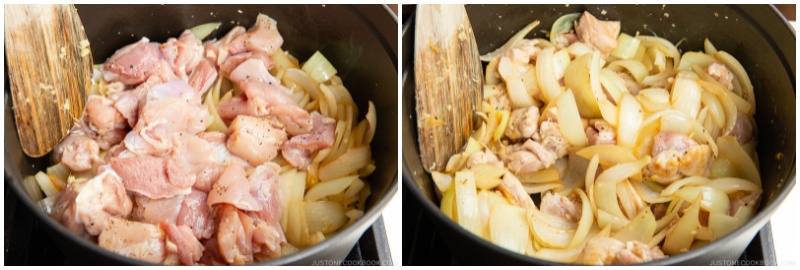
- Add the chicken and cook, stirring frequently, until it‘s no longer pink on the outside. If the onions are getting too brown, reduce the heat to medium low temporarily.
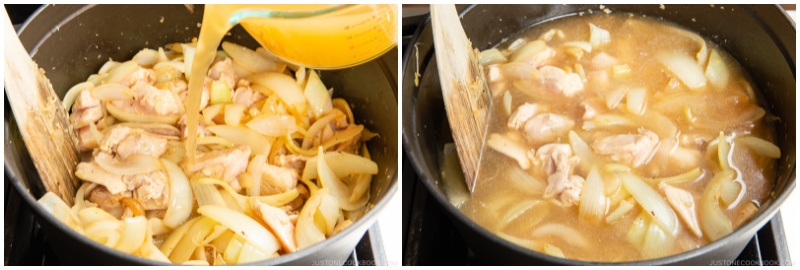
- Add 4 cups chicken stock/broth. To reduce the sodium, you can substitute with water only or use half stock and half water, if you prefer. Tip: If you‘re using my homemade curry roux, you don‘t need to worry as it does not contain salt.
- Add the grated apple, 1 Tbsp honey, 1 Tbsp soy sauce, and 1 Tbsp ketchup (or any condiment you choose to add). Please read my blog post for details.
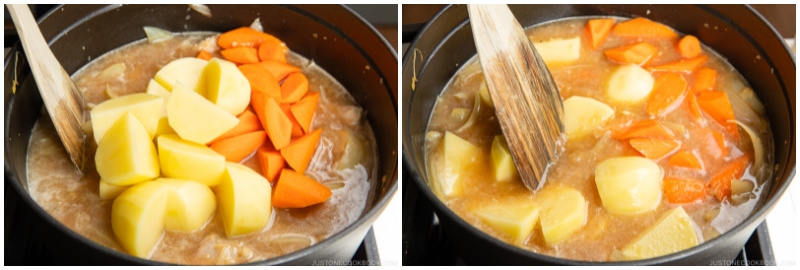
- Add the carrots and Yukon gold potatoes (if you‘re using russet potatoes, add them later in the last 15–20 minutes of cooking). The broth should barely cover the ingredients. Don‘t worry; we don‘t want too much liquid here, and additional liquid will be released from the meat and vegetables.
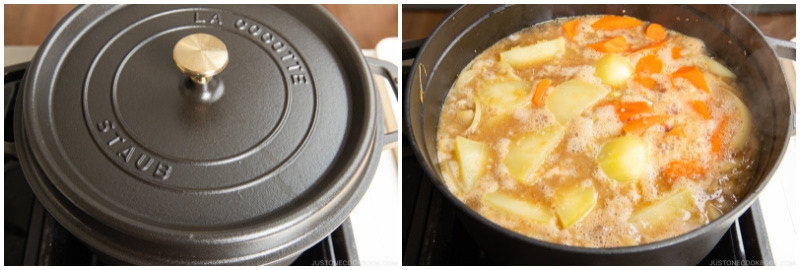
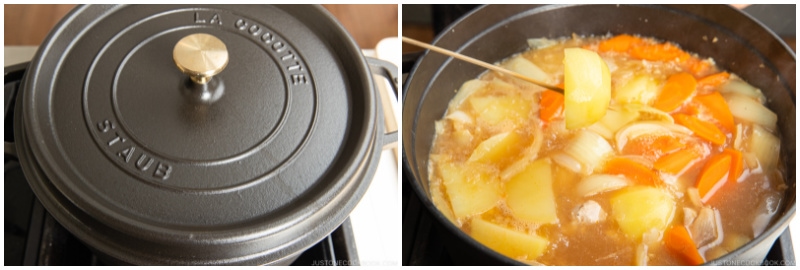
- Simmer, covered*, on medium-low heat for 15 minutes, stirring occasionally. *Simmer uncovered if the ingredients are completely submerged in the broth.
- Once boiling, use a fine-mesh strainer to skim the scum and foam from the surface of the broth.
- Continue to cook covered until a wooden skewer goes through the carrots and potatoes.


To Add the Curry Roux
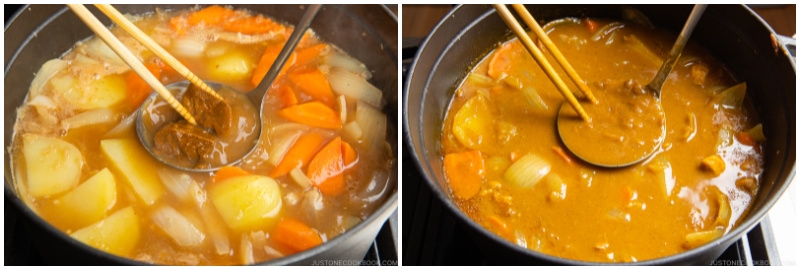
- Turn off the heat. From 1 package Japanese curry roux, put 1–2 cubes in a ladleful of cooking liquid. Slowly let it dissolve with a spoon or chopsticks and stir into the pot to incorporate. Repeat with the rest of the blocks, 2 cubes at a time. Tip: I use 1 full-sized box of store-bought curry roux, which is typically for 8–12 servings (be careful, as some brands offer a smaller box, which is 4 servings). With my homemade curry roux, I typically use 6–7 cubes for 8 servings (about 80% of the curry roux mixture if it hasn‘t solidified yet).
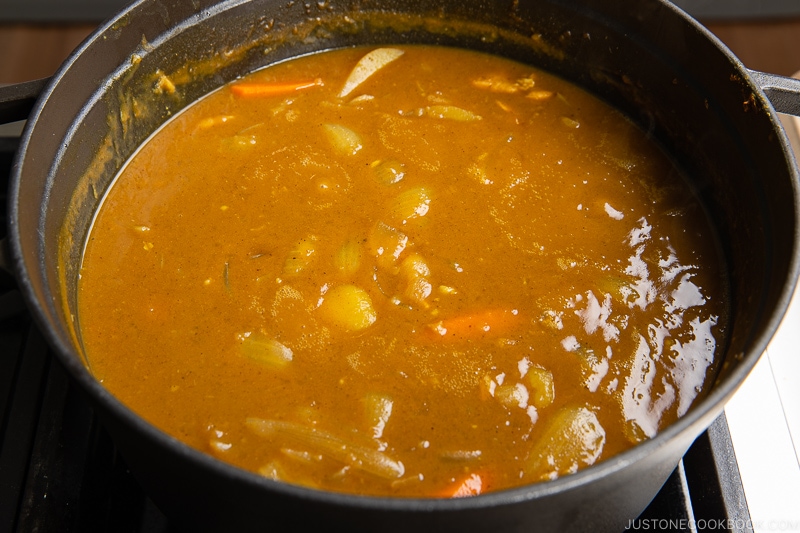
- Simmer, uncovered, on medium-low heat, stirring frequently, until the curry becomes thick, about 5–10 minutes. If your curry is too thick, you can add water to thin the sauce. When you stir, make sure that no roux or food is stuck to the bottom of the pot; otherwise, it may burn.

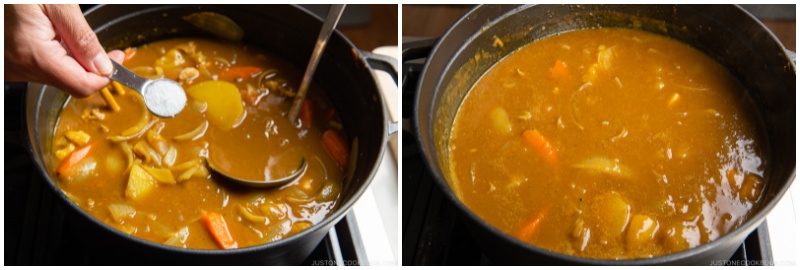
- If you use my unsalted homemade curry roux, taste the curry now and add salt to your liking. Tip: I recommend adding 2–4 tsp Diamond Crystal kosher salt, but this will vary based on the brand of the chicken broth and condiments you added.
To Serve
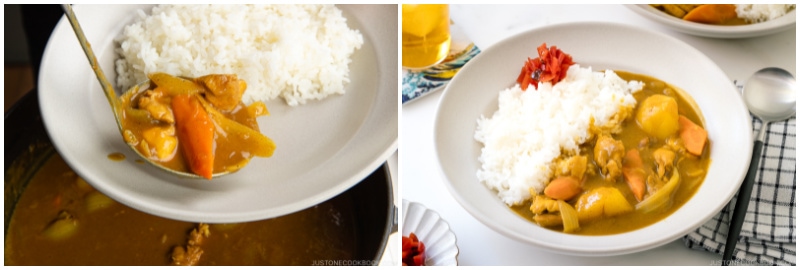
- Serve the curry with steamed Japanese short-grain rice on the side. If you like, garnish with fukujinzuke (Japanese red pickled vegetables).
To Store
- You can keep the leftovers in a glass airtight container (so no stains!) and store it in the refrigerator for up to 3 days and in the freezer for a month. The texture of the potatoes will change in the freezer, so you should take them out before freezing. Defrost the frozen curry in the refrigerator for 24 hours before you want to reheat it.
To Reheat
- Leftover curry sauce will thicken into a paste as it cools, so it tends to burn while reheating. To avoid this, stir ½ cup (120 ml) water or more into the leftover sauce until loosened. Then, gently reheat it on low heat. If the sauce seems thin, continue heating with the lid off to reduce the sauce.
Notes
Nutrition
Editor’s Note: The post was originally published on Mar 19, 2013. The blog content has been updated, and new images and new video have been added, and the recipe has been slightly revised in October 2021.


I just wanted to let you know that I make this recipe at least once a month. I used to live in Hawai’i and would eat at Curry House CoCo Ichibanya all the time. This is a great substitute recipe for it. Thanks! <3
Hi Jaquelyn! Thank you so much for your kind feedback. I’m so happy to hear you like this dish! Mr. JOC used to like Curry House CoCo too, but now he is happy with homemade curry. I’ve tried it in LA and Taiwan, and I think our curry freshly made at home is better. 😀 Hope you will try adapting the curry to your liking and make your own version! 🙂
This recipe is amazing! I have been cooking Japanese curry with the S&B curry roux and have been having a hard time getting my partner to agree to me making it for dinner because they thought it was too bland. Your recipe changed that! They said “This one is actually flavorful. It’s good!” I’m so happy because I love Japanese curry but wasn’t getting to make it as often as I liked due to the “blandness”. Now I won’t feel guilty when I make it for dinner! I agree this recipe really adds some needed flavor to the curry roux and it is just DELICIOUS. Thank you so much Nami!
Hi Erica! I’m happy to hear your kind feedback and thank you! I’m happy to hear you get to enjoy Japanese curry. 🙂
I just made this, and it’s super tasty! I can’t eat gluten though, so I used your recipe for curry roux, replacing the 4 Tbs flour with 2 Tbs superfine brown rice flour and 2 Tbs potato starch (and I used GF soy sauce, too). The final curry was a tad thicker, but still delicious. Thanks for the great recipe!
Hi Karin! I’m so glad to hear you liked this recipe, and thanks so much for sharing GF option! My readers will appreciate your information. 🙂
Oh my gosh, I love Japanese curry so much. I’ve been making it for myself since high school, but your recipe looks so much tastier. I have a suggestion for eating it leftover in a lunch or as a snack. If you take roasted seaweed sheets and wrap bites of curry in them, it’s super tasty! Thank you so much for your recipe, I look forward to making it.
Hi Mellie! I hope you enjoy this recipe! Thanks for sharing the new way to enjoy the curry with roasted seaweed! 🙂
I love this recipe! I originally found it while I was searching for a way to make the curry roux at home – we used to buy the packaged blocks, but when we started eating less packaged foods, I wanted to make it myself. We have made the Chicken Curry a half dozen times or so – and tonight I made the recipe with leftover duck and homemade duck stock from our Valentine’s Day dinner. This is fabulous and so very versatile! Thank you so much for this recipe, and for your whole site. It is amazing!
Thank you so much for your kind feedback Amanda! I am happy to hear you like this recipe! I love duck… You must have made delicious curry! 🙂
I have made this recipe several times – my girls love it. What a great website with fantastic recipes. Keep up the good work!
Hi Aaron! Thanks so much for your kind feedback! I’m happy to hear you all enjoyed it! 🙂
Thanks Nami! I’ve made this dish a couple of times and I loved it ^^ x
Thank you so much for your kind feedback AngelC! 🙂
Hello. Just stumbled upon your website yesterday and saw this recipe. I’m not very comfortable with cooking and the detailed recipe with pictures is just great! Haven’t found many of those. Will be making this recipe once I get curry powder and will tell you how it goes. Looking forward to browsing through more recipes. Thanks!
Hi Sarah! I hope you enjoy this recipe and thank you for your feedback. More recent recipes/posts include videos and I hope you find them helpful as well. Good luck! 🙂
Growing up, this was the only type of curry I knew existed! Thai or Indian curries are ok but this is certainly my favorite. I hadn’t made it myself until tonight. It was fantastic! I added a red bell pepper and a celery stalk but otherwise followed the recipe. Thanks for sharing it!
Hi Mub! So happy to hear you enjoyed this curry recipe! I also grew up eating Japanese curry only…but now I love Thai curry. 😀 Thank you very much for your kind feedback. It means a lot to me! 🙂
Hi Noel! With the amount of ingredients used this recipe (I am talking about chicken, potatoes, etc), 2 1/2 cups of water is not enough to cover to cook the ingredients (See step 9). You lose some of liquid by skimming and evaporating, so 4 cups is necessary to cook for this amount of ingredients.
The box doesn’t require the same amount of ingredients, therefore 2 1/2 cup maybe enough. If you put less ingredients than specified amount, most likely you won’t need that much water as well. Hope this explanation makes sense.
I usually use one box to make curry (I don’t always use homemade roux), and I use pretty much same amount of ingredients as shown here, so I believe it should work.
For those who are worried, I’d say to adjust the amount of stock/water according to the ingredients you use. Please also note that if you put too many ingredients (=more liquid required), then you may not have enough roux.
Hi, thisis great I’m trying it today. If I knew it was so easy, I wouldn’t have paid $15 for my fix everyweek all these years! Will you be doing a Ramen recipe any time soon?
Hi P! Hope you enjoy this recipe! I do have Miso Ramen and Spicy Shoyu Ramen if you’re interested… Thank you!
https://www.justonecookbook.com/recipes/homemade-chashu-miso-ramen/ (with video)
https://www.justonecookbook.com/recipes/spicy-shoyu-ramen/
I loved this recipe! It was really easy and very hearty. I love one pot recipes too.
If I were to put some daikon radish in the next time I made this, how would you recommend cooking it? Should I basically treat it like a carrot?
Hi Jonathan! I love one pot recipes too, especially in winter time. Thanks so much for trying this recipe. I’m so glad you like it! Yes, daikon takes slightly longer to cook than carrot. I’d cut a bit smaller than carrot so that cooking time is about the same. Hope this helps! 🙂
Hi Nami,
I grew up eating Vermont curry in Yokohama and love Japanese curry but not very keen on processed food. After coming across your homemade curry roux recipe I decided to give it a go and my partner and I were very happy with the result. We also found that the flavour improves with time – we packed the left overs and took it on our ski holiday with us (to Vermont actually 🙂 Thanks for the great recipe!
Hi Cath! Hahaha, instead of the packaged Vermont Curry, you were eating homemade curry in Vermont! That’s awesome! 😀 I’m glad to hear you two enjoyed this recipe! Thank you very much for your kind response. 🙂
Tried this out tonight! Absolutely fantastic! Thanks for sharing 😀
Thank you for your kind feedback Michelle! So happy to hear you enjoyed this dish. 🙂
Thank you so much for this delicious recipe. Like the previous poster, I always just followed the instructions on the box of curry roux. Your recipe makes it so much more delicious!!
Hi Allison! Thank you for your kind feedback! The package tastes pretty good but it will always taste the same. Adding other ingredients (yogurt, soy sauce etc) give the curry taste a bit more depth. 🙂 So happy to hear you liked this recipe. Thank you for writing! 🙂