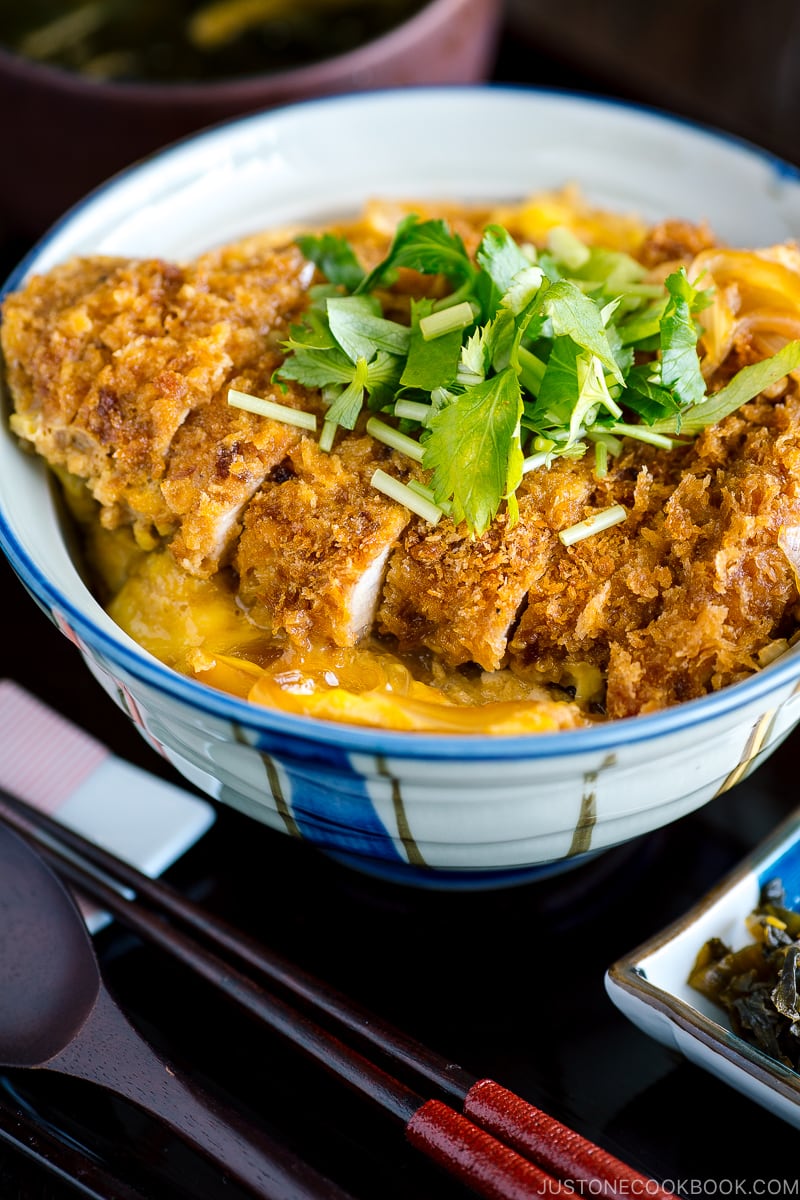
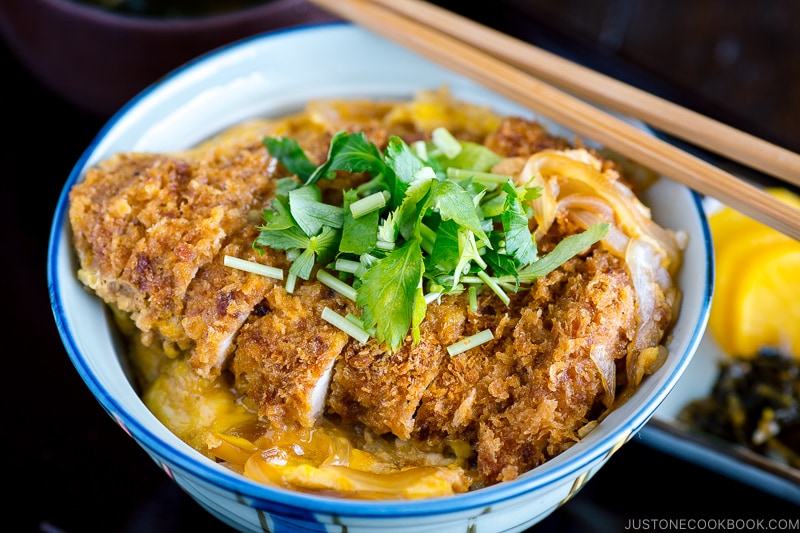
With a crispy pork cutlet and runny egg simmered in a savory broth and served on a bed of hot steamed rice, this Baked Katsudon (Pork Cutlet Rice Bowl) is pure comfort. Follow my tips for baked tonkatsu that is juicy and extra crunchy—and just as good as the deep-fried version.
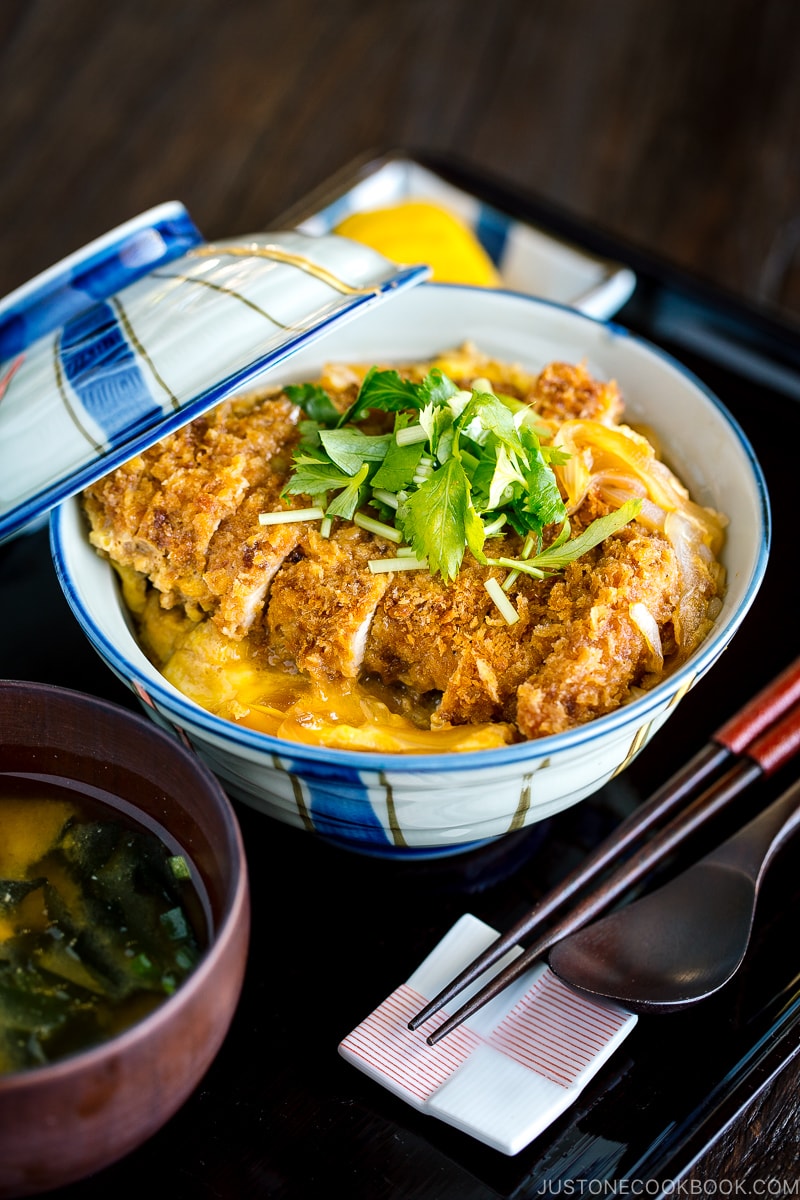
Are you a big fan of Japanese deep-fried pork cutlet Tonkatsu? Then don’t miss out on this simple and delicious donburi –Katsudon (カツ丼). The true soul food of Japan, Katsudon is said to have the ability to warm the coldest of hearts. Case in point: Irresistibly juicy cutlet, creamy eggs, and steamed rice soaked in a savory sauce, Katsuson is nothing but pure comfort.
The cutlets typically get their crunchy texture from deep frying, but today we’re going to take the mess-free route and make Baked Katsudon (揚げないカツ丼). Follow my simple tips, you’ll be able to achieve the same golden katsu for your rice bowl. I promise the baked version is just as good as deep-fried one.
3 Secrets to Make Delicious Baked Katsudon
1. Pre-Toast The Panko Breadcrumbs
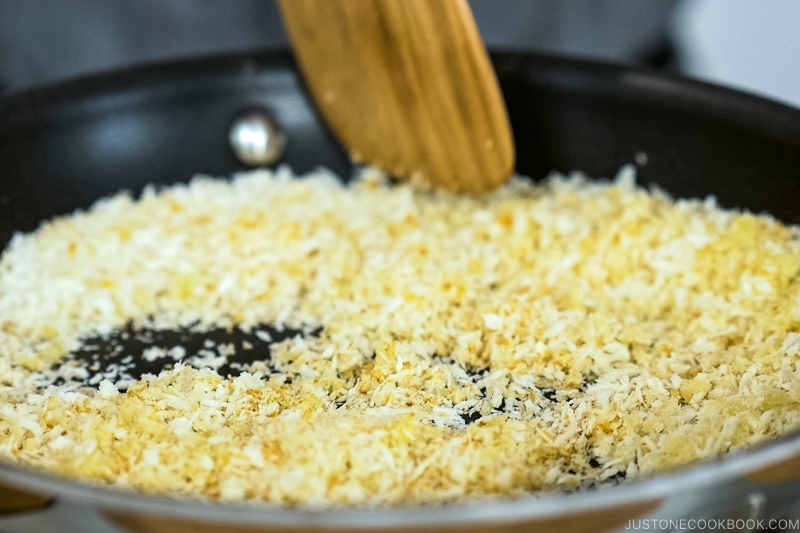
Before breading the pork cutlets, pre-toast the panko in a frying pan until nicely brown. Since we’re not deep frying the cutlets, this step is the golden trick in achieving a beautiful crust and crunchy texture for the baked tonkatsu.
I use the same technique for my Baked Tonkatsu or Baked Chicken Katsu recipes.
2. Make One Serving At a Time
When making Donburi dishes like Katsudon and Oyakodon, we make one serving at a time using a special Oyakodon Pan (親子丼鍋). This way, you can keep the balance of ingredients and distribute them evenly. It also makes it easier to transfer the cooked food over to the rice as the size of the cooking pan is similar to a donburi bowl.
In this recipe/ video, I used my mom’s Oyakodon pan that I found in her kitchen last summer. I brought it home with me and I’m happy that I could use it in this recipe.
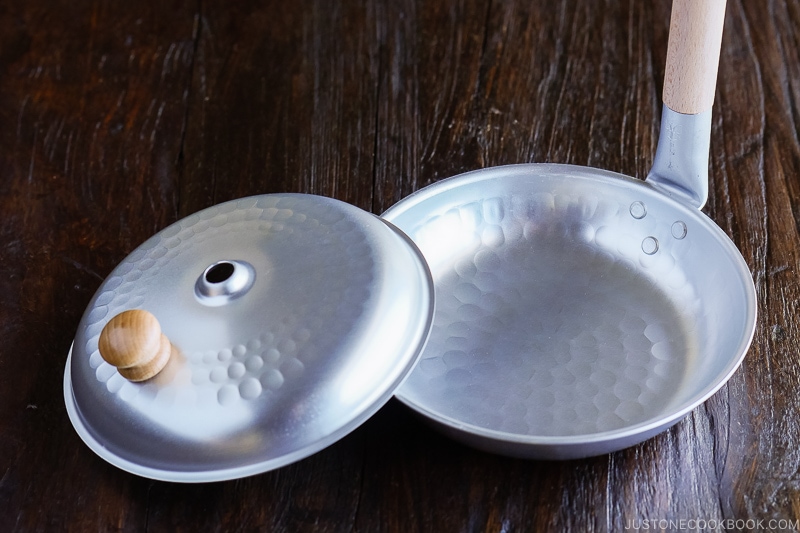
However, my mom’s pan is smaller and shallower than what we can get these days. So I got a brand new Oyakodon pan with a lid (picture above). Alternatively, you can use a 5-6 inch pan instead.
3. Use Good Dashi
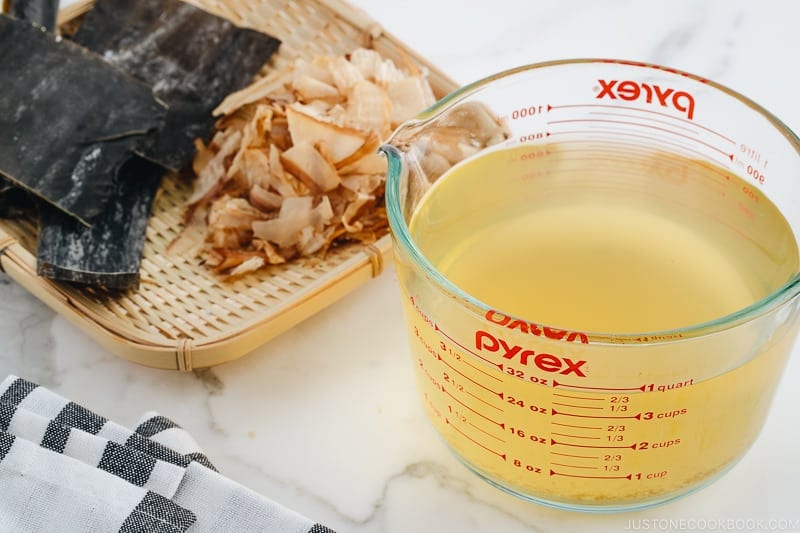
When you make Katsudon sauce, it’s important to use good dashi. I highly recommend making your own dashi, but if you’re too busy, you can use a dashi packet. It still tastes better than dashi made with dashi powder. For vegan/vegetarian, use Vegan Dashi.
Donburi – The Ultimate Comfort Food
If rice bowl is your type of dinner, you will enjoy this Baked Katsudon as much as I do. The contrast of juicy panko-crusted pork, sautéed onion, soft eggs, fluffy steamed rice, and a flavorful sauce, all come together to deliver a bowl of deliciousness.
For more mouthwatering Japanese fried foods in baked versions, try out my Baked Croquettes and Baked Chicken Katsu recipes!
More Delicious Donburi Rice Bowl Recipes You’ll Love:
Wish to learn more about Japanese cooking? Sign up for our free newsletter to receive cooking tips & recipe updates! And stay in touch with me on Facebook, Pinterest, YouTube, and Instagram.

Baked Katsudon (Japanese Crispy Baked Cutlet Rice Bowl)
Video
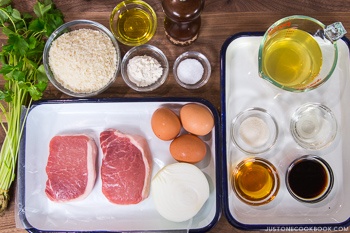
Ingredients
For the Baked Tonkatsu
- 1 cup panko (Japanese breadcrumbs)
- 1 Tbsp neutral oil
- 2 pieces boneless pork loin chops (½-inch thick) (4 oz, 113 g each; for vegan/vegetarian, use tofu or other plant-based meat substitutes)
- 1 tsp Diamond Crystal kosher salt
- freshly ground black pepper
- 1–2 Tbsp all-purpose flour (plain flour)
- 1 large egg (50 g each w/o shell)
For the Katsudon
- ½ onion (divided; ¼ onion per serving)
- 2 large eggs (50 g each w/o shell) (divided; 1 egg per serving; for vegan/vegetarian, use egg substitute such as JUST Egg)
- 2 servings cooked Japanese short-grain rice (typically 1⅔ cups (250 g) per donburi serving)
For the Sauce
- 1 cup dashi (Japanese soup stock) (I use a standard Awase Dashi made with kombu and katsuobushi; for vegan/vegetarian, make Vegan Dashi)
- 2 Tbsp sake
- 2 Tbsp mirin
- 2 Tbsp soy sauce
- 2 tsp sugar
For Serving
- 4 sprigs mitsuba (Japanese parsley) (optional; or use chopped green onion/scallion)
- shichimi togarashi (Japanese seven spice) (optional)
Instructions
Before You Start…
- For the steamed rice, please note that 1½ cups (300 g, 2 rice cooker cups) of uncooked Japanese short-grain rice yield 4⅓ cups (660 g) of cooked rice, enough for 2 donburi servings (3⅓ cups, 500 g). See how to cook short-grain rice with a rice cooker, pot over the stove, Instant Pot, or donabe.
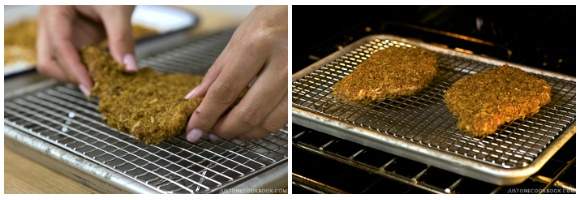
- Gather all the ingredients. Adjust the oven rack to the middle position and preheat the oven to 400ºF (200ºC). For a convection oven, reduce the cooking temperature by 25ºF (15ºC). Prepare a rimmed baking sheet with an oven-safe wire rack or line it with parchment paper. I prefer to use a wire rack as it allows hot air to circulate around the cutlets and prevents the panko underneath from getting crushed.

To Toast the Panko
- Combine 1 cup panko (Japanese breadcrumbs) and 1 Tbsp neutral oil in a frying pan. Toast the panko over medium heat, stirring frequently, until golden brown. Transfer the toasted panko into a shallow dish and allow to cool.


To Prepare the Pork
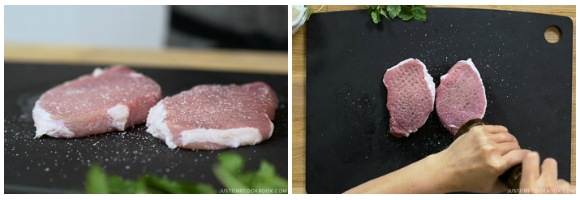
- Cut off the extra fat from 2 pieces boneless pork loin chops (½-inch thick). Make several slits on the connective tissue between the meat and remaining fat. Tip: Red meat and fat have different elasticities, and they will shrink and expand at different rates when they are cooked. Making a few slits will allow the tonkatsu to stay nice and flat and prevent the cutlets from curling up.

- To tenderize the meat, pound both sides of the cutlets with a meat pounder; if you don’t have one, then use the back of the knife. Mold the flattened meat back into the original shape with your hands.
- Sprinkle the cutlets with 1 tsp Diamond Crystal kosher salt and freshly ground black pepper.
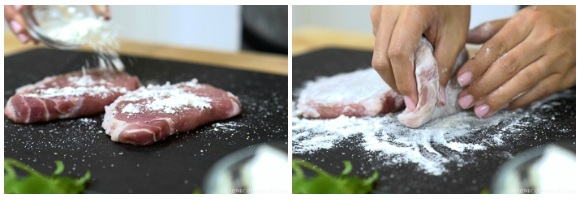
- Dredge the pork pieces in 1–2 Tbsp all-purpose flour (plain flour) to coat completely. Pat off the excess flour.
- Next, beat 1 large egg (50 g each w/o shell) in a bowl. Then, dip the pork into the beaten egg and coat with the toasted panko. Press on the panko flakes to make sure they adhere to the pork.


To Bake
- Place the pork cutlets on the wire rack or parchment paper on the prepared baking sheet. Bake at 400ºF (200ºC) until the pork is no longer pink inside, about 20 minutes.
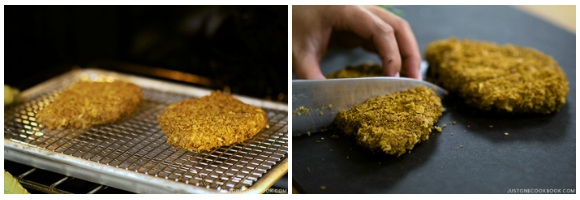
- Remove the tonkatsu from the oven and cut into 1-inch (2.5-cm) pieces (so you can eat them with chopsticks). Press the knife directly down into the cutlets, instead of sawing back and forth. This way, the panko crust will stay on the meat. Set aside for now.
To Prepare the Katsudon Ingredients
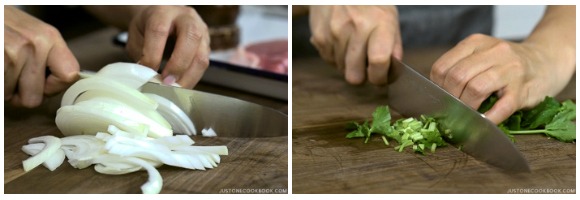
- Cut ½ onion into thin slices and divide into 2 portions. Chop 4 sprigs mitsuba (Japanese parsley) (optional) into small pieces.
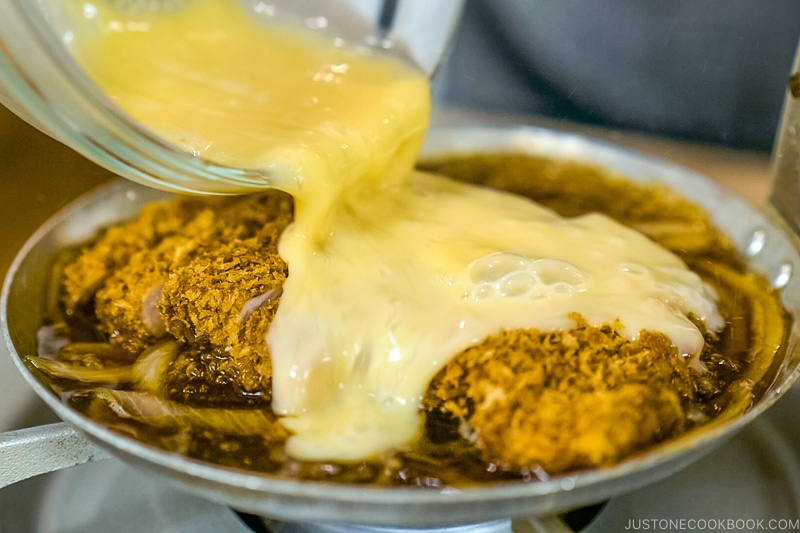
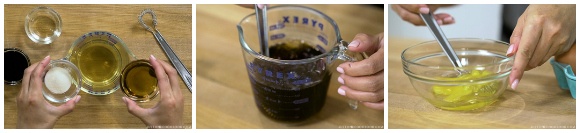
- Combine the sauce ingredients in a liquid measuring cup or bowl: 1 cup dashi (Japanese soup stock), 2 Tbsp sake, 2 Tbsp mirin, 2 Tbsp soy sauce, and 2 tsp sugar. This amount could be more than you need, depending on the frying pan size you use. You can store the extra in a mason jar in the refrigerator for up to a week. In a separate small bowl, beat one of the 2 large eggs (50 g each w/o shell).
Why Use an Oyakodon Pan?
- In the following step-by-step instructions, I will show you how to make Katsudon using a traditional single-serving oyakodon pan. The oyakodon pan is similar in size to a donburi bowl; therefore, the food cooks in the right size and shape to slide easily onto the steamed rice in the bowl. You can make two servings at once in one large frying pan and carefully divide it, but each portion won't be a round shape that fits perfectly into the donburi bowl.

To Make the Katsudon
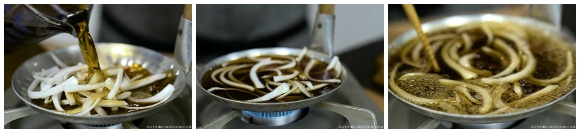
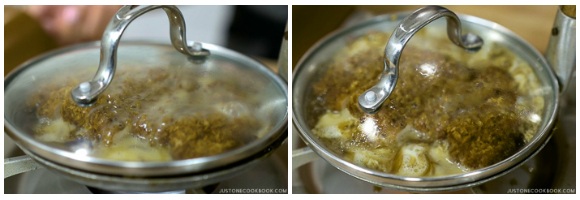
- For each serving, put 1 portion of the onion slices into the pan and pour ½–¾ cup (120–180 ml) of the sauce on top to cover them. Adjust the amount of sauce based on your frying pan size. Bring the sauce and onions to a boil. Lower the heat to medium and cook the onion slices until translucent, about 4–5 minutes.
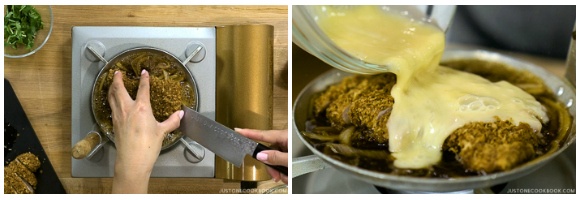
- Carefully place one baked and sliced tonkatsu cutlet on top of the onions in the sauce and turn the heat to medium high. Then, slowly drizzle the beaten egg, evenly distributing it over the tonkatsu and broth. Cover the pan with the lid.
- When the egg is half cooked, about 30 seconds, turn off the heat. The egg should be almost set but still runny.
To Serve
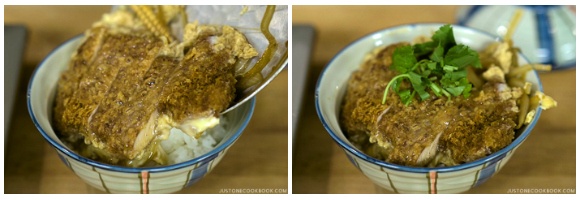
- From the 2 servings cooked Japanese short-grain rice, add 1 serving of hot steamed rice into a donburi bowl. Slide the cooked tonkatsu and egg mixture, including the sauce, on top. Continue cooking and plating the second serving. Sprinkle the chopped mitsuba on top, and serve with shichimi togarashi (Japanese seven spice) on the side.
To Store
- You can keep the leftovers in an airtight container and store them in the refrigerator for up to 3–4 days. You also can freeze the baked and cooled cutlets separately in an airtight container or freezer bag for up to a month. To reheat, bake it at 375ºF (190ºC) on a wire rack until the inside is warm.
Nutrition
Editor’s Note: The post was originally published on July 26, 2017. It’s been edited and republished in May 2020.


Nami,
This was another hit at home. The baked katsu came out perfectly. I made the broth in my instant pot on the saute setting. Everything came out wonderfully and my son is always impressed with the Just One Cookbook recipes. I’m so glad that I was searching to the takoyaki recipe and found your site!
Hi Gail! I’m so happy to hear you and your son enjoy my recipes. Thank you for trying this recipe and for your kind feedback. 🙂
Made this tonight and it was wonderful! The pork was tender and flavorful! This is a great recipe and I can’t wait to make it again. Super easy and perfect for weeknights. Made the dashi the day before, which was really convenient.
Hi Jessica! I’m so glad you enjoyed this recipe! Thank you for your kind feedback! xo
Thank you so much for this! I always thought making katsudon (one of my favourite Japanese dishes) looked way too complicated to attempt, but this recipe made it look easy so I gave it a try, and it was not only easy but also delicious 🙂 このレシピを作ってくれてありがとうございます????
Greetings from Canada!
Hi Marianne! Thank you so much for your kind feedback. I’m really happy to hear you made your favorite recipe at your own home! I’m glad to hear you liked it too. 温かいコメントありがとう!
Hi Nami, I love your recipes.
I made this, but I was a bit confused by the amounts.
1. The amount of panko seems way too high – I had 300g pork chops. But panko is cheap.
2. The Katsudon ingredients say 2 eggs, but only one is used in step 11.
3. The Katsudon sauce ingredients add up to nearly 300ml, but you only require 1/2 to 3/4 cup in step 12? This seems like a waste.
4. Similarly we slice 1/2 onion but it seems like half of the sliced onion is used in step 12?
I ended up throwing a lot away!
Hi Lionel! Thank you for writing, and here are my answers.
1) For my BAKED katsu recipes (anything that you pre-toast panko), I list 3/4 to 1 cup of panko to be safe. The reason is… If some people use the meat that’s slightly bigger piece or more (because meat is not always perfect amount), it’s highly possible that you may not have enough toasted panko to coat at Step 8.
You don’t want to toast more panko AGAIN at Step 8. So I include roughly 1/4 cup extra so that when you’re dredging, you have some panko in the tray, not exact amount of panko goes to meat.
2) This recipe is for 2 serving. One for coating the pork (Step 8), and one for Katsudon serving 1, last one for Katsudon serving 2. Each katsudon gets one egg.
3) Same reason, you are making 2 Katsudon, each one gets 1/2 to 3/4 cup. It’s a big range because not everyone has exact same pan size as I do… and I need to make sure you get enough sauce even though you have a bigger pan to cook.
4) Same reason, you’re making each Katsudon separately.
I think the confusing part is that Katsudon and Oyakodon is traditionally make individually using Oyakodon pan I mentioned in the post. Read “Secret 3: Make Katsudon for One Serving”.
I hope that cleared your question… 🙂
Hi~!
Can I use tonkatsu sauce for this?
Hi Diana! Sure! If you still want to make it as a rice bowl dish, but want to use tonkatsu sauce, you can serve like this:
https://www.justonecookbook.com/crispy-tonkatsu-donburi/
It’s faster than going through “Katsudon” style. Katsudon usually don’t get tonkatsu sauce (different flavors). 🙂
Thank you so much for your help! I look forward to making it 🙂
Hi Nami, I’m wondering if I could take this with me to work and microwave it there. Do Japanese people do that? or would it get too soggy? What do adults take to work for lunch?
Hi Nora! Japanese are used to eating room temperature bento so we don’t reheat the bento (bento is always served and enjoyed at room temperature). Microwave makes the panko soggy, so the best way to reheat is to use an oven or toaster oven (for me). The Japanese usually bring whatever leftover from the lunch or make a new food just for bento (as entire family needs lunch then it makes sense)…
Can I replace sake in this recipe with mirin?
Hi Winnie! Hmmm if you replace sake with mirin, you have to cut down on sugar. Mirin is sake + sweetener so you’re adding more sugar content. You can use Chinese rice wine instead of sake. 🙂
I’ve tried this recipe today and everybody loved it.
Thanks for sharing delicious recipes 😉
Hi Eri! I’m so happy to hear that. Thank you for trying this recipe and for your kind feedback. 🙂
MY MOTHER in law is from Japan. My 1 year old son loves husband grandmas Japanese cooking. I’m going to try this recipe tonight! IM excited to see if My husband and son like it
Hi Lacey! Hope they will enjoy! 🙂 Good luck!
Mine ended up pretty salty (though I use low sodium soy sauce) do you know what may have caused this?
Hi Leah! Thank you for trying this recipe! Hmm let me think… ok I’ll make the list.
1) The amount of salt you sprinkle at Step 6 was a little more than mine
2) The kind of salt (at Step 6). If you use table salt, it should be half of kosher salt.
3) Type of dashi. Did you use powdered dashi? It has salt in it but mine is homemade, so it doesn’t.
4) Type of sake. If you use cooking sake, instead of drinking sake, it has salt and other seasoning in it.
5) Same goes to mirin. If it’s not Hon-Mirin, it has some salt and other seasoning in it.
6) A brand of soy sauce – saltiness is different.
7) Longer you cook the sauce, the flavor is more concentrated (water evaporate) and it gets salty.
Do you think it can be one of the reasons? Maybe two combined?
That’s the only reasons that I can think of… Hope this helps?
Jennifer M. from Black Fox offered $5.00 off shipping on their rice. I jumped on this offer and I ordered two bags of their sushi rice. Not familiar with the Black Fox brand, is cooking their sushi rice follows the same procedure as other sushi rice? Should the ratio of water to rice is about 1 to 1? Arigato.
Hi Steve! Wonderful! I’m glad you got some discount on shipping! Usually Japanese short grain rice to water ratio is 1 : 1.2. 🙂
I wish it were that easy to choose what rice to buy here in Japan. On Amazon if I select Koshihikari I get 4000 entries. I haven’t got a clue so I usually go on price or customer review and I buy 10kg at a time. Wish there was some course I could go to and learn a bit more. For sake and shouchu as well, there are so many it makes my head spin !!!
Hi Angelo! I’m jealous that you get to enjoy so many kinds of rice in Japan. I truly look forward to eating rice for 2 months every year when I go back home…. I can hardly wait! The thing is… it’s really up to someone’s preference too. So what I think it’s good may not be your favorite rice. My mom usually try different rice to try out until she finds the one she likes…and eat that for a while and move on to next. But not just the brand, but freshly milled rice is truly amazing. If you can get the rice that is just milled, sometimes it tastes better than better “brand” rice, for example. Think of it as a way to explore… I am stuck with just a handful choice of rice/sake/shochu here in the Bay Area. 🙂
Are the calories with the rice included?
Hi Rosie, Yes, it includes rice, egg, and sauce as listed in the ingredients.
We hope this helps!
Great natsukashii recipes. Many dishes I never learned to cook, or knew pieces, like this tonkatsu recipe, but had only eaten at restaurant, so it’s great to know how to finish it up edge serve. I appreciate the healthy gluten free and less fat versions offered too. Great to be able to make the taste from my childhood now that my mother is gone..
Hi C. Shintaku! Thank you for your kind feedback. I hope you get to try this recipe at home! I’m sure you will remember your mother’s taste once you try and adjust to your liking, truly personal than a restaurant version!. 🙂
I made this today and it was delicious!!! Thank you so much for all of these wonderful recipes! I can’t wait to try more of your recipes!!
Hi Sunny! Thank you for trying my recipe! I’m so happy to hear you enjoyed my recipe! Thanks for your kind feedback. Hope you enjoy other recipes too. 🙂
Where do you get that whisk?
Hi Lauren! The whisk I use is here: http://amzn.to/23Xyfq1
I have a list of tools I use in this page as well, in case you’re interested: https://www.justonecookbook.com/shop/
What type of dashi would you use in this recipe?
I use awase dashi for my recipes unless I said otherwise (like Kombu dashi etc).
https://www.justonecookbook.com/how_to/how-to-make-dashi-jiru/
https://www.justonecookbook.com/how-to-make-dashi-3-ways/