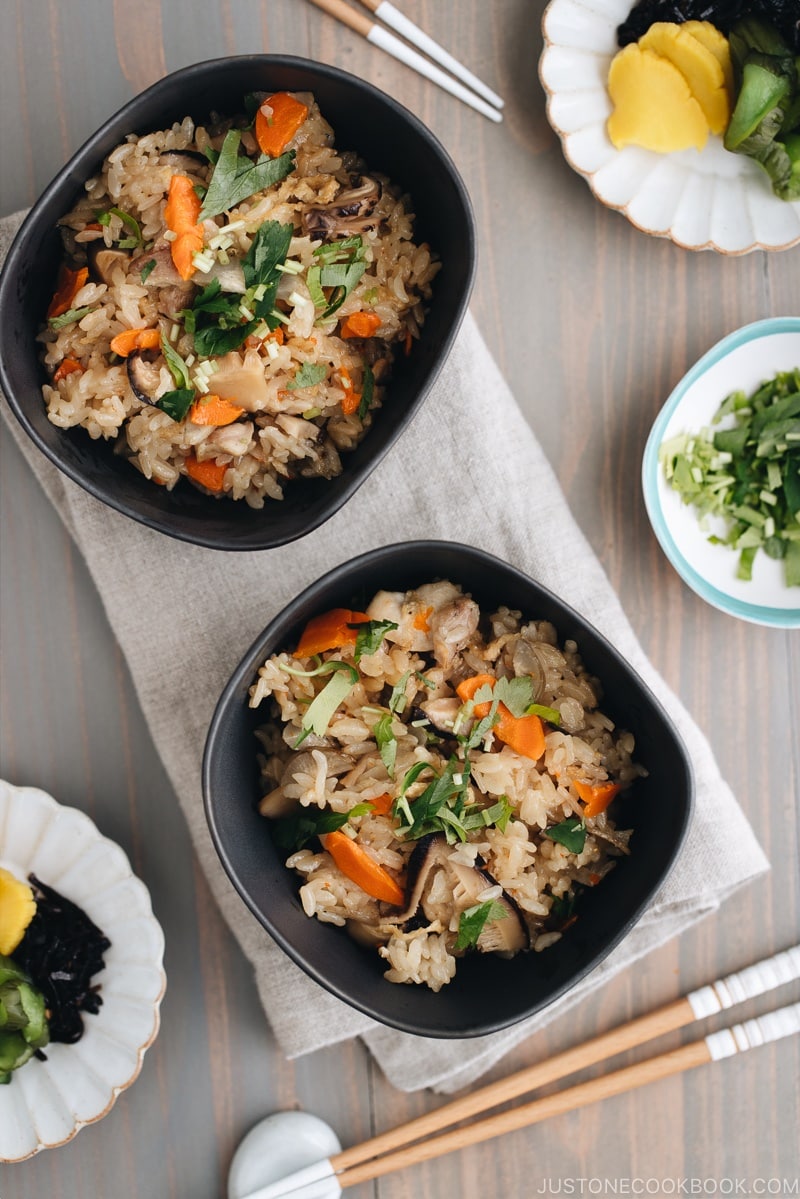
This Instant Pot Takikomi Gohan is a traditional Japanese mixed rice with chicken and vegetables that is pressure cooked in a savory dashi broth. This time-saving recipe makes for a delicious and quick weeknight meal!
Looking for more ways to cook various rice dishes in your instant pot? Today we will use the trusty pressure cooker to make Instant Pot Takikomi Gohan, a versatile Japanese rice dish with a colorful mix of ingredients. Everything is cooked in one pot, and nutrition-wise, it is a wholesome, comfort food to enjoy on a hectic weeknight.
This rice recipe is specifically created for those of you who practically cook everything with the instant pot. If you don’t own an instant pot, you can prepare takikomi gohan following my rice cooker method.
What is Takikomi Gohan?
Takikomi Gohan (炊き込みご飯) is a Japanese rice dish cooked with dashi and soy sauce along with mushrooms, vegetables, meat, or fish.
Takikomi Gohan often includes seasonal ingredients such as matsutake mushrooms in Matsutake Gohan or chestnuts in Kuri Gohan. We also put different ingredients to make all kinds of variations. On the blog, we have:
- Gobo and Miso Takikomi Gohan
- Sweet Onion Takikomi Gohan
- Ginger Rice
- Sansai Gohan (Rice with Mountain Vegetables)
- Classic Takikomi Gohan (stovetop)
There is a similar dish called Maze Gohan (混ぜ御飯), in which flavorful ingredients are mixed into cooked rice.
4 Important Tips for Making Instant Pot Takikomi Gohan
1. Cut the ingredients into similar sizes.
Ingredients should be cut into similar sizes for two reasons. One, you don’t want to eat chunky big ingredients when you’re eating soft tender rice. And two, all the ingredients are cooked at the same time; therefore, tougher ingredients should be cut into slightly smaller than tender ingredients.
2. Add the seasonings right before cooking rice.
Takikomi gohan is always cooked with soy sauce and salt. These ingredients prevent the rice from absorbing water, so make sure to soak the rice for 20-30 minutes before cooking. Japanese short-grain rice is ALWAYS soaked prior to cooking because it is plumper and thicker and it takes time to become tender.
3. Do not mix rice and ingredients.
When you add the ingredients to the rice, you may want to mix it all up. Actually, it’s best not to. In order for the rice to cook evenly, the rice should not be mixed up with the ingredients, and stay below the ingredients. That way, rice gets access to water easily without interference from the meat and vegetables.
4. Fluff the rice after 10-minute natural release
Set the timer for 10 minutes when the Instant Pot beeps to let you know it’s done cooking. Then release the remaining pressure by opening the valve. You do not want to keep too much moisture in the cooker, so open up the pot and release the moisture and fluff up the rice.
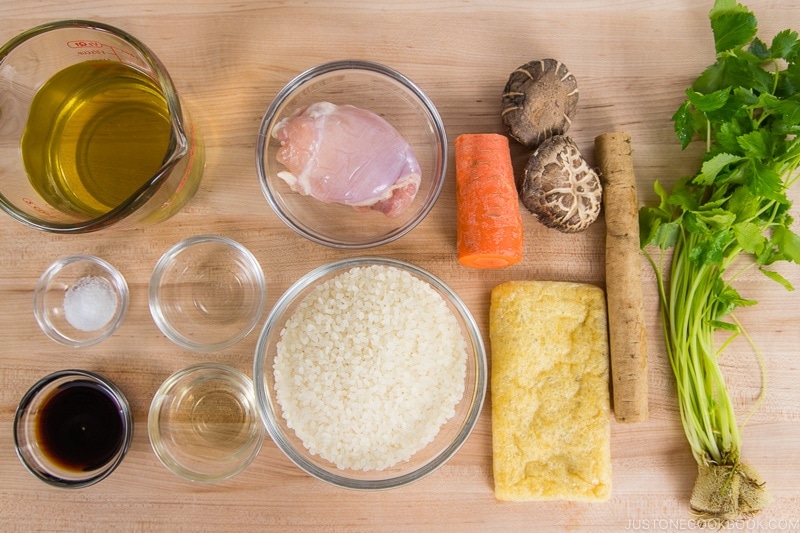
Takikomi Gohan Ingredients & Substitute
Don’t feel restricted to using the same ingredients when it comes to Takikomi Gohan. As I mentioned earlier, Takikomi Gohan has many variations and you can definitely make yours with whatever you like. Here are the ingredients I used today, with tips on substitution.
- Dried shiitake mushrooms: Shiitake mushrooms, especially dried ones, have amazing aromas and flavors. Plus, you can get the delicious “shiitake dashi” out of the soaking water, which you can use to cook the rice! You can find dried shiitake mushrooms at any Japanese or Asian grocery store and online at Amazon. Alternatively, you can use fresh shiitake mushrooms (but can’t get dashi out of fresh ones) or other mushrooms.
- Gobo (burdock root): Japanese/Asian grocery stores and Whole Foods carry gobo, but it may be costly or come in bulk (I have many gobo recipes). If you can’t find it, you can skip and add other root vegetables, such as turnips.
- Aburaage (deep-fried tofu pouch): The tofu pouch adds extra flavors & texture to the mixed rice, so I almost always like to add this ingredient. It’s the same tofu skin used for Inari Sushi, but it’s not seasoned (basically the tofu skin before seasoned). You will find it in a freezer or tofu section at Japanese grocery stores and sometimes Asian grocery stores carry similar deep-fried tofu that is a small cube shape. You can cut it up for use.
- Mitsuba (Japanese parsley): This Japanese herb makes the dish extra tasty, yet it is extremely hard to find if you don’t have a well-stocked Japanese grocery store. Use chives or green onion/scallion instead to add some green color.
- Dashi: The fundamental Japanese stock is what makes the rice dish “authentic” Japanese. Chicken broth or vegetable broth will not make Takikomi Gohan. You can use any dashi you like – Awase Dashi (Kombu + Katsuobushi), Kombu Dashi, and Shiitake Dashi. You can pick 3 ways to make dashi (dashi powder, dashi packet, or from scratch).
The Wonder of Instant Pot Japanese Mixed Rice
Besides being convenient, you’ll learn that takikomi gohan makes a great template for trying new flavor combinations. I hope you can lean on the recipe anytime when you need to make a fulfilling meal for the family.
Wish to learn more about Japanese cooking? Sign up for our free newsletter to receive cooking tips & recipe updates! And stay in touch with me on Facebook, Pinterest, YouTube, and Instagram.

Instant Pot Takikomi Gohan
Video
Ingredients
- 1½ cups uncooked Japanese short-grain white rice (2 rice cooker cups, 360 ml)
- 2 dried shiitake mushrooms
- ¼ cup water (to rehydrate the shiitake)
- 1 chicken thigh (4–5 oz, 113–142 g)
- ½ Tbsp sake (for marinating the chicken)
- 1.8 oz gobo (burdock root) (about ⅓ cup sliced)
- 1.8 oz carrot (about ⅓ cup sliced)
- 1 piece aburaage (deep-fried tofu pouch) (about ⅓ cup sliced)
- 3 sprigs mitsuba (Japanese parsley) (for garnish; or use green onion)
For the Seasonings
- 1½ cups dashi (Japanese soup stock) (use standard Awase Dashi, dashi packet or powder, or Vegan Dashi)
- 1½ Tbsp soy sauce (use gluten-free soy sauce for GF)
- 1 Tbsp mirin
- ½ tsp Diamond Crystal kosher salt
Instructions
- Gather all the ingredients. Make the dashi if you haven‘t already and let it cool to room temperature (you can place the pot with dashi in a bowl of iced water).

To Wash and Soak the Rice
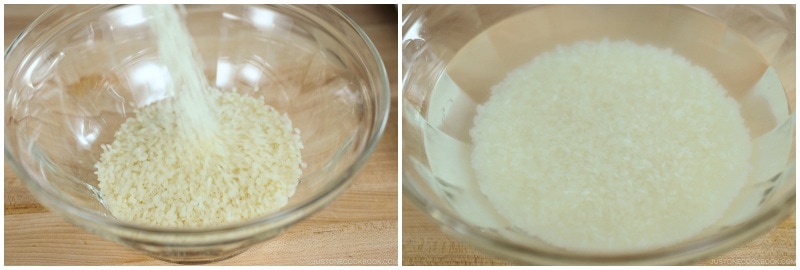
- In a large bowl, measure and add 1½ cups uncooked Japanese short-grain white rice. Rinse the rice under cold water, gently rubbing the rice with your fingertips in a circular motion for 10–15 seconds. Add more water, then pour off the starchy water. Rinse and repeat until the water becomes clear. Then, add water to cover the rice and soak for 20–30 minutes. Meanwhile, start preparing the ingredients.

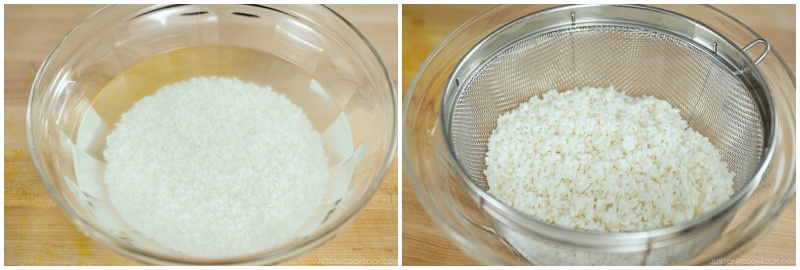
- Here‘s how the rice looks before and after soaking for 20 minutes. Drain the water completely. Set aside for 10 minutes. If you don’t have time to wait, then shake off the excess water the best you can.
To Prepare the Ingredients
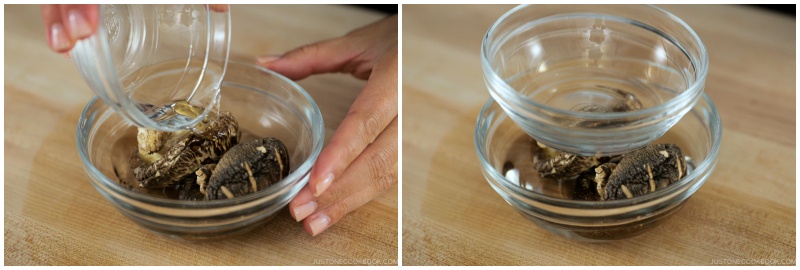
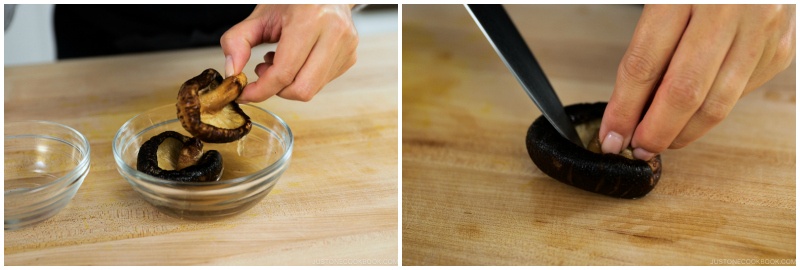
- In a small bowl, add 2 dried shiitake mushrooms and ¼ cup water. Put a heavy object on top so the mushrooms stay submerged in the water. Let them soak until they‘re tender. In the meantime, prep the other ingredients.
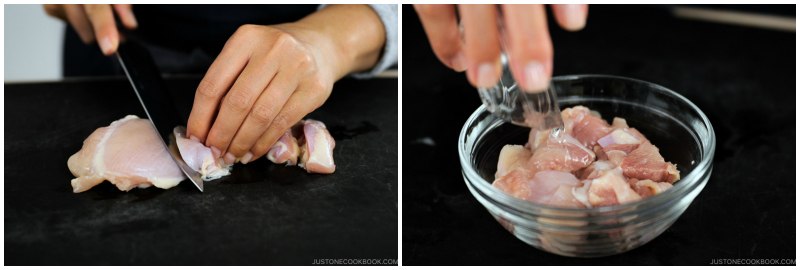
- Cut 1 chicken thigh into slanted, smaller bite-sized pieces. I use the sogigiri Japanese cutting technique to create more surface area so the meat will cook faster. Sprinkle the pieces with ½ Tbsp sake to remove any unwanted smell from the chicken.
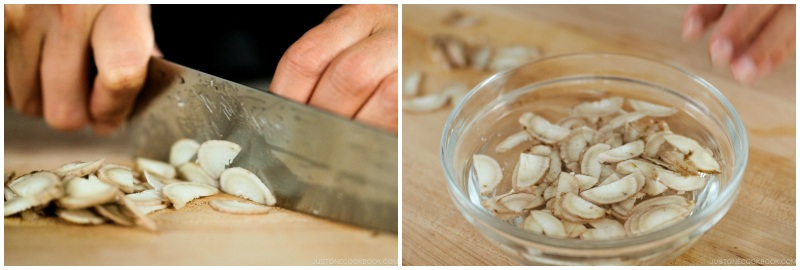
- With the back of a knife, scrape off the skin of 1.8 oz gobo (burdock root). Do not peel the skin with a vegetable peeler, which will remove the earthy and delicious flavor just below the skin. Cut the gobo in half lengthwise.
- Thinly slice each half diagonally. Soak the gobo in water to prevent it from turning brown and remove any astringent taste.
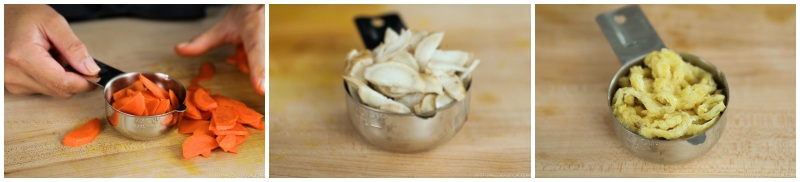
- Cut 1.8 oz carrot in half lengthwise and thinly slice it diagonally.
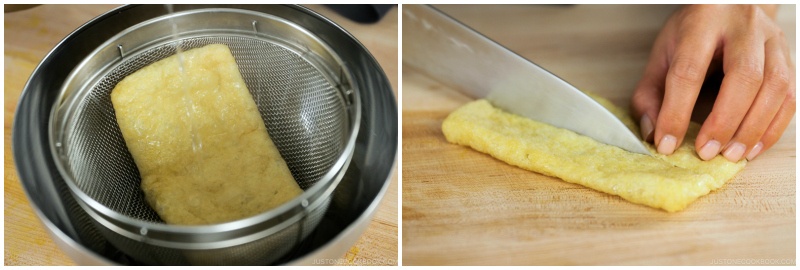
- Pour hot water over 1 piece aburaage (deep-fried tofu pouch) to get rid of the excess oil. Some people skip this step as the factory oil is cleaner these days. I do it anyway. Cut the aburaage in half lengthwise.
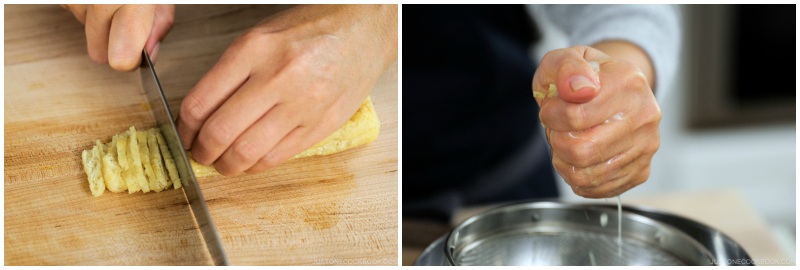
- Cut the tofu pouch into thin slices and squeeze out the water.
- You will need about ⅓ cup each of sliced carrot, sliced gobo, and sliced aburaage.

- By now, the shiitake mushrooms should be hydrated and tender. Squeeze out the excess liquid into the bowl and reserve this shiitake dashi to use later. Next, remove the stem from each shiitake mushroom.
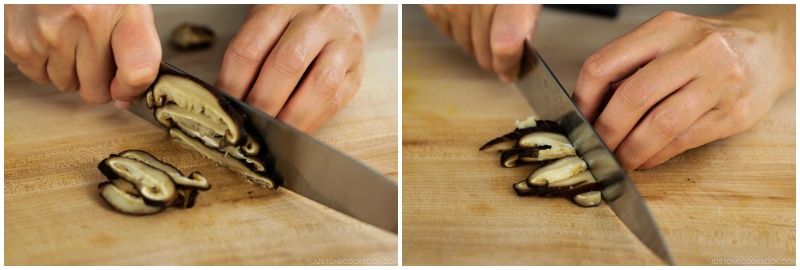
- Thinly slice the mushroom caps. If it’s a big mushroom, cut the thin slices in half crosswise.
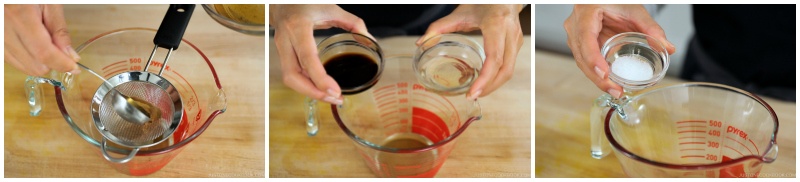
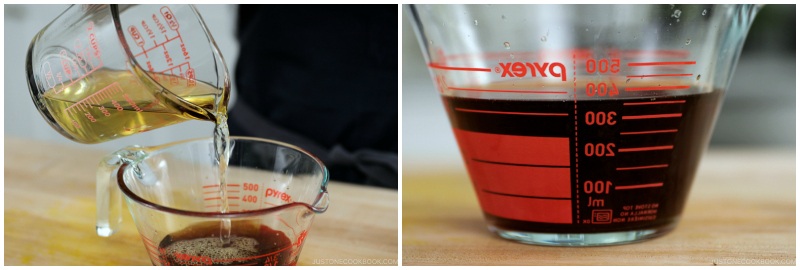
- In a 2-cup measuring cup, add 2 Tbsp shiitake dashi (the reserved liquid from hydrating the shiitake mushrooms). If you are worried about the small particles left in the liquid, you can strain the liquid using a tea strainer. To the same measuring cup, add 1½ Tbsp soy sauce, 1 Tbsp mirin, and ½ tsp Diamond Crystal kosher salt.
- Lastly, add enough of the 1½ cups dashi (Japanese soup stock) to the measuring cup so that the seasoning liquid measures 360 ml total.
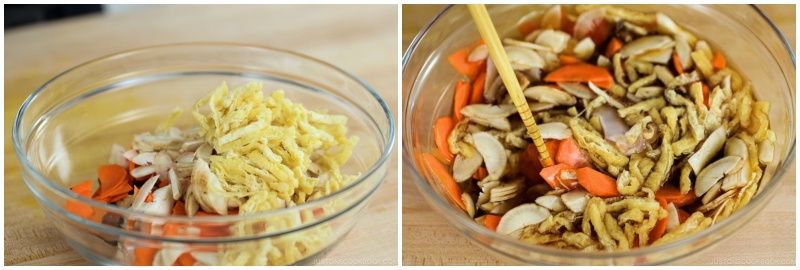
- To a large bowl, add the chicken, shiitake mushrooms, carrot, gobo, and aburaage. Then, add the 360 ml seasoning liquid from the previous step. Mix well.


To Cook the Rice
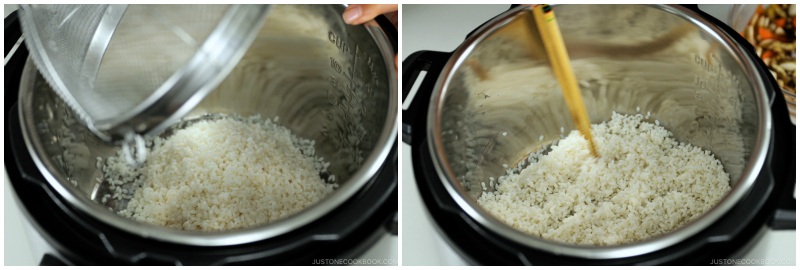
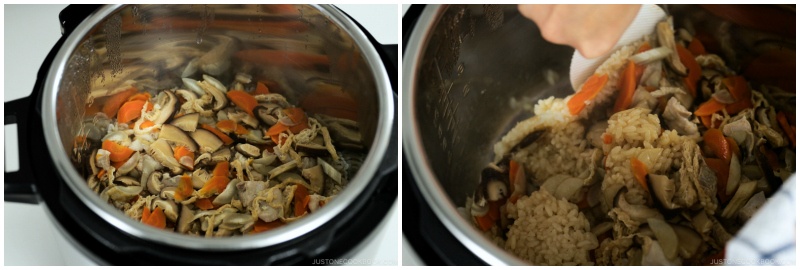
- Transfer the well-drained rice to the rice pot. Make sure the rice is evenly distributed and flat.
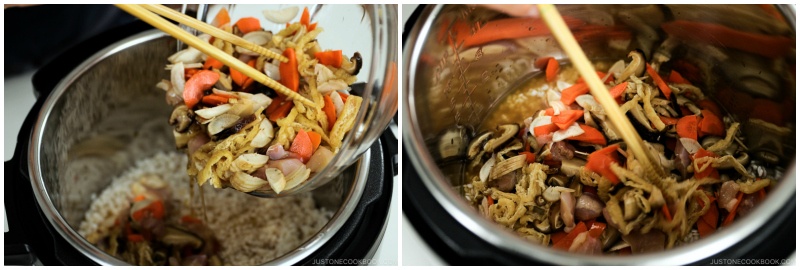
- Add the ingredients and seasoning liquid on top of the rice. DO NOT MIX the rice and the ingredients. Try to evenly distribute the ingredients on top and flatten them without mixing with the rice.
- Close the lid and click Manual. Set to High pressure for 2 minutes.
- Make sure the steam release handle points at Sealing and not Venting. The float valve goes up when pressurized (it takes roughly 10 minutes to pressurize).

- When it’s finished cooking, the Instant Pot will beep and switch automatically to the Keep Warm mode. Let the pressure release naturally for 10 minutes; I recommend setting a timer. DO NOT EXCEED 10 MINUTES of natural release. After 10 minutes, proceed with a quick release by turning the steam release handle to the Venting position until the float valve drops down. Hold a kitchen towel over the steam release valve to protect your hand and face during quick release. Only a little bit of steam will be left after 10 minutes of natural release.
- Open the lid and immediately fluff the rice with a rice scooper to avoid burning the rice on the bottom. Instead of “mixing” the rice, try to “cut” it at a 45-degree angle using a slicing motion as you turn over each scoop of rice to fluff.


To Serve
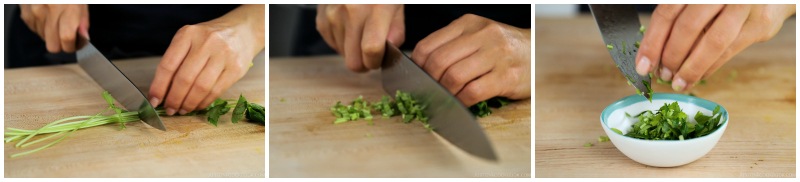
- Cut 3 sprigs mitsuba (Japanese parsley) into small pieces. If you don’t have mitsuba, you can use green onion.
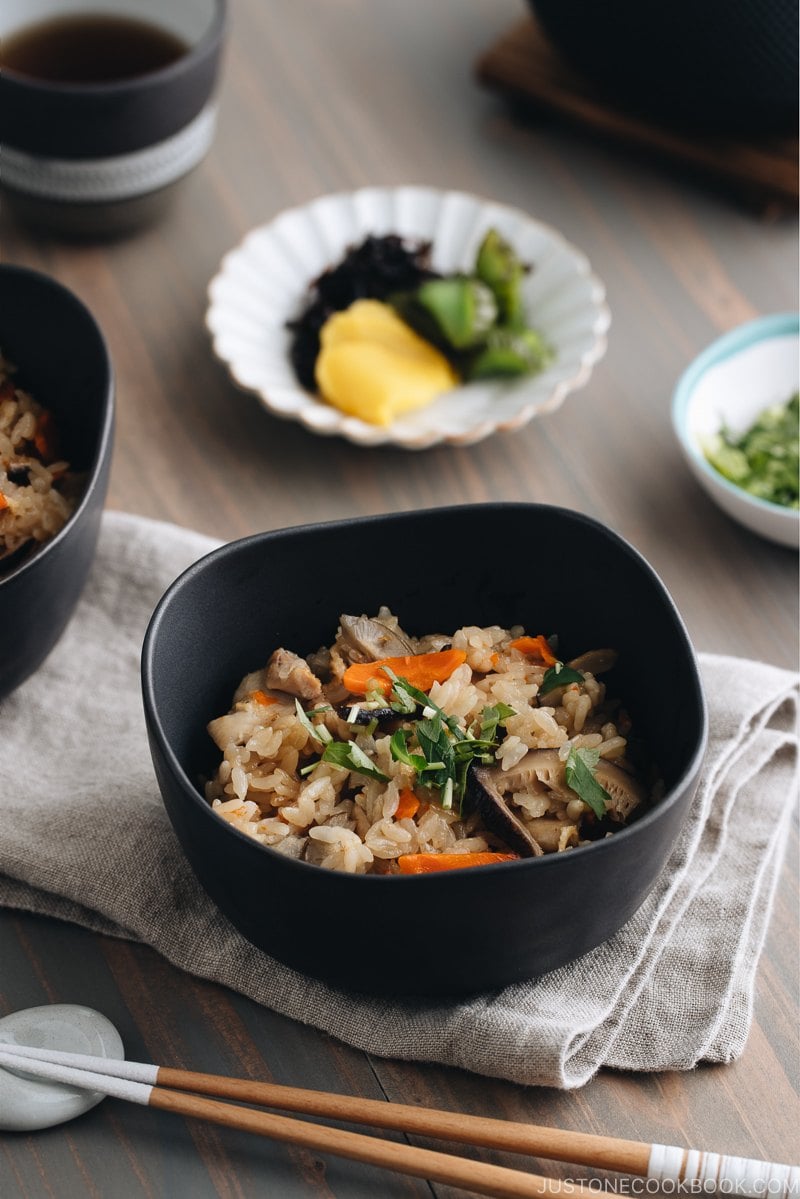
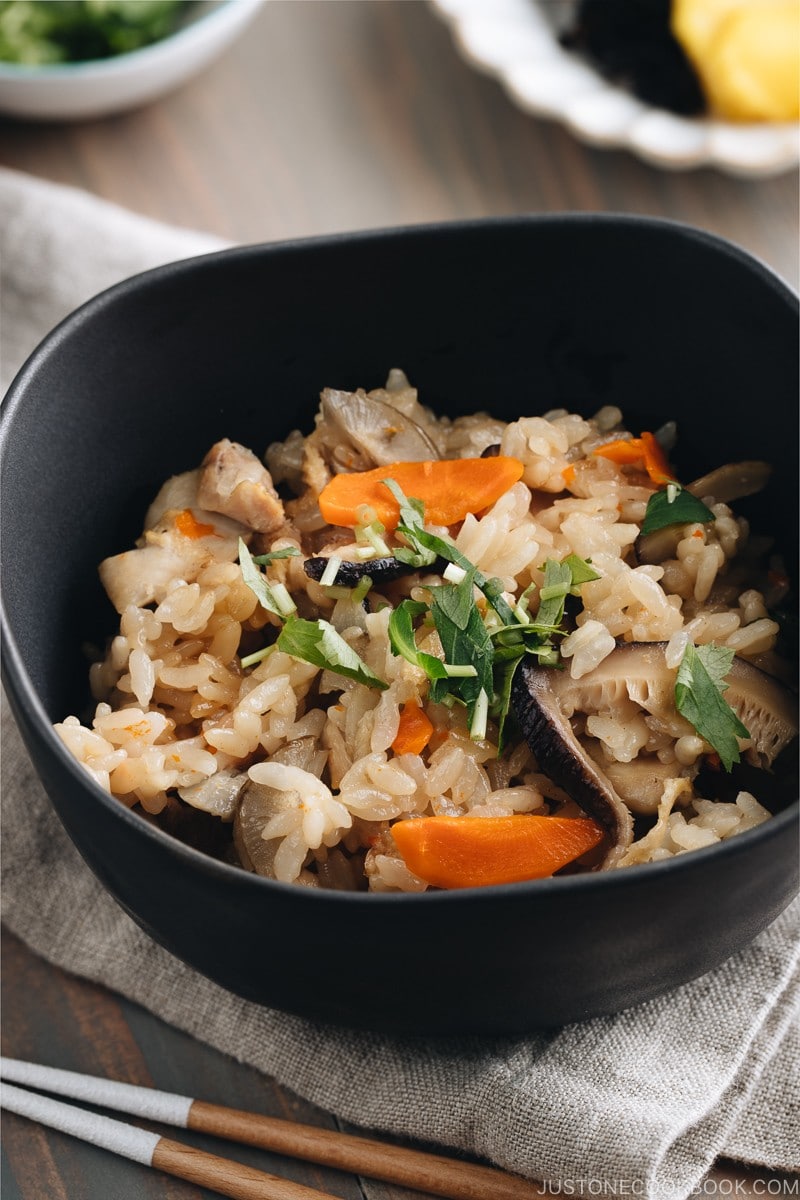
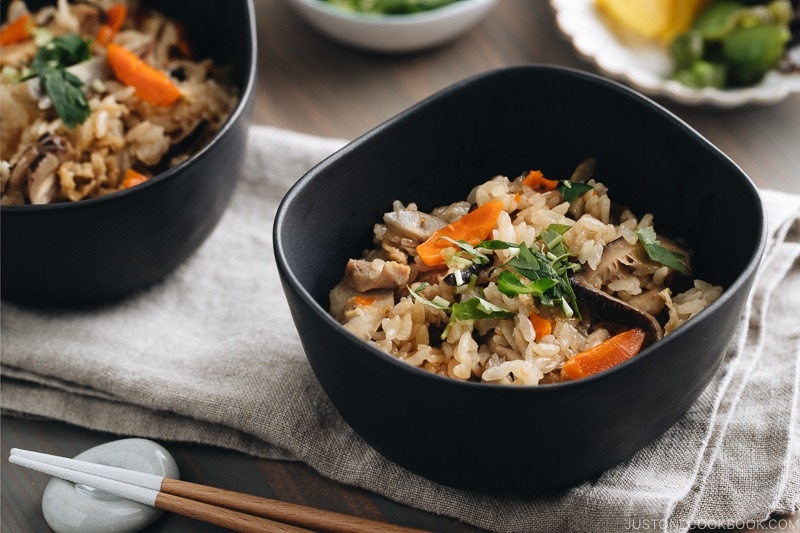
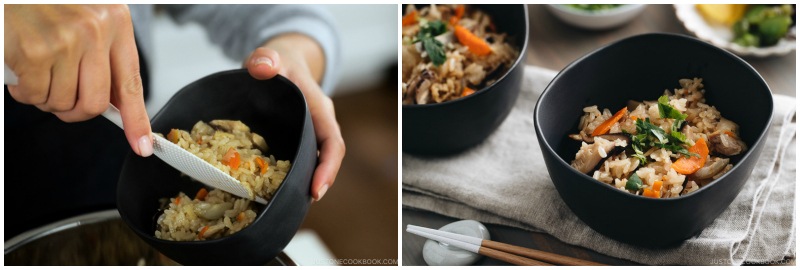
- Serve the Takikomi Gohan in individual bowls and garnish with the chopped mitsuba.
To Store
- The best way to store Japanese rice is to freeze it, even if you plan to use it the following day. To learn how, please read my post on how to store cooked rice.


[…] Takikomi Gohan cooked in a rice cooker/instant pot […]
This is a great recipe! I really appreciate that you have tested various Japanese recipes using the instant pot. I look forward to more instant it recipes!
Thank you so much for trying this recipe Fumiko! I usually cook Japanese recipes at home and I look forward to using my IP to make more Japanese recipes. 🙂
This was easy and very tasty. Would definitely make again.
Hi Jane! Thank you so much for trying this recipe! I’m so glad you enjoyed it! 🙂
[…] Instant Pot (Pressure Cooker) Takikomi Gohan […]
[…] Instant Pot Takikomi Gohan (Regular Takikomi Gohan) […]
[…] Takikomi Gohan […]
If you want to cook 6 cups of rice , do you just triple all the ingredients? Do you need to increase the cook time?
Hi Candy! Whoa, 6 cups! So many lucky people to eat your takikomi gohan. 🙂 I’d say you should triple the amount if you want to keep the ratio of rice and ingredients same. As for the cook time, I highly encourage to increase the time a little bit. Unfortunately, I never tried cooking 6 cups of rice, so I am not sure how much more time is necessary… I’m really sorry.
[…] 4. Takikomi Gohan […]
I have made this and it is just delicious. If I want to add Ajitsuke clams instead of chicken, how would I do this? Would I keep the juice from the can as well?
Hi Gwen! Add the clam with all the ingredients. If you want to add the juice from clam can, then drain, reserve the juice, and add the juice to the seasoning at Step 11 before adding dashi. 🙂
Hi, is it possible to make this dish in the regular rice cooker instead?
Hi Aga! Yes, you can do that. 🙂 Here’s the recipe: https://www.justonecookbook.com/takikomi-gohan/ Enjoy!
If I double the recipe, how long should I cook it in the instant pot?? Thank you, as always, for fantastic, simple, and delicious recipes!
Hi Micki! I haven’t tasted but I may add 1-2 minute more… I would test by adding 2 minutes and see if I should cook less or more. And thank you for your kind words! I’m happy to hear you enjoy my recipes. xo
Hi there, Micki! I just found this recipe recently and since it turned out so great, I also wanted to try doubling the amount I could make! Did you ever find the right cook times that worked for this?
[…] Read More… […]
Hi Nami I tried making it but the rice burned:/. Do You know what possibly went wrong?
Wendy
Hi Wendy! Assuming you used your instant pot (I’m not sure how other pressure cookers would work), how long did you leave the Takikomi Gohan after it’s finished cooking? Did you take release after 10 minutes of natural release (Step 5 under “To Cook Rice”)? If you watch my video around 3:22 time stamp, you see my rice that was on the bottom of the pot is more brown color? This is common when you cook Takikomi Gohan. But the darkness comes from soy sauce. So if you keep your rice in the instant pot for a longer time, it becomes “burnt”. Some people purposely do that to get burnt rice (we call this “Okoge” お焦げ), but it’s preference. I especially love it when it’s made in Donabe (claypot) so it is crispy, but hard to get Okoge in the rice cooker or the instant pot. Do you think this could the reason? Oh! Another thing that I could think of is… you didn’t mix rice and ingredients right? Remember to keep the ingredients ON TOP (Step 2 under “To Cook Rice”). Hope this helps….
I cooked takikomi goha using the instant pot for the first time. It turned out great. Thank you for the recipe!!
Hi Fumiko! I’m glad your takikomi gohan came out well! Thank you for your kind feedback. 🙂
Hi, I was hoping to use brown rice for this recipe. May I know if the instant pot settings should follow the 20 mins usually used for brown rice or 2 mins like this recipe did? Thank you!
Hi Vicki! First of all, make sure to soak the brown rice for a long time (important). I’d suggest cooking 20 minutes to follow a brown rice cooking setting. HOWEVER, it gets tricky to include vegetables that are chopped into smaller pieces because 20 minutes is actually a quite long time for pressure cooking. Veggies can get mushy. 🙁 I haven’t tried cooking Takikomi Gohan with brown rice both in a rice cooker or IP… I may suggest using ingredients that are okay to cook for a longer time, and doesn’t affect the texture of the ingredients.
I just used brown rice and it turned out great! I cooked it for 20min like the brown rice IP recipe and added dashi until I got to 400mL instead of the 360mL for white rice here. I would have added a little more soy sauce or mirin, but I figured using dashi instead would be a safer bet for a first try.
I did not have burdock root, but I added another aburaage, extra shiitake, and Taiwanese sausage. I cut the carrots a little thicker, but they still ended up very soft. I don’t mind super soft carrots, and they were small enough that they blended in with the rice anyway.
Hi Emmeline! Thank you for trying this recipe with brown rice and giving us tips/feedback! I’m glad it came out well! 🙂
Hi Nami,
I tried your recipe last week and it was successful and yummy! I want to make it again this weekend but double the proportion. Do I need to increase the time of high pressure from 2 min to longer time?
Hi Ruby! I just researched a bit and it looks like it should not require extra cooking time. The time that requires for pressurizing will be longer (because you have more rice and water) but cooking time should not be affected. However, I haven’t tried it myself, so I can’t confirm it. Please let us know if you try (have tried) it. 🙂
Mine also burned. D: Instant Pot even did the “burn” notice
I’ve made takikomigohan many times in the rice cooker and never had this problem. This is not okoge…it’s burnt (my husband loves okoge, I wish it were that!)
Nami, can you troubleshoot?
Hi Surin! Thanks for trying this recipe! Since I bought my IP, I made different Takikomi Gohan using IP so far, but I had never had IP “burn” notice or my rice got burnt. Did you decrease the amount of rice or mix (combine) ingredients with rice before cooking or change something in the recipe? I’d like to know because I make it the same way (with different ingredients) and haven’t had this issue before. If you used different ingredients, what did you add?
I never responded, I’m sorry! I made it exactly as specified (no mixing!) but didn’t have aburaage so I left that out. I do have some in the freezer and have been hungry for takikomigohan lately, so I will try this recipe again in the Instant Pot and let you know if it gives me another “burn” notice. I will make sure I follow everything exactly so I can give really detailed notes!
Thank you Surin! Wishing you good luck! 🙂
I have been using the pot-in-pot method for this recipe with success since the first couple of times I tried it. The 2nd time did burn again, but after researching it appears this is common in newer IPs as the company that manufacturers them has moved to a thinner-walled inner pot.
Pot-in-pot was a recommended work-around for this and it works well for this recipe — I use a 3-qt IP pot set on the trivet that comes with the IP inside my 6-qt IP. I follow the recipe as written but add some water under the trivet in the big pot, and put the ingredients in the little pot. For the most part it works, but I have found it needs a little extra time (about 5 extra minutes) presumably because the inner pot is insulated and therefore it doesn’t cook as directly/quickly.
Next time I make this I might try my 8-qt IP and see if it has a thicker inner pot for hopefully less fuss! Thanks again Nami for this delicious and versatile recipe.
Hi Surin! Thanks for your update! For those who bought an Instant Pot recently or got a newer inner pot, this information might be helpful. So far I have no issues with mine, so everyone, please keep this in mind. Thanks Surin for sharing the info!
I think the seal ring may have not been installed correctly, letting the steam (moisture) out which caused the burning.
Scott, I’m an IP pro, use it all the time. It was not the silicone ring. It appears that the IP pot has changed over time and the newer (thinner) inner pots contribute to more burn notices and undermine the effectiveness of this recipe as written. I discovered a workaround which I will share above.
Is there any vegetable I can substitute for burdock?
Hi Esther! Unfortunately, I can’t think of any other food that’s similar to burdock, in terms of texture and that earthy taste… If you can find some earthy, dry root vegetables would be good. Otherwise, you can skip gobo. 🙂
I previously inquired about this recipe but didn’t have an IP. My in-laws gifted me with one and I still remembered this recipe. Worth the wait! It’s delicious comfort food. Thanks, Nami!
Hi Barbara! So happy to hear that you now have an IP! Congrats!! Hope you enjoy more IP dishes this fall/winter!
Ohhh Thank you so much for this. I make this dish at least once a week 😋
Hi Luciana! Ohh you must love Takikomi Gohan! It’s a great way to get all the nutrition, too. 🙂