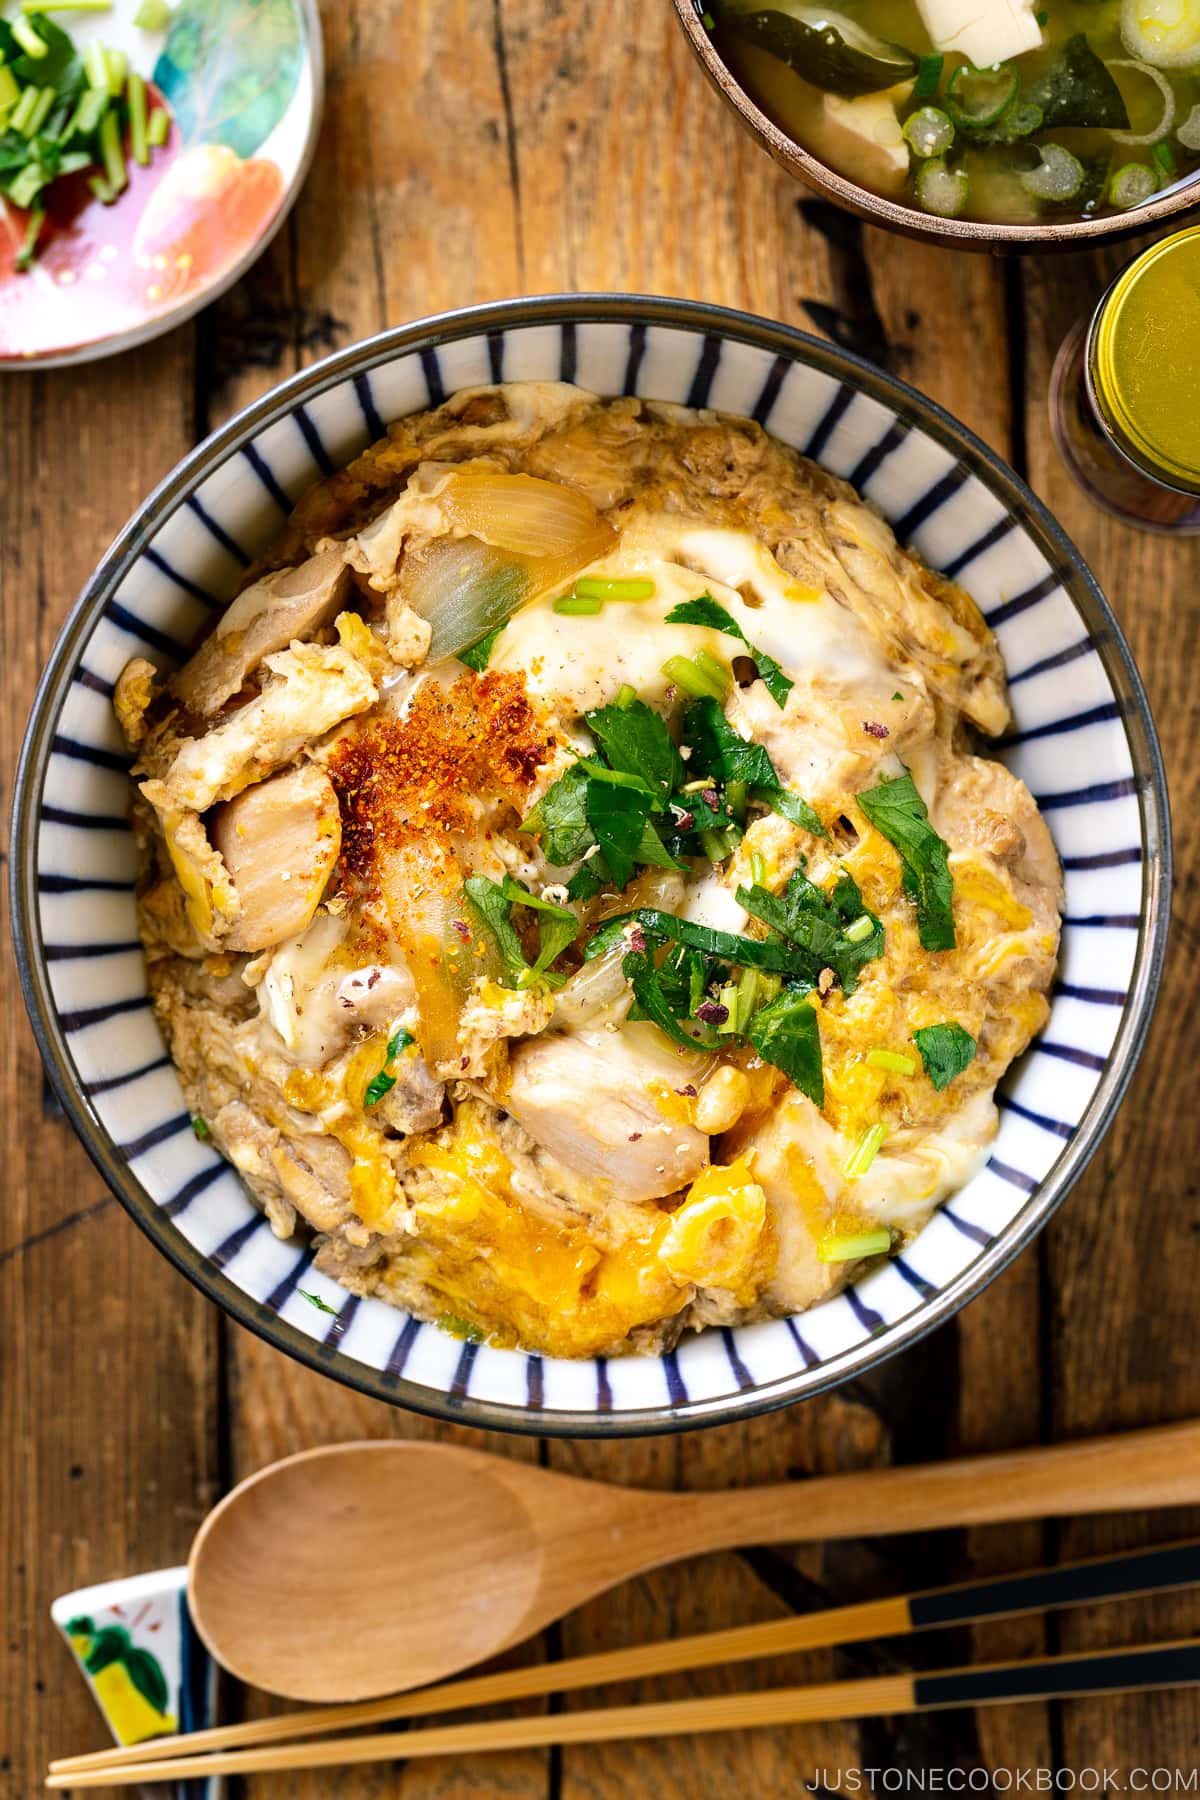
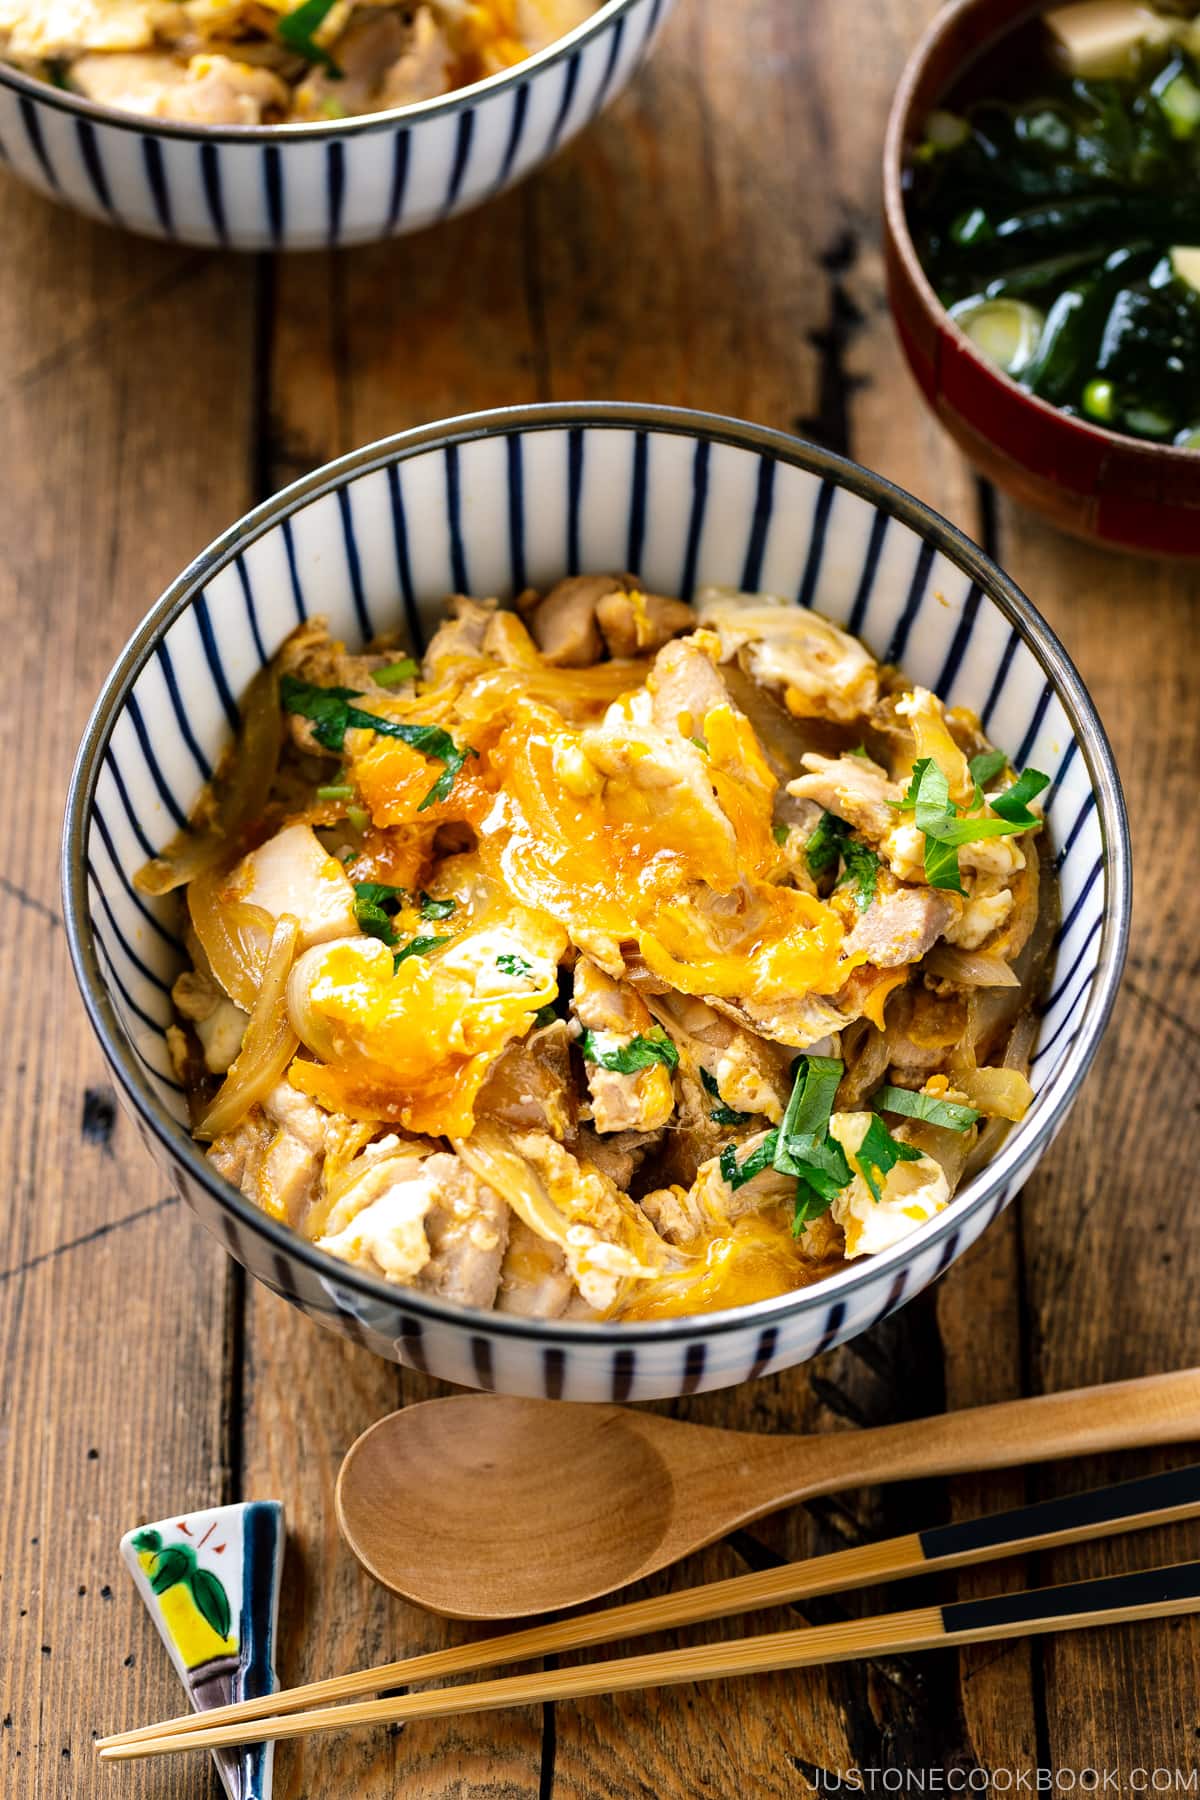
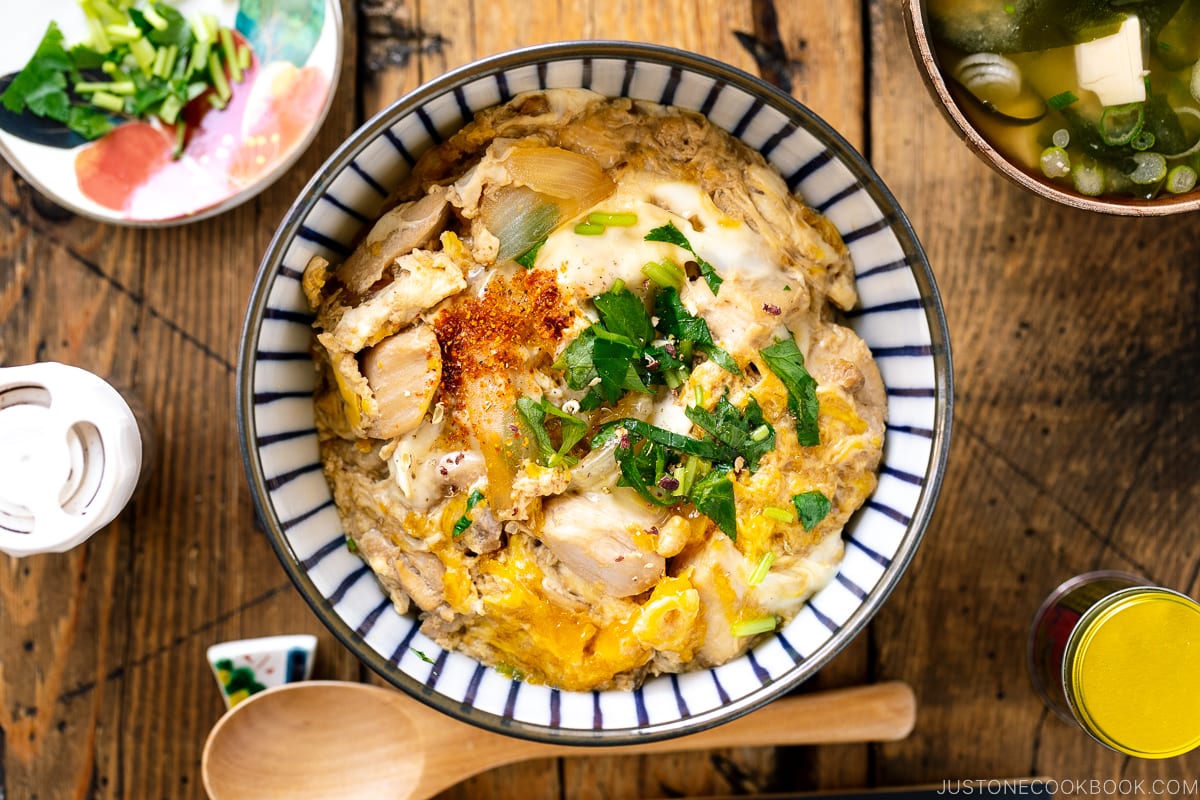
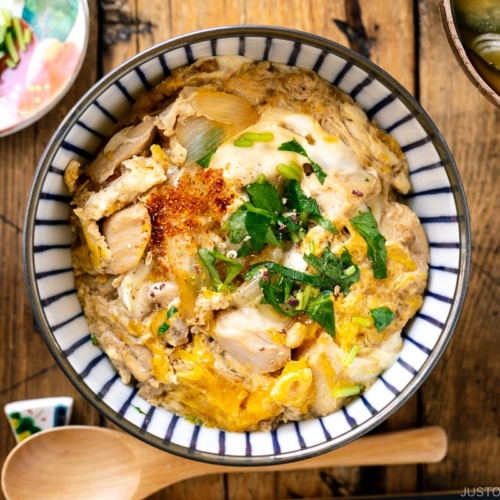
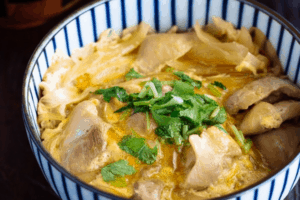
Oyakodon is a classic comfort food of Japanese home cooking. Tender pieces of chicken, onions, and eggs are simmered in an umami-rich sauce and then poured over a bowl of fluffy steamed rice. Simple, delicious, and utterly comforting, this is the kind of one-bowl meal you can cook in less than 30 minutes!
When it comes to mainstream fast food, Japan offers not only hamburgers and french fries, but the menu also extends to noodles and donburi (rice bowl) meals.
During lunchtime, you’d see diners and noodle shops around the office buildings crowded with Japanese office workers making their fuss-free fast food orders. These lunch spots usually serve up quick one-bowl meals, and Oyakodon (親子丼) or Oyako Donburi (親子丼ぶり) is often one of the popular choices.
Today, let’s make this quick and easy Chicken and Egg Rice Bowl at home!
Table of Contents
What is Oyakodon?
An epitome of Japanese soul food, oyakodon (親子丼) literally translates to parent-and-child (oya-ko) rice bowl (don) as the dish is composed of chicken and egg.
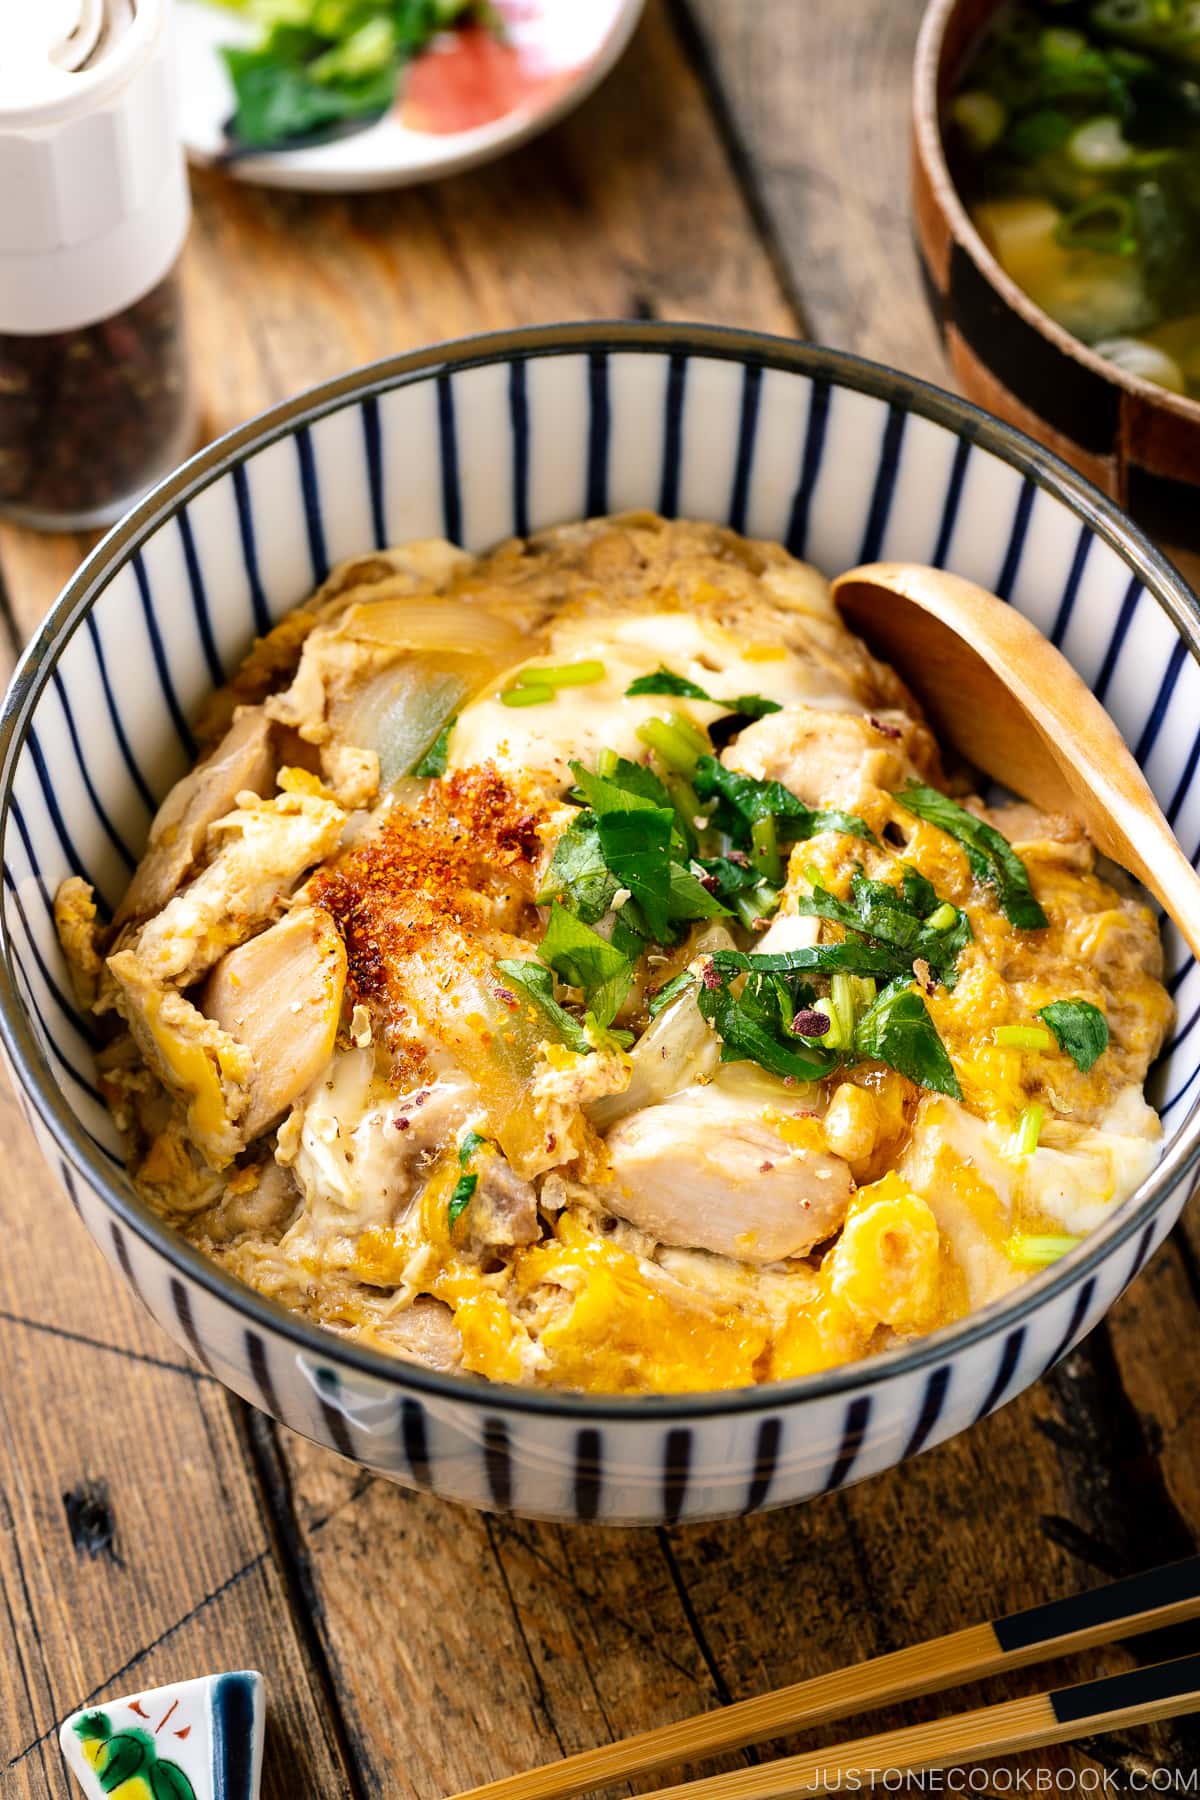
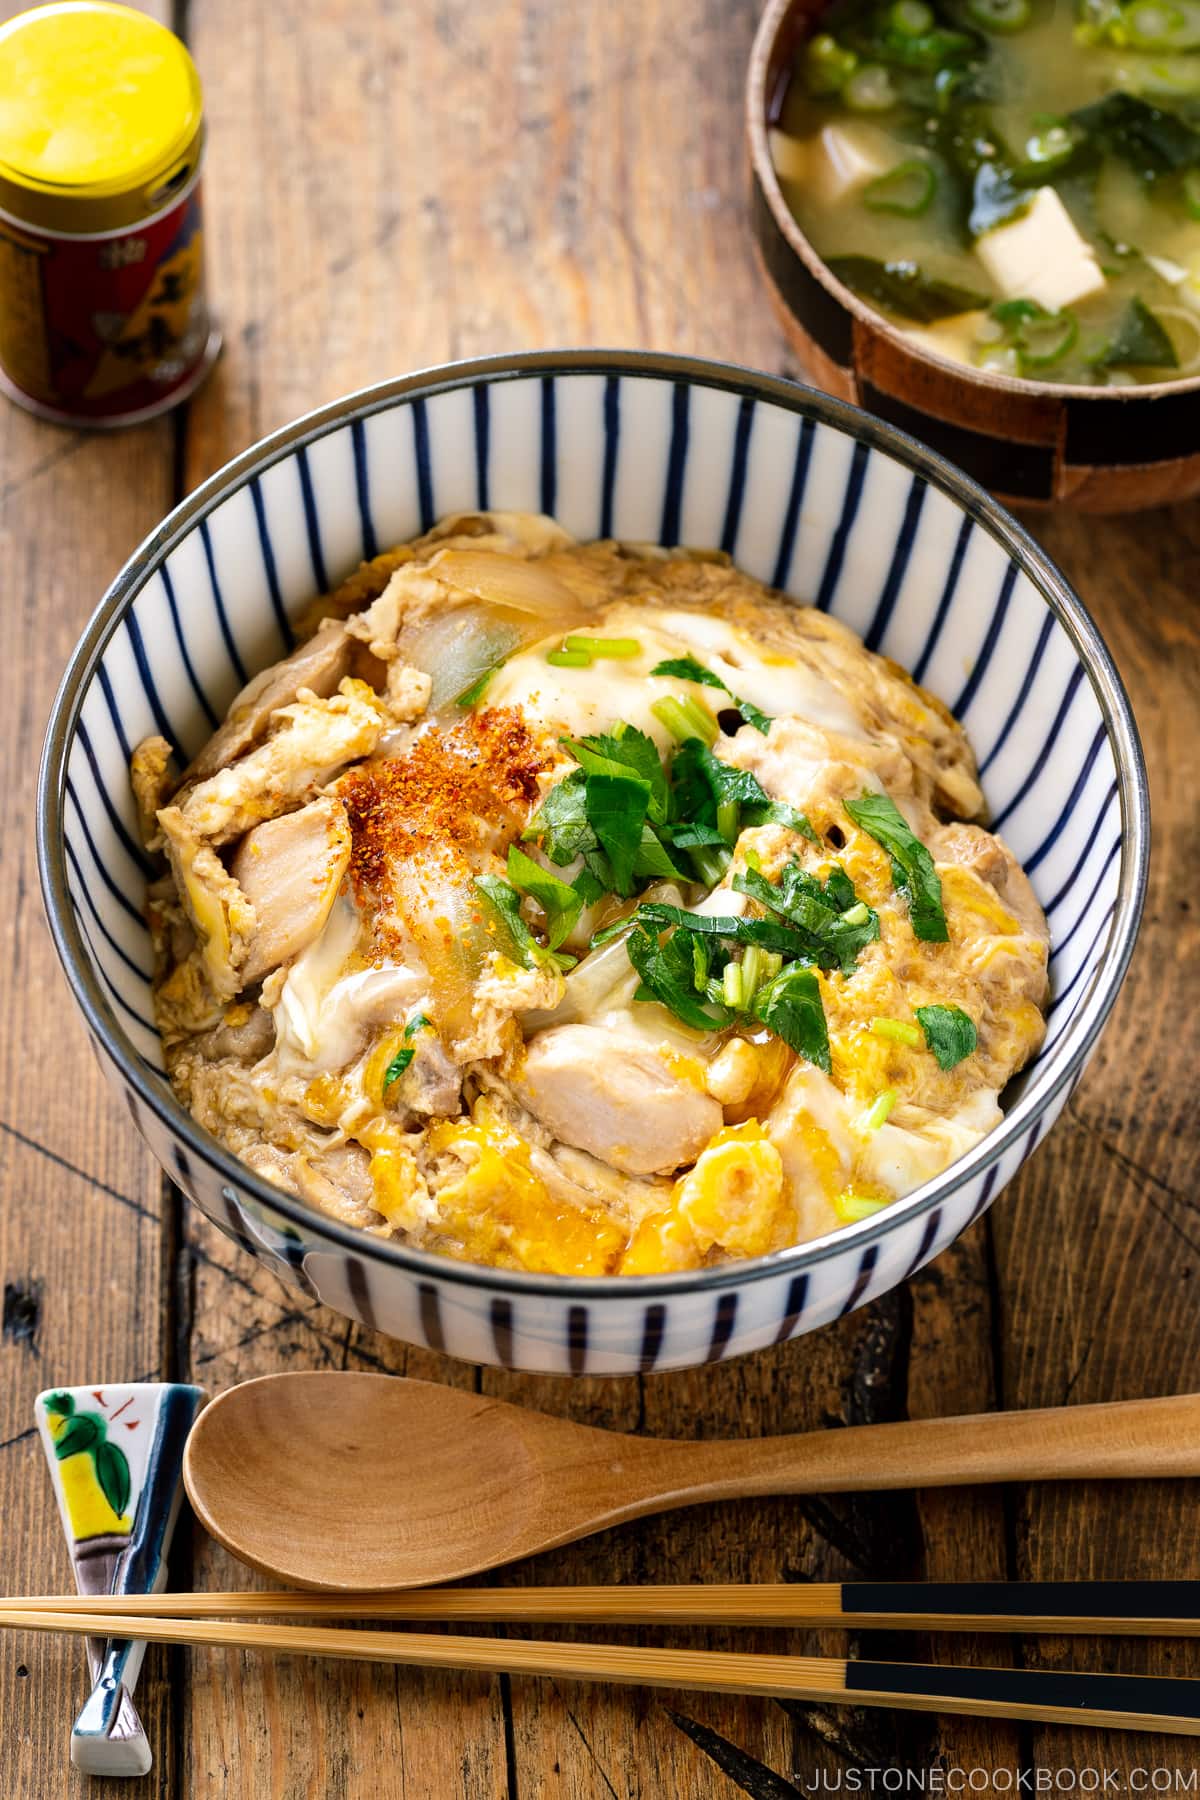
Bite-size chicken, tender onion, and softly cooked egg are layered and simmered together in a sweet-salty sauce made with dashi, soy sauce, and mirin and served on a bed of steamed rice. The contrast of textures and flavors makes you craving for more bites.
Like Gyudon and Katsudon, oyakodon is not only a long-time restaurant favorite but also a staple dish of Japanese households. Just as the name implies, everything about the rice bowl brings comfort and warmth.
5 Reasons Why You Should Try This Recipe
- One pan and one bowl meal. When thinking of easy weeknight meals, a one-pan and one-bowl meal is an ideal solution. Fewer dishes = easy cleanup!
- Quick and easy 30-minute cooking! This dish can be whipped up with minimal time and effort. I first learned how to cook oyakodon in my home and economics class in middle school. These days, it is still one of my go-to comfort foods. If you have teenagers at home, oyakodon is a great dish they could easily master. It is a survival meal that will sustain them when they go off to college.
- Easy-to-access, pantry-friendly ingredients. Chicken, egg, and onion are standard ingredients in most cuisines. I usually have them handy in my refrigerator (or freezer for chicken). As for the condiments, if you cook Japanese or Asian food often, you most likely have dashi-making ingredients, soy sauce, mirin, and sake.
- No oil! The onions and chicken are simmered in a broth. There’s no frying with oil.
- A satisfying comfort meal at home. You have tender chicken and a soft cooked egg over a fluffy bed of rice. The rice absorbs delicious dashi sauce and every mouthful is sweet-salty-savory. Here you have it: a belly-filling, delicious comfort meal in one bowl.
How to Make Oyakodon
Ingredients You’ll Need
- Chicken thighs – I recommend thighs over breasts because fattier thighs are more flavorful, tender, and forgiving (not like dry, overcooked breasts).
- Sake – Drizzling a tablespoon of sake over chicken helps remove its gamey odor.
- Onion
- Eggs
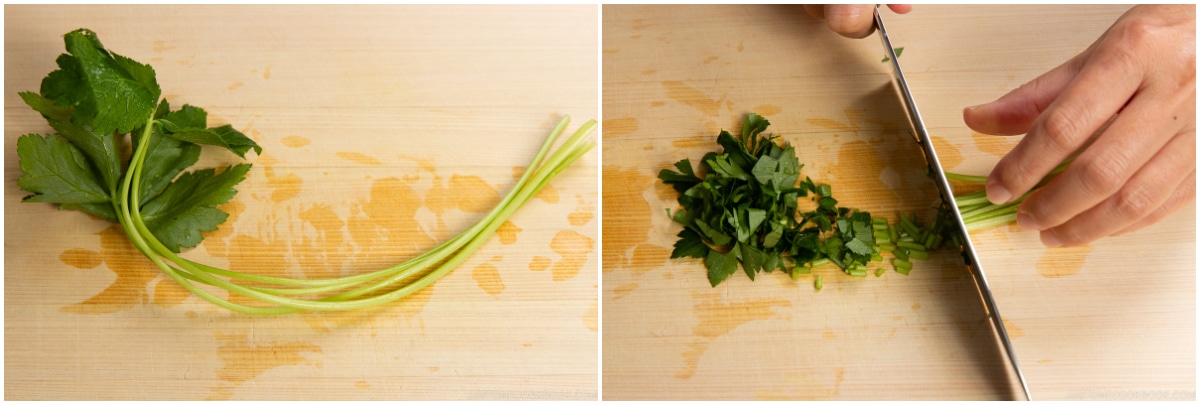
- Mitsuba – This Japanese wild parsley has a celery-like flavor with a slightly bitter taste. Because of its refreshing and unique flavor, the herb is used in many donburi dishes as a garnish. You can substitute it with diagonally thinly sliced green onions.
- Seasonings: Dashi (Japanese soup stock), soy sauce, mirin, and sugar.
- Steamed Rice
- Shichimi togarashi (Japanese seven spice) [optional for spicy kick]
- Sansho pepper powder [optional for fragrance] – It is finely grind peppercorns of the prickly ash tree and has a vibrant peppery-lemon flavor with a long residual heat.
Overview: Cooking Steps
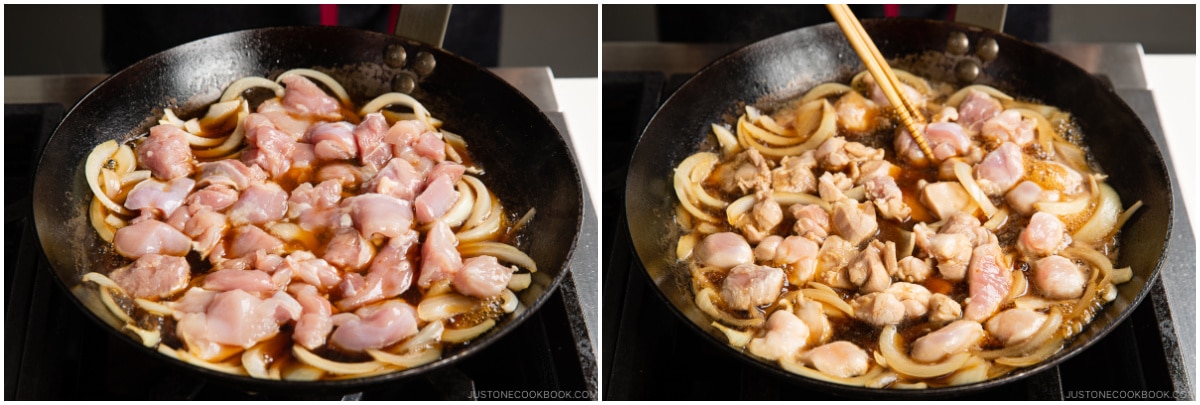
- Prepare the ingredients: Cut the onion, mitsuba/green onions, and chicken and crack the eggs.
- Cook the onion in the seasoning mixture.
- Add the chicken and cook until no longer pink.
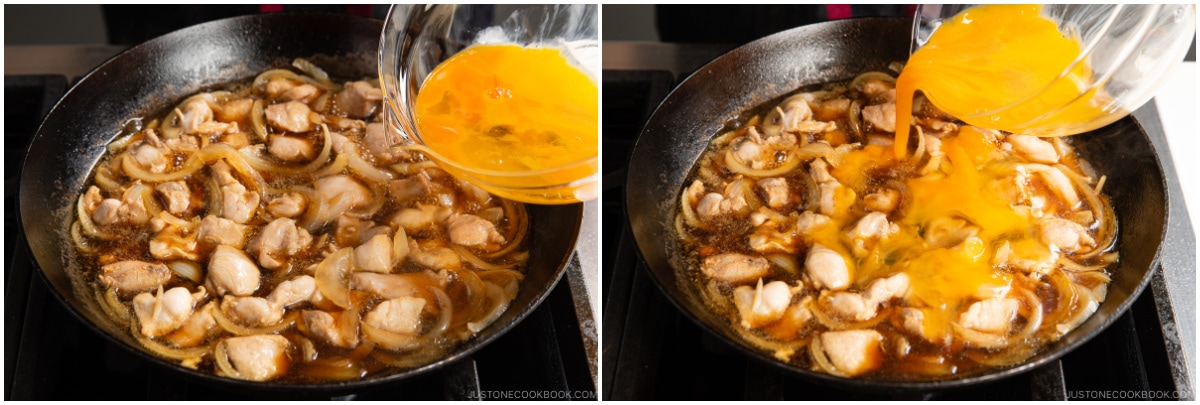
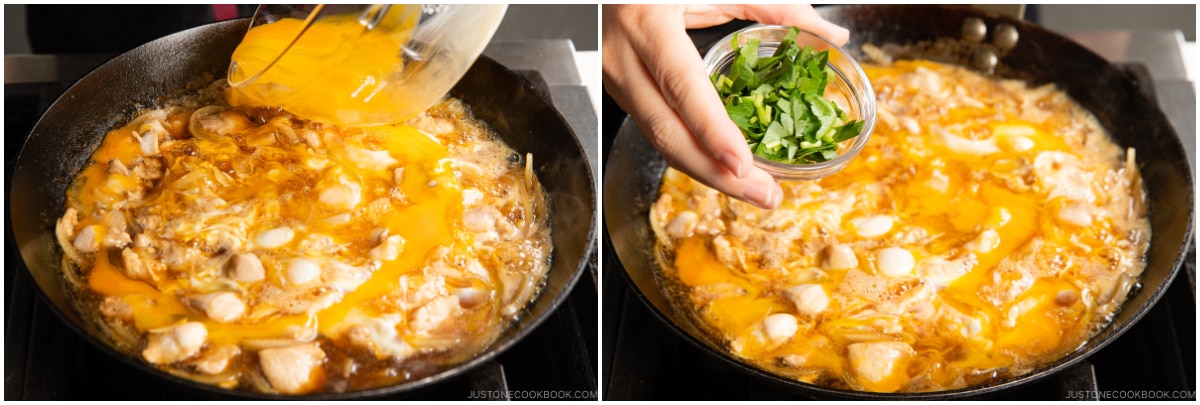
- Drizzle egg mixture at two separate times. Garnish mitsuba/green onions.
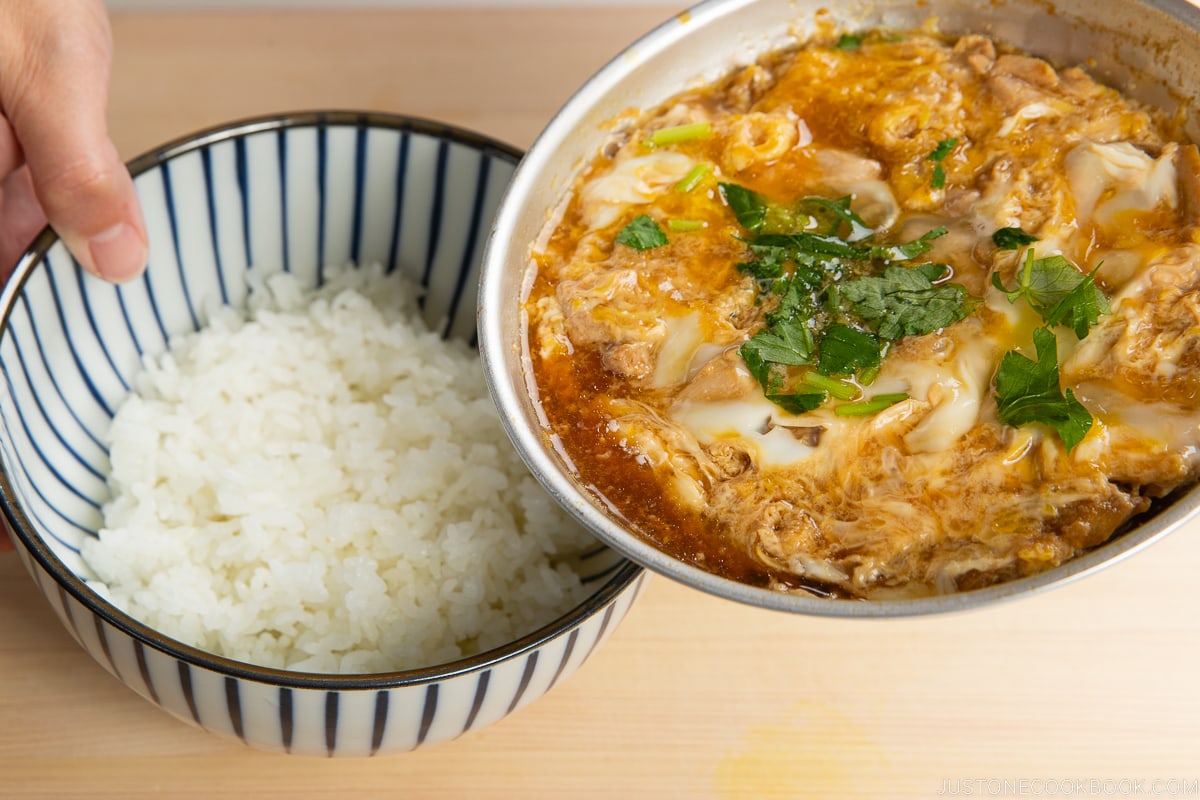
- Spoon the finished dish over the bed of steamed rice in a donburi bowl.
Oyakodon Cooking Tips
Tip 1: Use Good Japanese Soup Stock (Dashi)
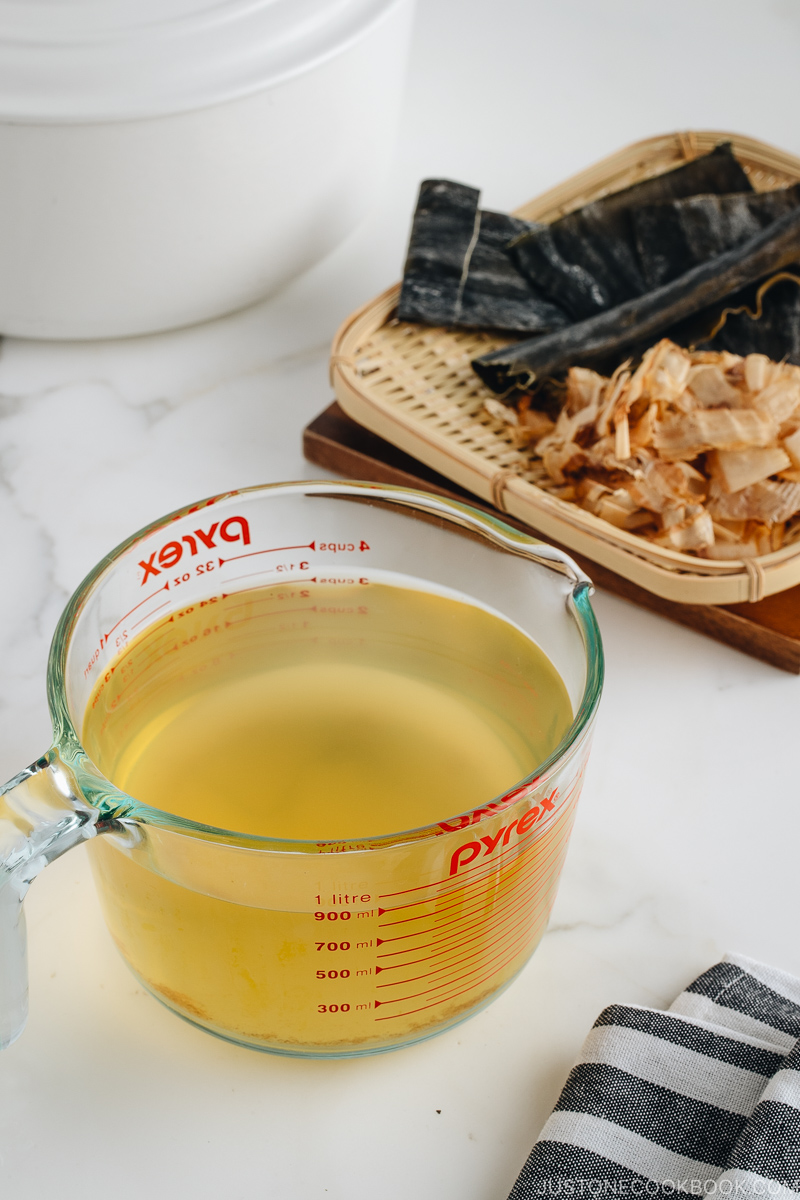
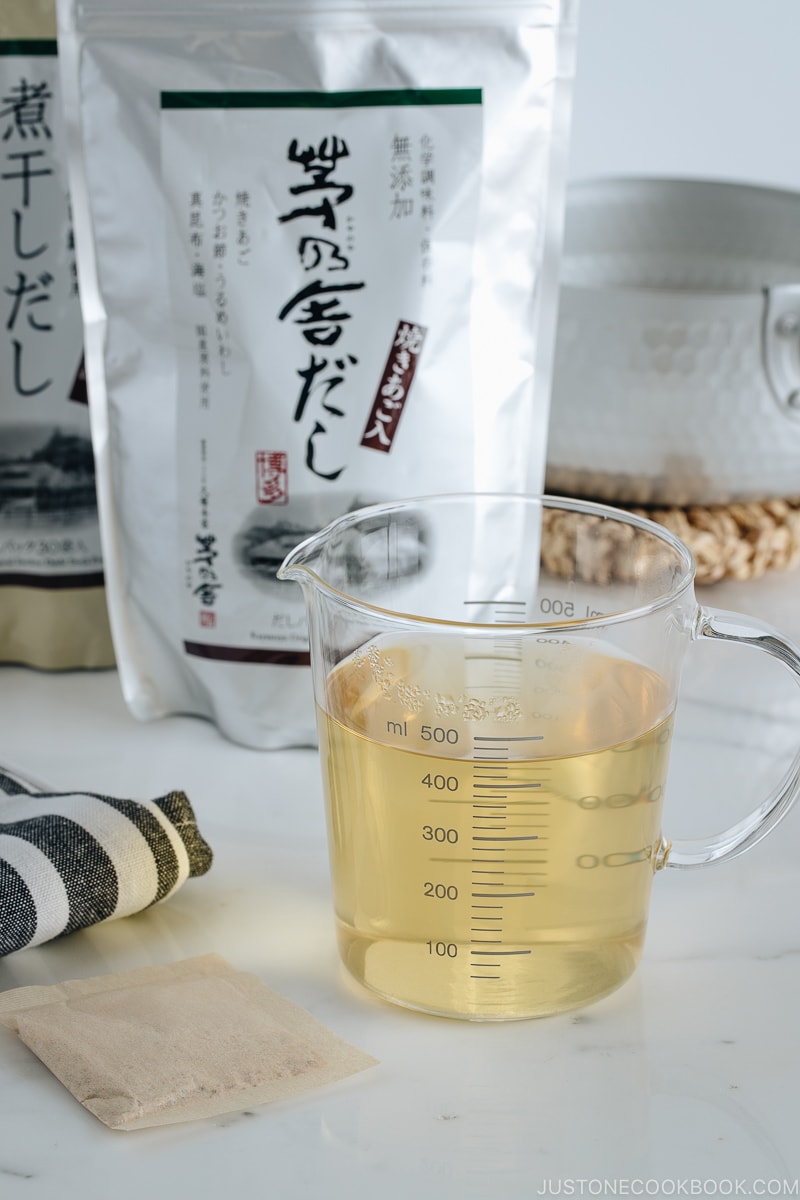
What makes this chicken and egg rice bowl authentically Japanese? It’s the flavor of dashi (Japanese soup stock). If you’re not familiar with dashi, think of this ingredient as the most essential flavor of Japanese cuisine. The good news is:
- It’s so easy to make compared to other stocks; homemade dashi takes 30 minutes.
- It can be vegan-friendly – read Vegan Dashi.
- Dashi can be made instantly with a dashi packet (my preferred method over dashi powder).
I highly recommend reading my Ultimate Dashi Guide as dashi appears in the majority of Japanese recipes and you can’t avoid it.
For two servings, I recommend making a pot of dashi (about 4 cups) and then using ½ cup for Oyakodon and the leftover (3½ cups) for Homemade Miso Soup to serve as a meal set. Now you have a filling rice bowl and a soothing miso soup.
Tip 2: Use the Japanese Cutting Technique “Sogigiri”
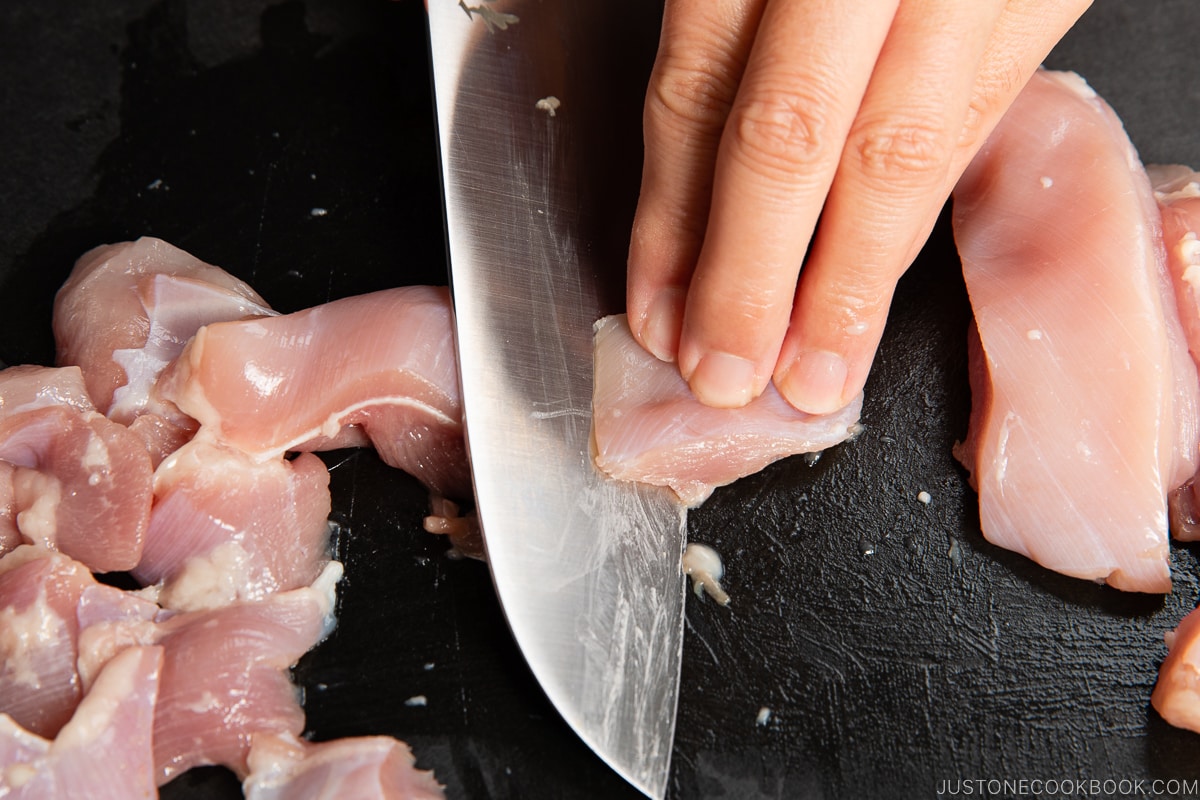
This “sogigiri” cutting technique gives each piece of the ingredient equal thickness and creates more surface area for faster cooking and better absorption of the flavors.
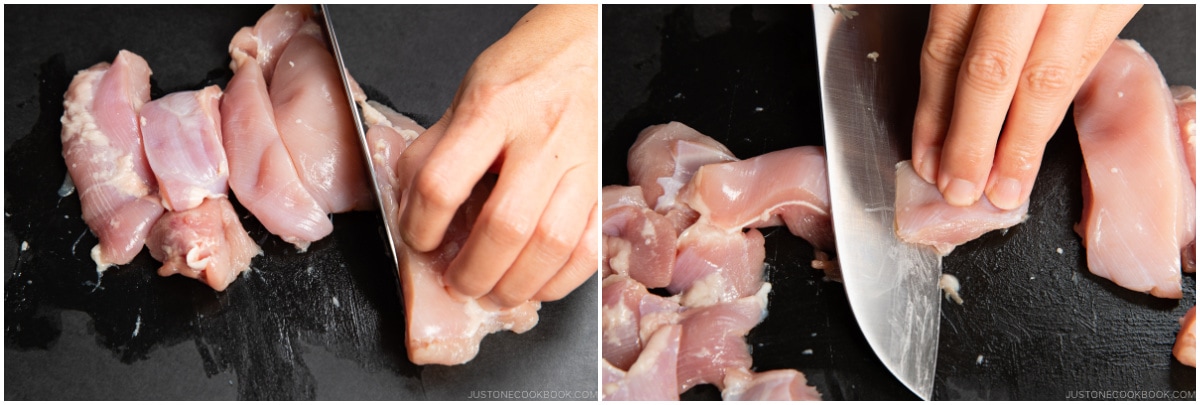
Also, after trying out different sizes of chicken pieces, I realized that cutting the chicken into 2-cm (3/4 inch) pieces worked the best. Big pieces of chicken tend to separate from the rest of the ingredients while smaller pieces are better at incorporating with the onions and soft-cooked eggs.
Tip 3: “Cut” the Egg Whites
For the best-looking oyakodon, aim for high color contrast between the white and yellow parts of the eggs. That’s why it’s important not to beat the eggs. If you use a beaten egg mixture, you will get one uniform yellow color on your oyakodon.
Instead, “cut” the egg whites 5-6 times with a pair of chopsticks, lifting the whites to break them up into a few smaller clumps. This will prevent the egg whites from falling into the frying pan all at once.
How about the egg yolks? While cutting the egg whites, you may have accidentally broken some of the egg yolks. That’s perfect!
You don’t want to blend the yolks and whites together. If the yolks haven’t broken yet, you can gently break them a little bit. The egg whites and yolks are broken, but still distinct, and they should look like a marble pattern.
Tip 4: Cook a Maximum of Two Servings in One Medium Frying Pan
Let’s say you want to multiply the recipe for your family of four or six. The ingredients and seasonings will increase significantly compared to two servings, but the medium frying pan (about 10 inches/25 cm) won’t double or triple in size.
If you try to cook four or six servings in a medium or large frying pan, you will overcrowd the pan and the ingredients will take a long time to cook. Also, the seasonings will not evaporate as efficiently as with two servings. As a result, your oyakodon will have too much sauce, almost like a soup.
Therefore, make two servings per medium frying pan for this recipe. You will need two medium frying pans for four servings.
Tip 5: Add the Eggs at Two Separate Times
To achieve an ideal egg texture for delicious oyakodon, aim for egg whites that are somewhat firm but still wobbly and egg yolks that remain soft and runny. Since raw eggs are safe to consume in Japan, oyakodon can look a bit different when it’s served in Japan. Don’t be shocked if the eggs are a lot more on the runny and raw side there.
If you live outside of Japan, it’s best to cook the eggs slightly longer than how it’s cooked in Japan. It may not look as pretty, but it’s for food safety reasons.
To achieve the fluffy soft-cooked egg for oyakodon, we add the eggs to the simmering chicken and egg mixture at two separate times:
- Add two-thirds of the eggs (ideally more egg whites because they take longer time to cook than egg yolks) to the center of the pan, avoiding the edges where eggs get overcooked.
- Add the remaining one-third of the eggs (ideally more egg yolks) to the entire surface of the pan.
One last tip! It’s faster to cook egg whites when the eggs are already at room temperature.
FAQs
What is an oyakodon pan?
In Japan, oyakodon is typically made in this single-serving oyakodon pan.
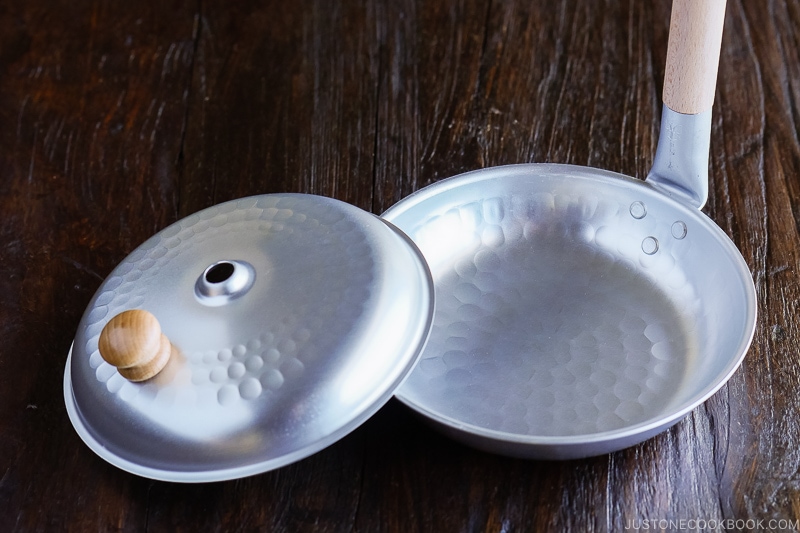
It helps to slide the well-layered dish, including the sauce and soft-cooked egg, into the rice bowl.
You can use a small shallow frying pan that is slope-sided, so you can easily transfer the chicken and egg mixture to the bed of rice in a donburi bowl. Ideally, the diameter of the pan should be the same or smaller size as your bowl.
Where can I buy an oyakodon pan?
You can find one in the following online stores:
- Amazon
- MTC Kitchen (Use JOC10 for 10% off)
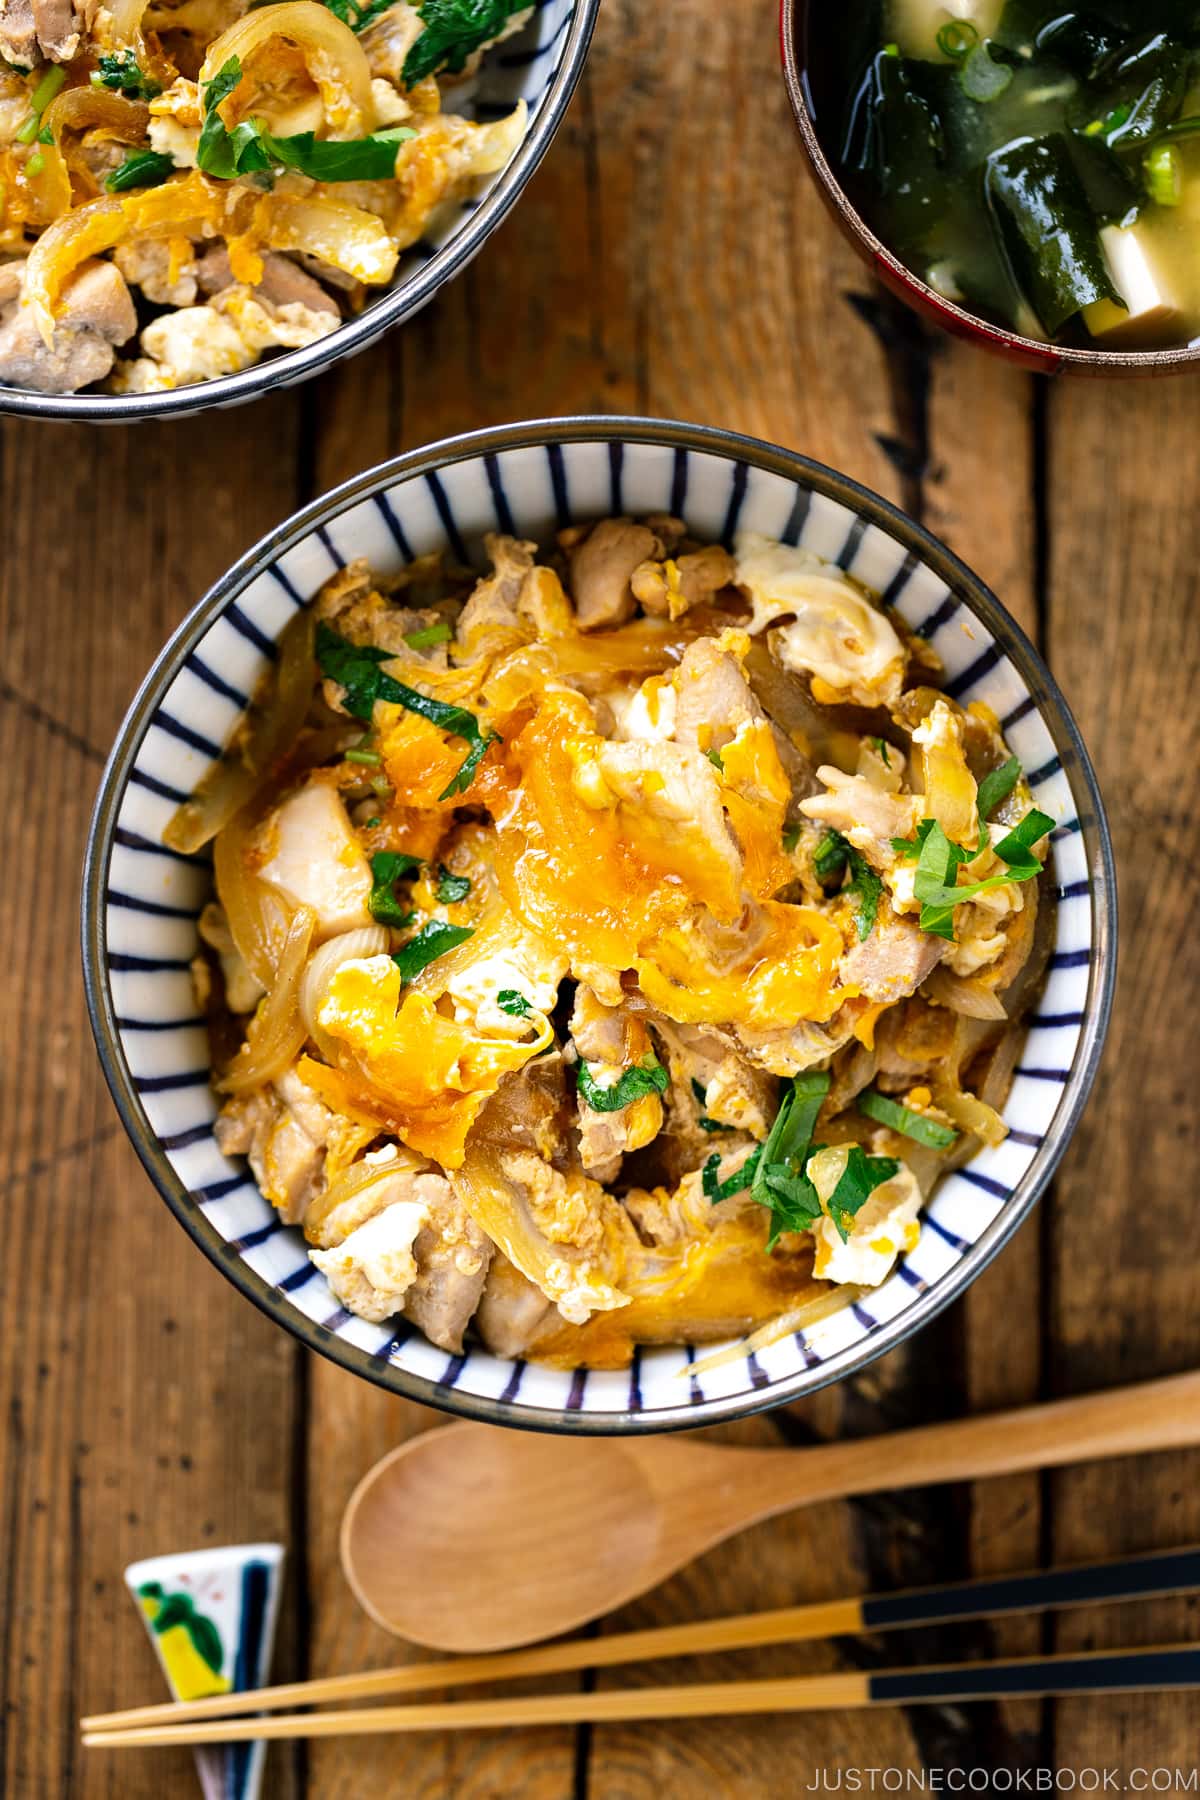
Why do we need to cook oyakodon one serving at a time?
I think it’s best to explain by comparing the two pictures below.
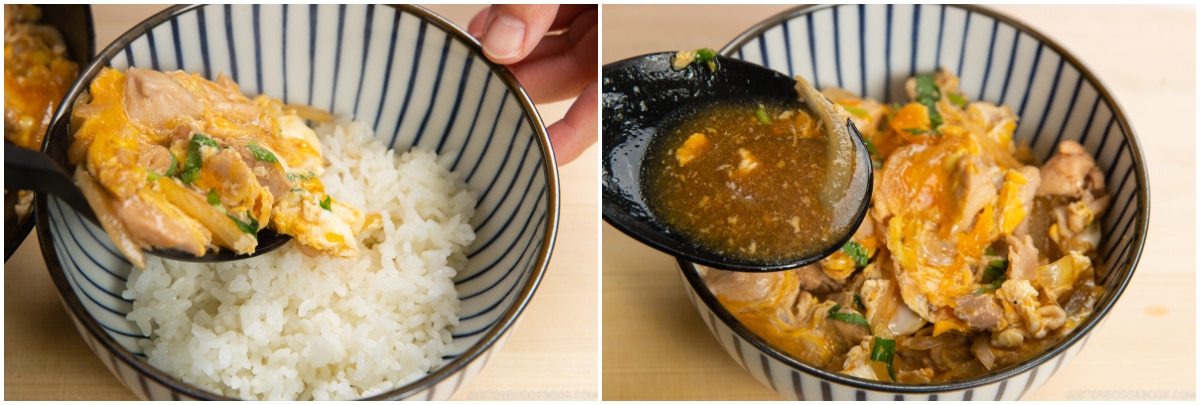
As I explained earlier, when you use an oyakodon pan or a small frying pan, you can slide the entire dish—onion-chicken-egg layer—onto the bed of steamed rice.
When you cook oyakodon in a medium frying pan, you have to scoop out the dish, breaking the layers despite your best attempt. If you have a really wide flat spoon, you may be able to transfer a big portion onto the rice bowl, but it will still not be big enough to cover the rice and the dish will look a little broken up.
Restaurants and some home cooks use the single-serving oyakodon pan just to achieve the proper look of the dish.
Can we use fewer eggs?
The standard number of eggs for oyakodon is 2 eggs per serving. The eggs bind all the other ingredients in the simmering sauce together so that the finished oyakodon can slide onto the bed of steamed rice smoothly.
If you’re cooking for two servings in a medium frying pan, you can use 3 eggs, 1½ eggs per serving. However, I don’t recommend using fewer eggs than that as they won’t be able to bind all the ingredients together.
Can we cover the frying pan with a lid?
I’ve made oyakodon both with and without a lid, testing out the cooking time, flavor, and texture and adjusting the seasoning mixture to achieve the best result.
With a lid on, the chicken will cook slightly faster, but the inside of the pan gets quite hot and the chicken can get overcooked while you want to simmer a bit longer for the chicken to absorb more flavors.
After multiple tests, my final verdict is to cook uncovered. When you cook uncovered, the excess moisture from the onion and chicken will evaporate and the sauce will be more flavorful and intense.
One exception is for cooking the eggs. If you prefer to fully cook the eggs, you may want to use a lid.
More Easy Rice Bowl Recipes
- Gyudon (Quick Beef Bowl)
- Tanin Don (Beef and Egg Rice Bowl)
- Chicken Katsudon
- Pork Curry Bowl
- 12 Donburi Recipes
Wish to learn more about Japanese cooking? Sign up for our free newsletter to receive cooking tips & recipe updates! And stay in touch with me on Facebook, Pinterest, YouTube, and Instagram.
Oyakodon (Chicken and Egg Rice Bowl)
Video
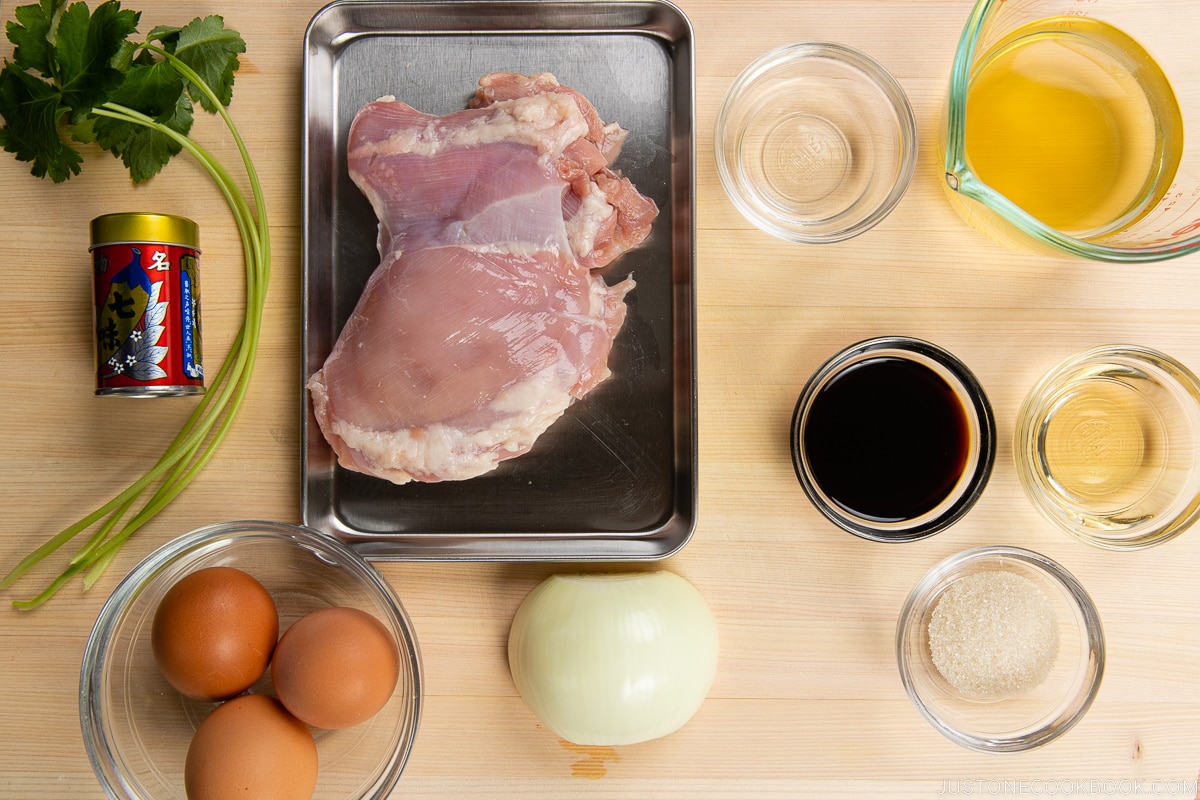
Ingredients
- ½ onion (4 oz, 113 g; peeled)
- 10 oz boneless, skinless chicken thighs (typically 1–2 thighs; use plant-based meat substitute for vegan/vegetarian)
- 1 Tbsp sake (for marinating the chicken; substitute with Chinese rice wine or dry sherry, or omit)
- 3–4 large eggs (50 g each w/o shell) (at room temperature; for vegan/vegetarian, use egg substitute such as JUST Egg)
For the Seasonings
- ½ cup dashi (Japanese soup stock) (use standard Awase Dashi, dashi packet or powder, or Vegan Dashi)
- 2 Tbsp soy sauce
- 2 Tbsp mirin
- 2 tsp sugar
For Serving
- 2 servings cooked Japanese short-grain rice (typically 1⅔ cups (250 g) per donburi serving)
- 4 sprigs mitsuba (Japanese parsley) (or green onion/scallion)
- shichimi togarashi (Japanese seven spice) (optional)
- Japanese sansho pepper (optional)
Instructions
Before You Start…
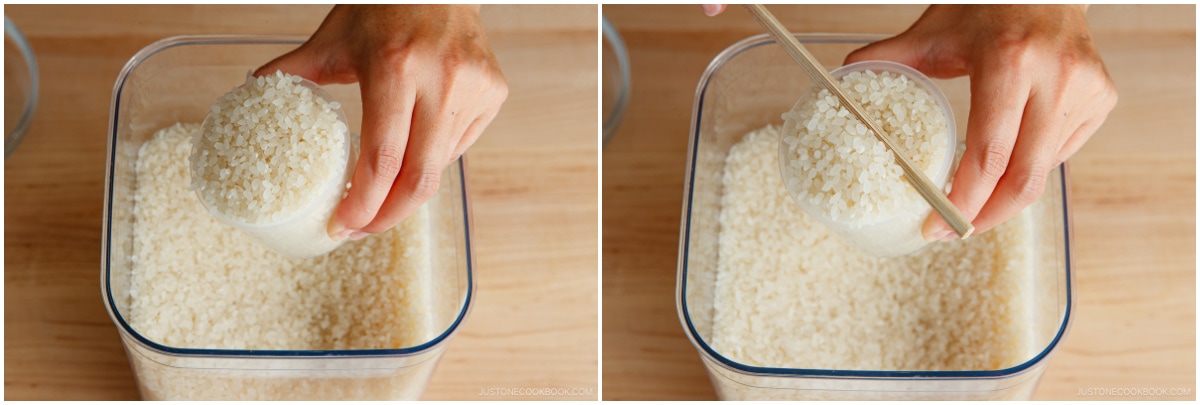
- For the steamed rice, please note that 1½ cups (300 g, 2 rice cooker cups) of uncooked Japanese short-grain rice yield 4⅓ cups (660 g) of cooked rice, enough for 2 donburi servings (3⅓ cups, 500 g). See how to cook short-grain rice with a rice cooker, pot over the stove, Instant Pot, or donabe.

- This recipe includes both cooking methods—using a medium frying pan (about 10 inches/25 cm) and an oyakodon pan or small frying pan (8 inches/20 cm). Typically, oyakodon is made individually for each serving using an oyakodon pan, which lets you slide the cooked ingredients onto the rice bowl easily. See the separate cooking instructions below.

- Gather all the ingredients. Do not make more than two servings in a medium frying pan. I explained a bit more in the blog post (under Oyakodon Cooking Tips). If you are making four servings, use two medium frying pans.

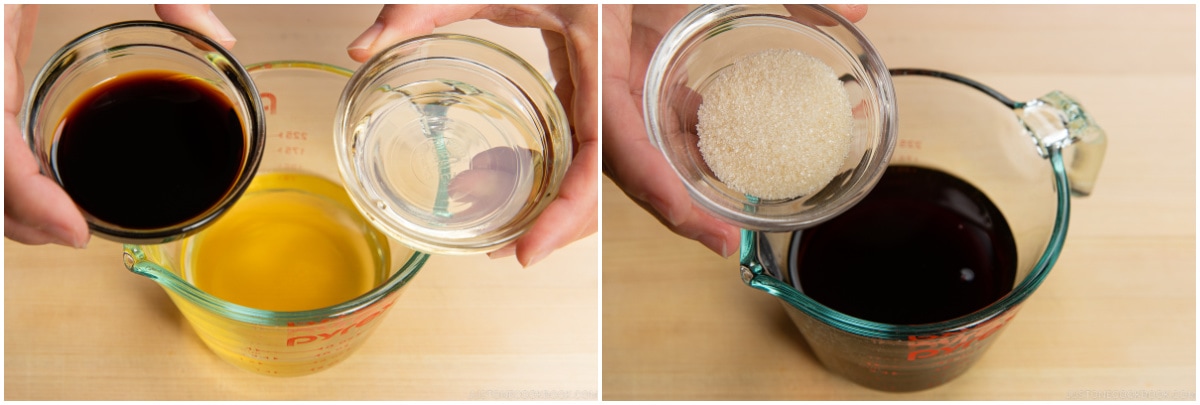
To Prepare the Seasonings
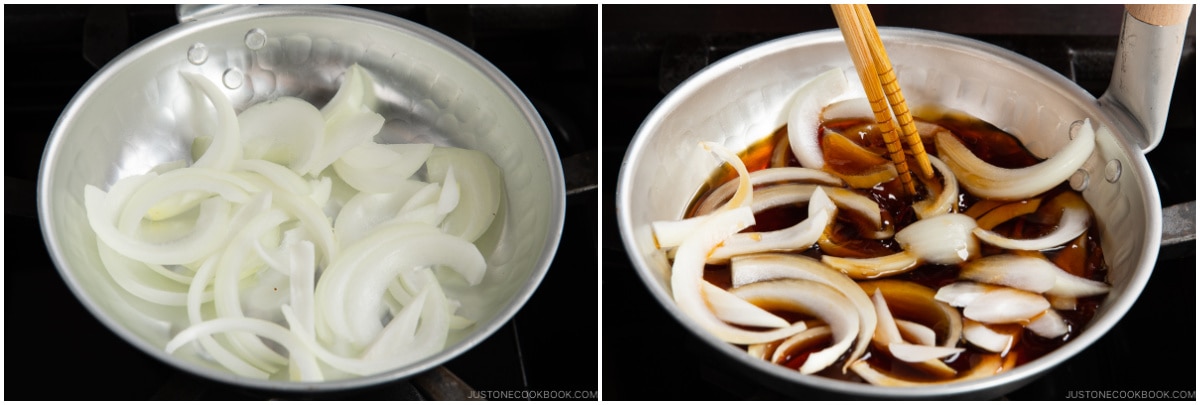
- Combine ½ cup dashi (Japanese soup stock), 2 Tbsp soy sauce, 2 Tbsp mirin, and 2 tsp sugar in a bowl or a liquid measuring cup and mix all together until the sugar is dissolved.
To Prepare the Ingredients
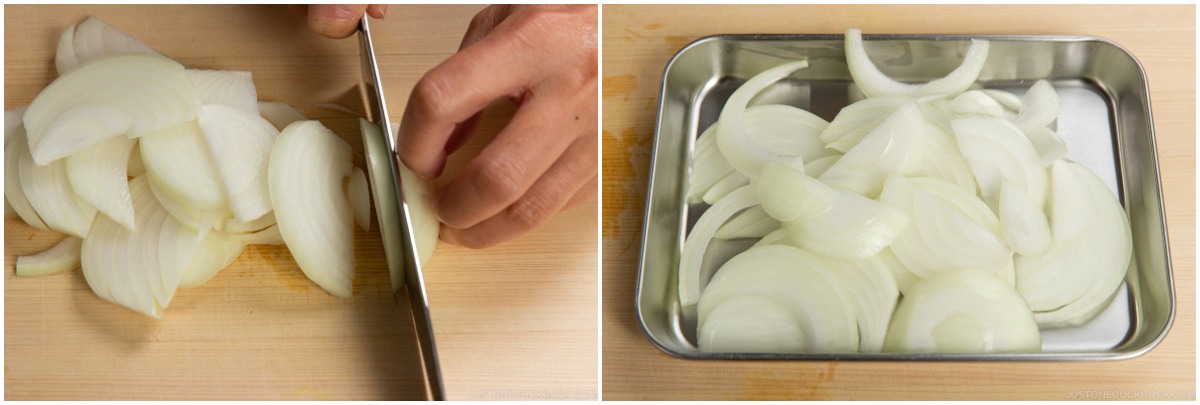
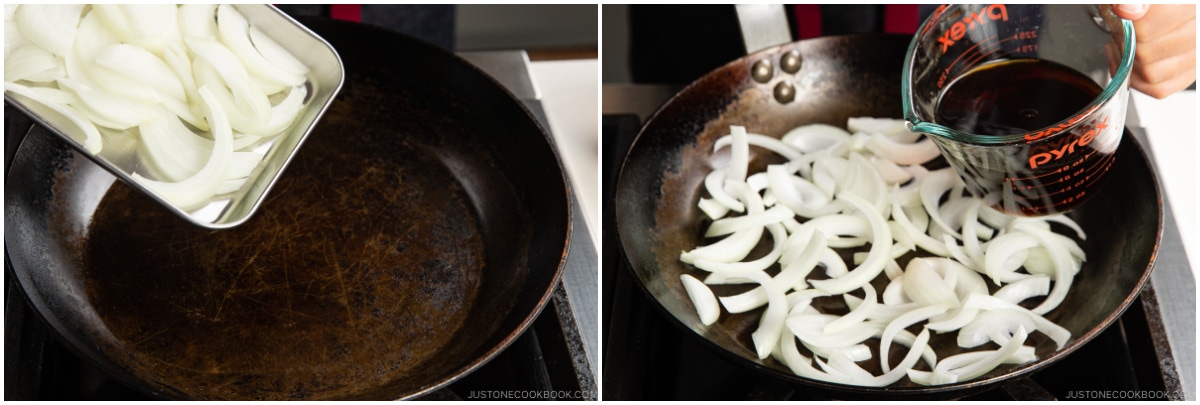
- Slice ½ onion lengthwise, about ¼ inch (6 mm) wide.
- Chop 4 sprigs mitsuba (Japanese parsley) ½ inch (1.3 cm) wide.
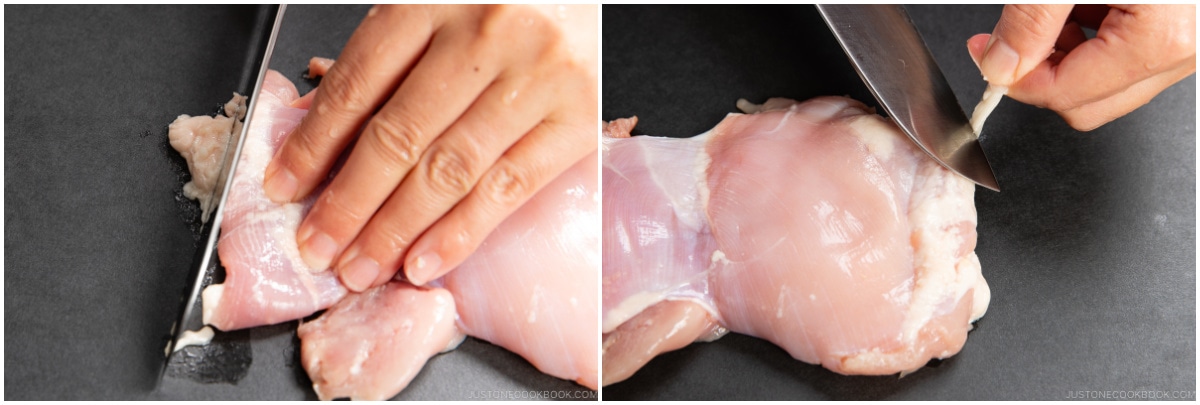
- Trim the extra bits of fat and connective tissue from 10 oz boneless, skinless chicken thighs with the knife.
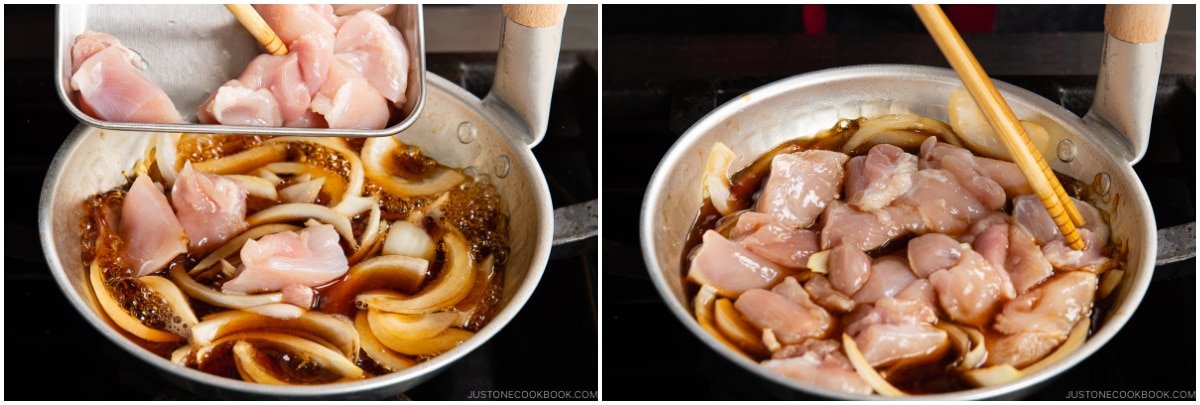
- Cut the chicken thigh along the grain into strips ¾–1 inch (2–2.5 cm) wide. Next, angle your knife back and diagonally (nearly parallel to the cutting board), and then slice the chicken strips against the grain into pieces about ¾–1 inch (2–2.5 cm) square. This sogigiri cutting technique gives the chicken pieces equal thickness and creates more surface area for fast cooking and better absorption of the flavors.
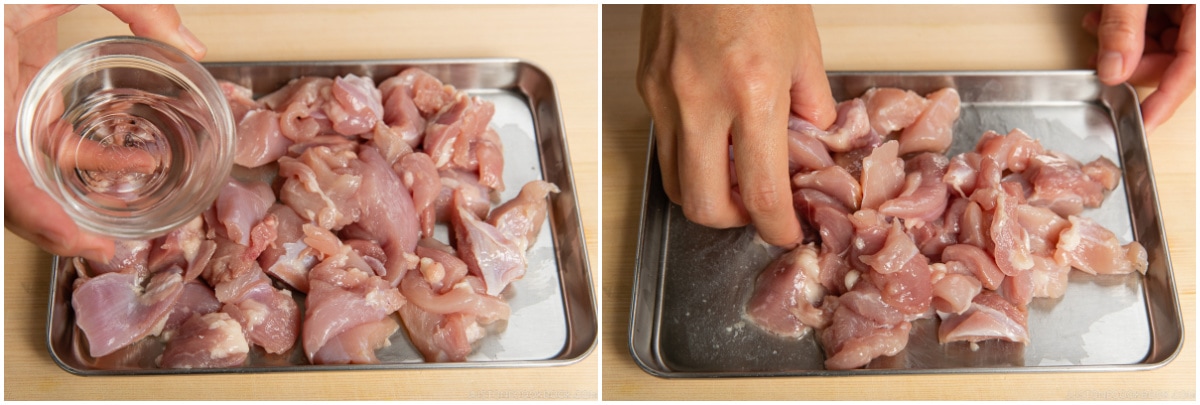
- Transfer the chicken to a bowl or tray and sprinkle with 1 Tbsp sake. Set aside for 5 minutes.
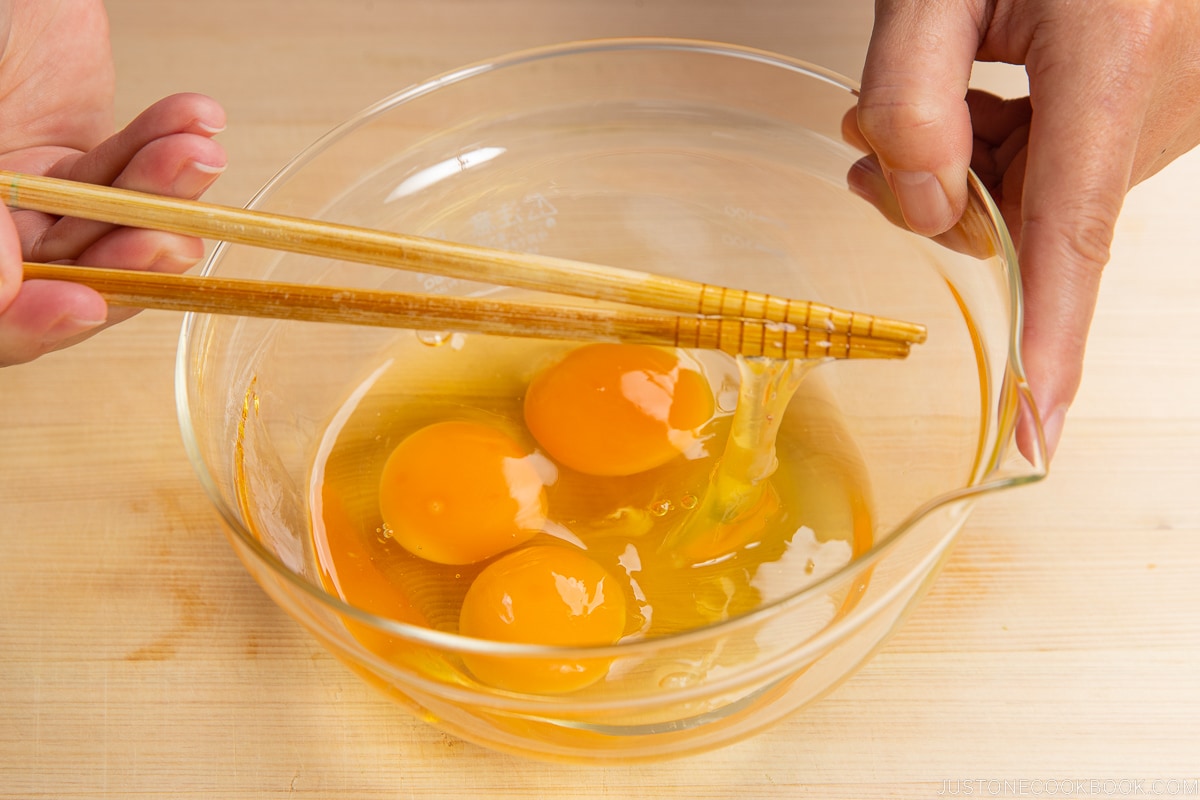
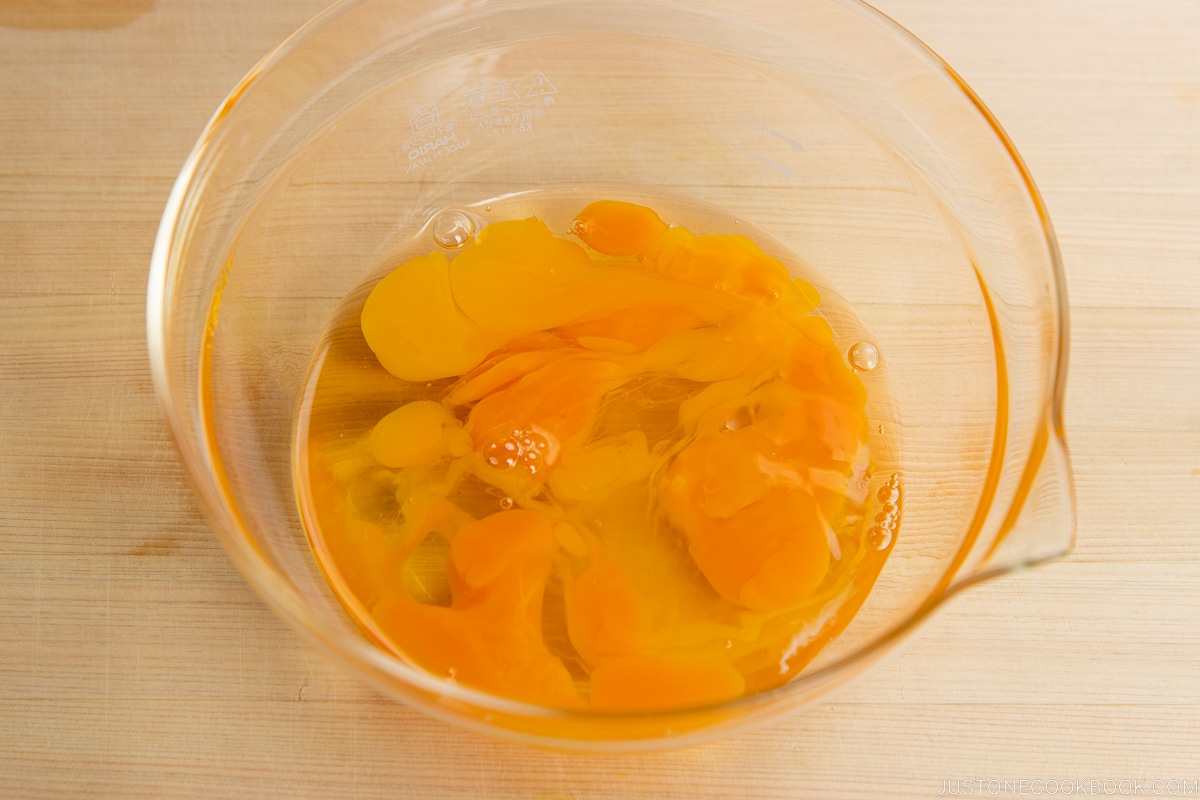
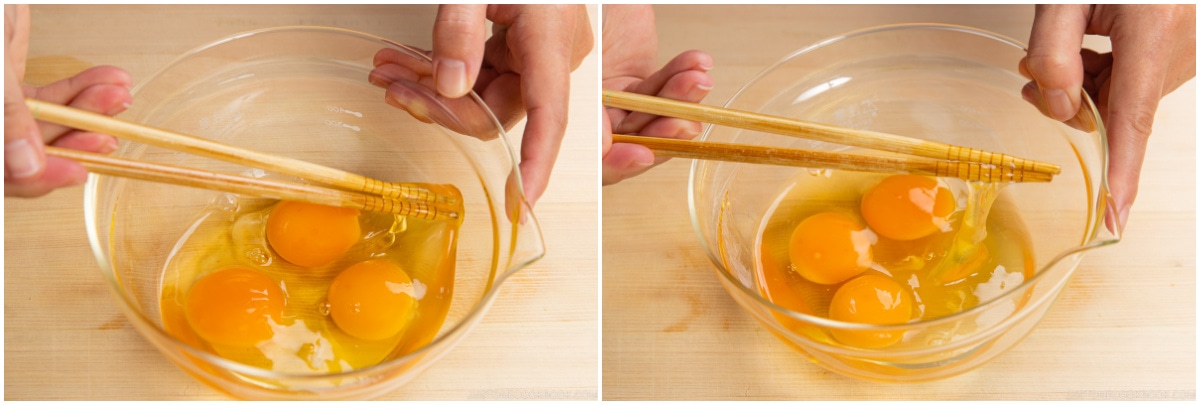
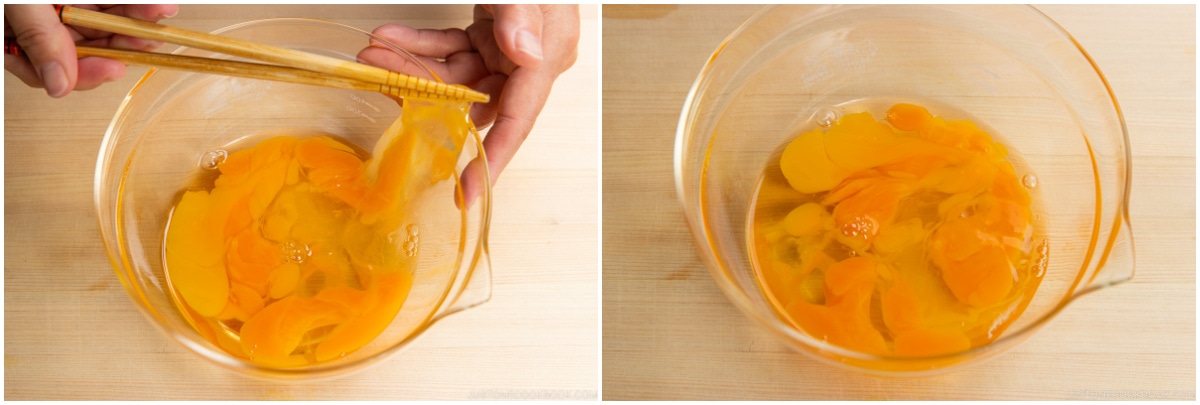
- Crack 3–4 large eggs (50 g each w/o shell) into a bowl. Using a pair of chopsticks, lift the egg whites to “cut“ them 5–6 times into a few smaller clumps. This will prevent the egg whites from falling into the frying pan all at once. Do not whisk or beat the eggs together. Tip: Aim for high color contrast between the white and yellow parts of the eggs in your finished dish.
- While “cutting“ the egg whites, you may have accidentally broken some of the egg yolks. That‘s okay. If the yolks haven‘t broken yet, you can poke them to gently break them, but do not blend the egg whites and yolks. The eggs should resemble a marble pattern.
To Cook the Oyakodon in a Medium Frying Pan
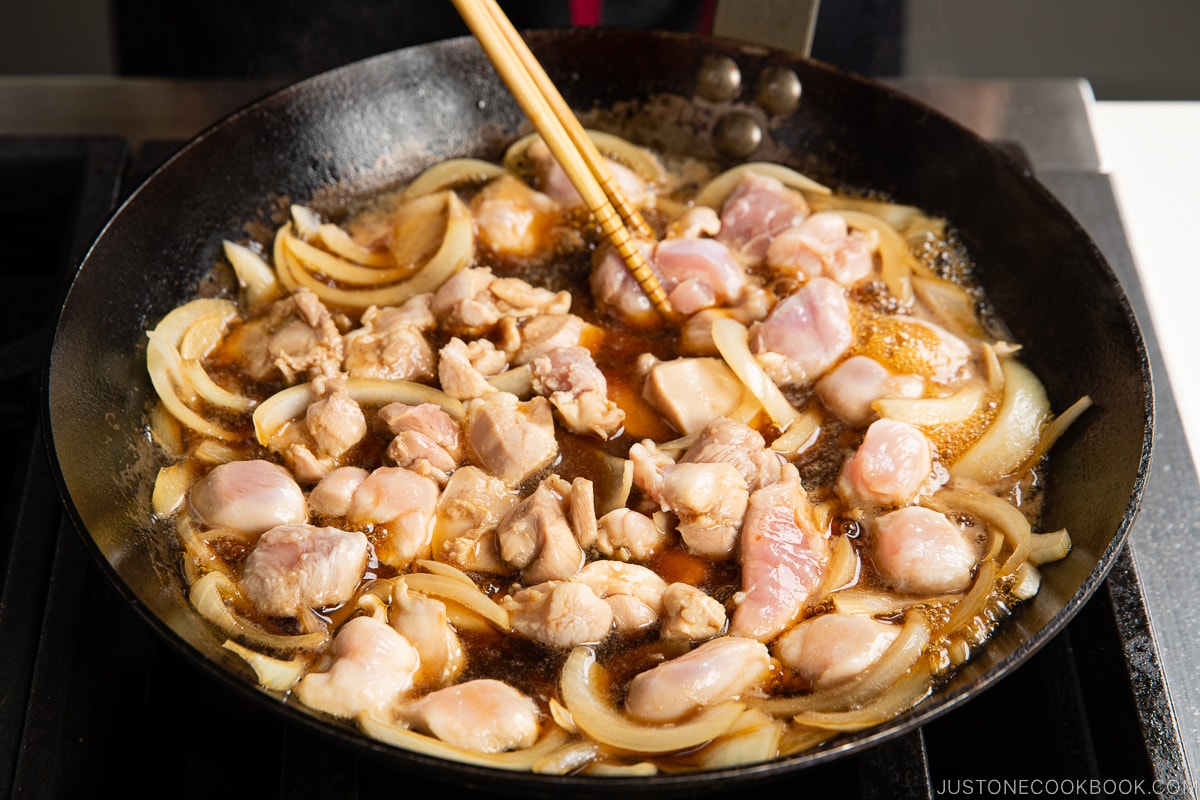
- With the stove off, add the sliced onions to a medium frying pan (I use a well-seasoned 11” carbon steel pan) in a single layer. Then, add the seasonings mixture. It should just cover the onions. If not, your frying pan is too big and you need to either increase the seasoning or use a smaller pan.
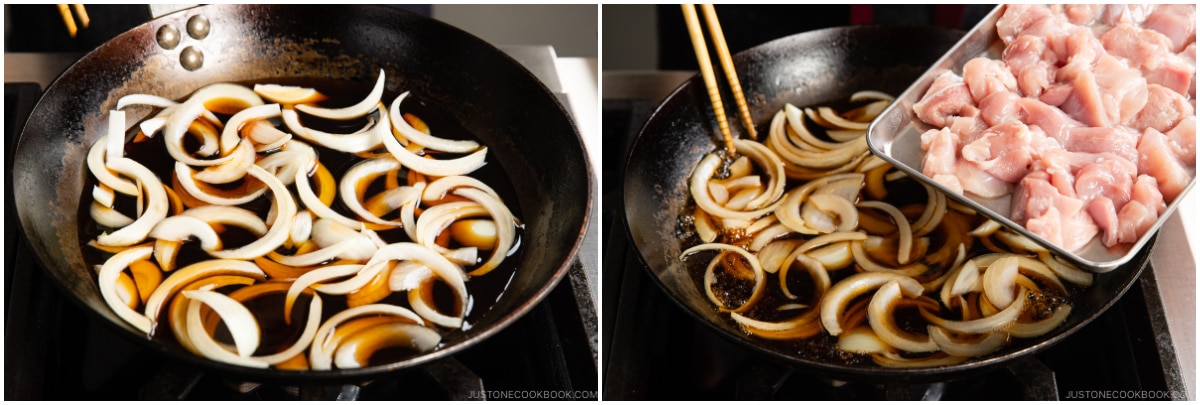
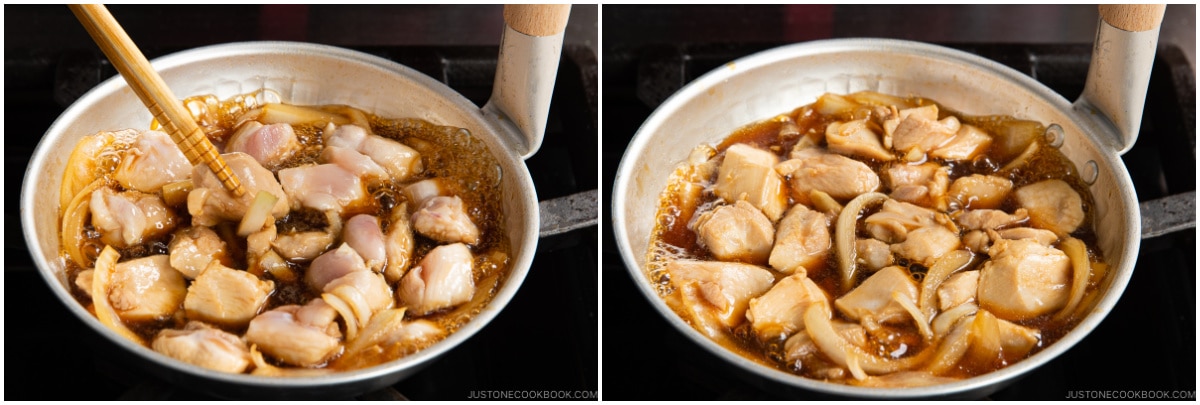
- Turn on the heat to medium and bring it to a simmer. Once simmering, add the chicken on top of the onions.
- Make sure the onions and chicken are evenly distributed. Once simmering again, lower the heat to medium low. Cook, uncovered, for 5 minutes or until the chicken is no longer pink and the onions are tender. Halfway through, flip the chicken. Tip: Evaporation reduces the sauce and intensifies the flavor.
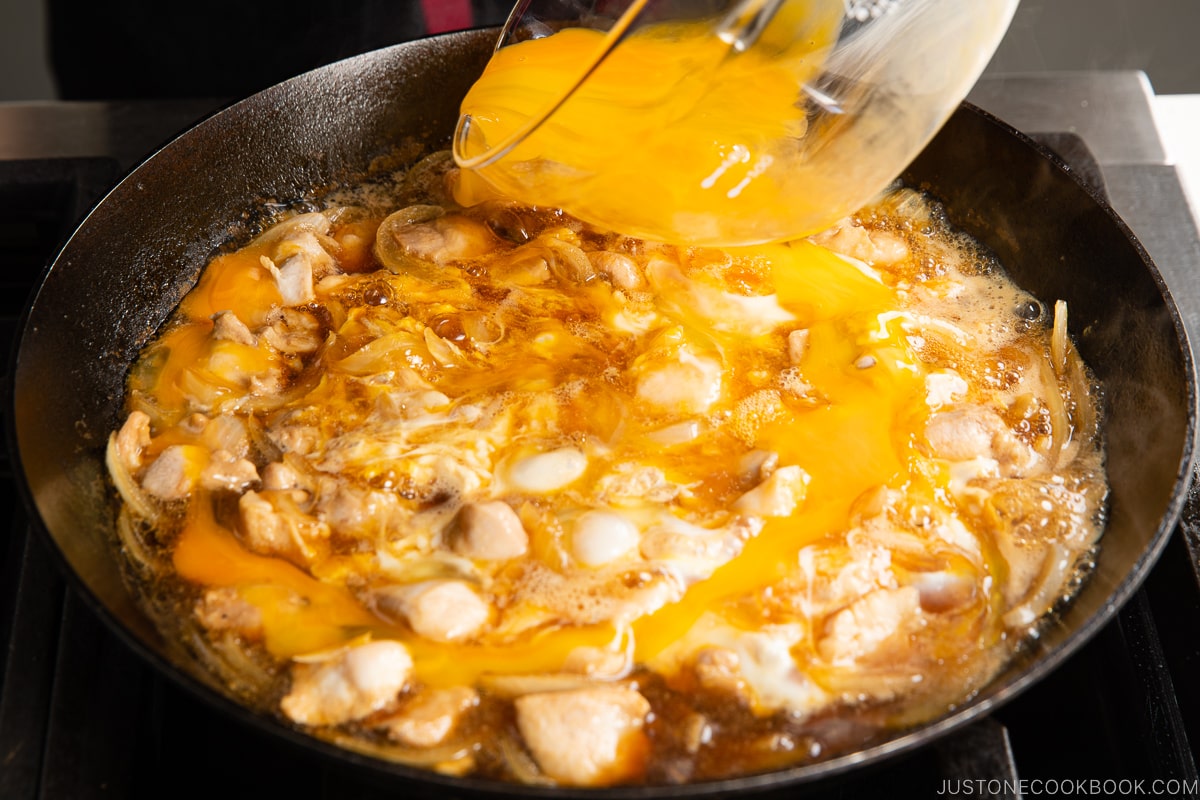
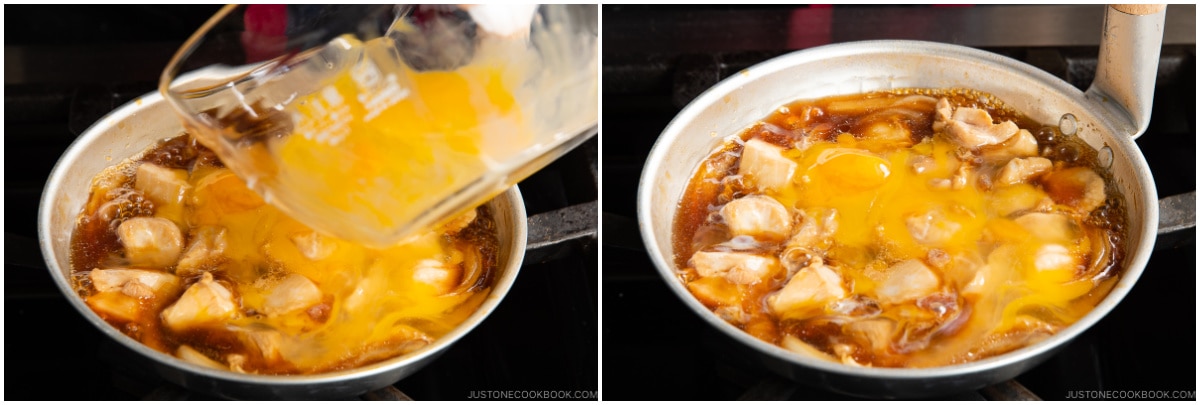
- We will add the eggs in two stages: Two-thirds of the eggs first, then the remaining one-third later. Now, increase the heat to medium. With the cooking liquid simmering (small bubbles around the edges), drizzle two-thirds of the eggs in a circular pattern over the chicken and onions, avoiding the edges of the pan where the eggs can easily overcook. Tip: Only drizzle the eggs if the cooking liquid is simmering, as with Egg Drop Soup. Also, try to add more egg whites at this stage, as the whites take longer to cook than the yolks. Ideally, we want to keep the yolks soft and runny for the final presentation.
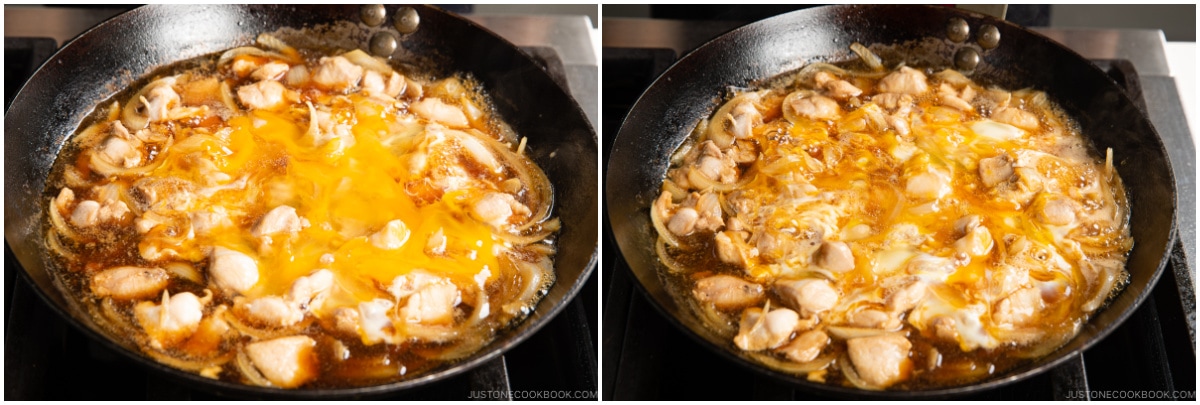
- If the heat is too strong, lower the heat. If the egg is moving toward the edges of the pan, gently gather it toward the center where the heat is not as strong. Optionally, you can cover the pan if the egg whites are taking a long time to set.
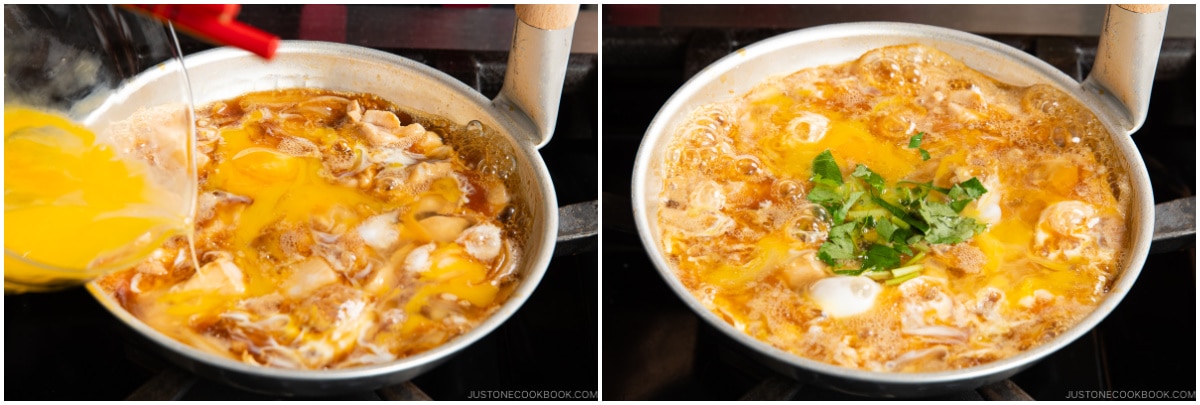
- When the eggs are still runny but just set, add the rest of the eggs to the center and around the edges of the pan. Add the mitsuba (or green onion) on top and cook on medium low until the egg is done to your liking. Usually, oyakodon in Japan is served while the egg is almost set but still runny (raw eggs are safe to consume in Japan). Tip: For the remaining one-third of the egg, try to distribute more egg yolks so the oyakodon will have a bright yellow color on top. For a good presentation, you can add a beaten extra yolk at the end.
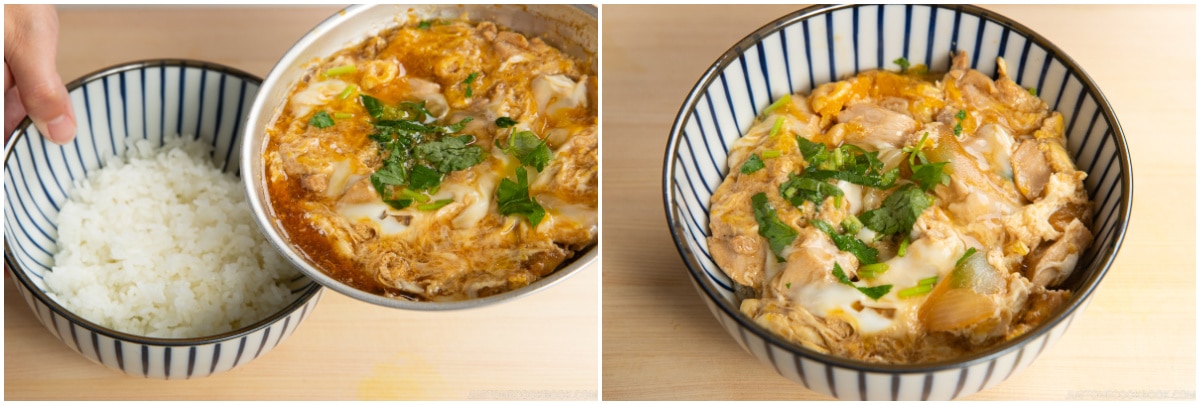
- Serve steamed rice in individual serving bowls. Spoon the cooked chicken and egg mixture onto the steamed rice and drizzle the desired amount of pan sauce on top.
To Cook the Oyakodon in an Oyakodon Pan or a Small Frying Pan
- Cook the chicken and egg in two batches, one serving at a time. Make sure to divide the ingredients in half. With the stove off, add half of the sliced onions to the pan in a single layer. Add half of the seasonings mixture (it should just cover the onions).
- Turn on the heat to medium and bring it to a simmer. Once simmering, add half of the chicken on top of the onions.
- Make sure the onions and chicken are evenly distributed. Once simmering, lower the heat to medium low. Cook, uncovered, for 4 minutes or until the chicken is no longer pink and the onions are tender. Halfway through, flip the chicken. Tip: Evaporation helps to reduce the sauce and intensify the flavor.
- We will add the eggs in two stages: Two-thirds of the eggs first, then the remaining one-third later. Now, increase the heat to medium. With the cooking liquid simmering (small bubbles around the edges), drizzle two-thirds of the eggs in a circular pattern over the chicken and onions, avoiding the edges of the pan where the eggs can easily overcook. Tip: Only add the eggs if the cooking liquid is simmering, as with Egg Drop Soup. Also, try to add more egg whites at this stage, as the whites take longer to cook than the yolks. Ideally, we want to keep the yolks soft and runny for the final presentation.
- When the eggs are still runny but just set, add the rest of the eggs to the center and around the edges of the pan. Add the mitsuba (or green onion) on top and cook on medium low until the egg is done to your liking. Usually, oyakodon in Japan is served while the egg is almost set but still runny (raw eggs are safe to consume in Japan). Tip: For the remaining one-third of the egg, try to distribute the egg yolk so the oyakodon will have a bright yellow color on top. For a good presentation, you can add a beaten extra yolk at the end.
- Portion 2 servings cooked Japanese short-grain rice into individual donburi or other serving bowls. Slide the cooked chicken and egg mixture onto the steamed rice and drizzle the desired amount of pan sauce on top. Repeat Steps 1 to 6 with the remaining ingredients.
To Serve
- Serve the Oyakodon with optional shichimi togarashi (Japanese seven spice) for a spicy kick and Japanese sansho pepper for a peppery fragrance on the side.
To Store
- You can keep the leftovers in an airtight container and store in the refrigerator for up to 2–3 days. To store in the freezer, do not add the eggs. You can add eggs after you reheat it in the pan.
Nutrition
Editor’s Note: The post was originally published on February 4, 2011. It has been republished with new images, updated content, and a revised recipe on October 30, 2022.


Hi Nami!
Oyakodon is my favorite donburi and my go-to restaurant has gone out of business so I thought why not make my own. Oh my, oh my. Your recipe is so easy to follow and the taste is even better than the restaurant’s. Even my husband (former Japanese restaurantier) really loved it! He hardly compliments. 😉 Thank you so much!
Hi Audrey! I’m so happy to hear you gave this recipe a try at home! With homemade, you can use the best ingredinets and you can even adjust the flavor as you like (little sweeter or saltier etc) and it’s really great! Now you can enjoy your favorite donburi more frequently. 😀 Thank you for your kind feedback!
So I was wondering is there a substitute I could use for Dashi in case I am unable to get my hands on any? I know it won’t be quite the same, but I was mostly curious as to whether you had any recommendations to things that could work in its place?
Hi Tyrone! It’s really hard question. 🙂 Without dashi, it lacks authenticity. I won’t consider you can actually replace dashi with other type of stock (chicken, vegetable, beef, etc) for 99% of Japanese food. When it requires dashi, you really need that umami flavor from dashi. Most of the time, dashi is the key to Japanese foods, it’s the thing that makes it unique Japanese flavors. So… I highly recommend making dashi with one of these 3 methods.
https://www.justonecookbook.com/how-to-make-dashi-3-ways/
Hondashi or powder dashi is easy to find, even on Amazon (http://amzn.to/1UuW32Z).
I’m so sorry my answer is not really answering to your question…
However, if you really don’t want dashi, then you can use chicken broth in this recipe because it has chicken already. But I have to say it won’t taste the same as real Oyakodon… 🙂
I always love oyakodon and would like to make it myself. So I decided to give it a try on your recipe and IT was great!! love the recipe, easy to follow n great taste! Thanks for sharing the step by step picture it is so helpful 🙂
Hi Hannah! I’m so happy to hear you enjoyed my Oyakodon recipe! Thank you! Glad to hear step-by-step pics were helpful too. 🙂 Thank you for your kind feedback!
I just came across your website through searching for Japanese food. Where I currently live there are no Japanese restaurants, and I’m seriously having withdraws. I love your website, and I can’t wait to make some of your recipes!
Hi Alline! Welcome to my blog! I’m happy to hear you like my site. Home cooked Japanese food is better than restaurants, so I hope you can try some recipes and enjoy them at home! 🙂
Thank you for the great recipe! I made it last month and it was delicious. Since it’s snowing outside it’s time to make it again for dinner.
Hi Lauren! Thank you so much for trying this recipe! So happy to hear you liked it. Stay warm! 🙂
Thank you so much for your recipes. I was already using your Miso Ramen & miso egg recipes (which my 12 yr old loves) but we just came back from Japan, had a great time eating the food…today I made your oyakodon, which turned out & tasted fantastic. I will be trying your omurice recipe & green tea desserts next as I bought heaps of green tea powder.
Hi Renee! I’m so happy to hear your 12 year old enjoy the ramen recipe! Thanks for trying oyakodon recipe too! I hope you had a great trip to Japan! 🙂
Wow–this was the bomb. My son said it was the second best dish he’s ever eaten 🙂
Hi J-man! I’m so happy to hear that! Thank you so much for your kind feedback! 🙂
Oh, and after all that, I forgot to ask – do you know if can you freeze this dish?
Yes, you can. Use a airtight container and store in the freezer. I recommend to eat it within a week or two…. 😉
Hi Namiko-san,
I just made this recipe and it came out as good as the what I get from the restaurants here in Japan! I used chicken tenderloins and it came out wonderfully. I simply let the onions simmer a few minutes before adding the tenderloin chunks, which cook very quickly.
I let my sauce boil a good 10-15 minutes before adding the onion/chicken/egg, which allowed it to reduce. The final product had just the right amount of liquid. This tip may help your readers who end up with too much liquid.
Thank you again for such an おいしい recipe and 凄い blog!
Anna
Hi Anna! Thank you so much for trying my recipe and sharing your tips! I’m glad to hear you enjoy my blog too. 🙂 どうもありがとう!
Hi Nami
Tried to sign up for your news letter but for some reason my e mail address was unexceptable, aahh. never mind will continue checking out you recipes.
G.M.H.
Hi Graeme! I manually added your email address to my subscriber list. However, you still have to “CONFIRM” the subscription. Please check your inbox (or spam folder) and make sure to click the link provided to confirm.
Thank you!!!
Hi Nami, I’ve made oyakodon following various recipes but since I came across your recipe 3 years ago, it’s my go-to recipe now. I’m not very inventive and follow your instructions to a T – the result is always the same, YUMMILICIOUS!!! My husband always asks if I’ve cooked extra after he licks his bowl clean. Thanks for all the step by step photos that makes cooking so easy! 🙂
Hi Juliana! Thanks so much for your kind feedback and I’m so happy to hear that you’ve been cooking my oyakodon recipe for 3 years and you liked the recipe! Glad to hear step by step pictures help! 🙂
Konichiwa Nami!
I tried your recipe and used flapsteak instead of chicken, but after using 1 cup of dashi, my dish turned in to a soupy mess with more liquid than eggs. Any suggestions on how to prevent this from happening again? (apart from maybe using 1/2 cup of dashi)
Other than that, I your blog is SUGOI and I even bought your book at the iBooks store 🙂
Doug
Konnichiwa Douglas! From what you mentioned, I wonder if your pot/pan was smaller than mine. If the opening surface is smaller, the liquid doesn’t evaporate much. Or my heat is stronger so it evaporate faster, etc… I don’t usually have any problem with 1 cup, and if I reduce to less than 1 cup, then the oyakodon becomes more dry and there is no extra sauce to drizzle…
Arigato for your kind comments and for purchasing my ebook! 🙂
I made this today and I think you made a mistake on the amount of dashi (you wrote 1 cup). It was the saltiest thing ever when I made it and the sauce completely over took the eggs. If I’m wrong I’d love to know how I could better prepare this dish for next time. thank you and have a nice day.
Hi Bridgette! No, 1 cup dashi is correct. I just want to check with you. Did you make homemade dashi or dashi powder or maybe some other type?
Because dashi can’t be salty if you make dashi normally. It’s just water +kombu/bonito flakes. Nothing salty…
Here’s dashi recipe: https://www.justonecookbook.com/how-to-make-dashi/
IF your other ingredients are less than mine, you probably need to adjust the amount of seasonings as it could be salty. If you increase the amount of ingredients, then increase the seasoning..etc etc.
Hope this helps!
Making this for dinner tonight! May need to tweak it a little bit as I don’t have any dashi and I might add some Chinese sausage I have in the fridge too.
HI Kristi! I hope you enjoy this recipe! 🙂
Hi Nami-san,
I just tried this recipe and loved it. Okay, I did change a number of things in the ingredients so my recipe is a bit different and it looks different too. Oh well, still, I loved it. Thanks for sharing this.
Hi Cath! I’m glad to hear you enjoyed making oyakodon! 🙂