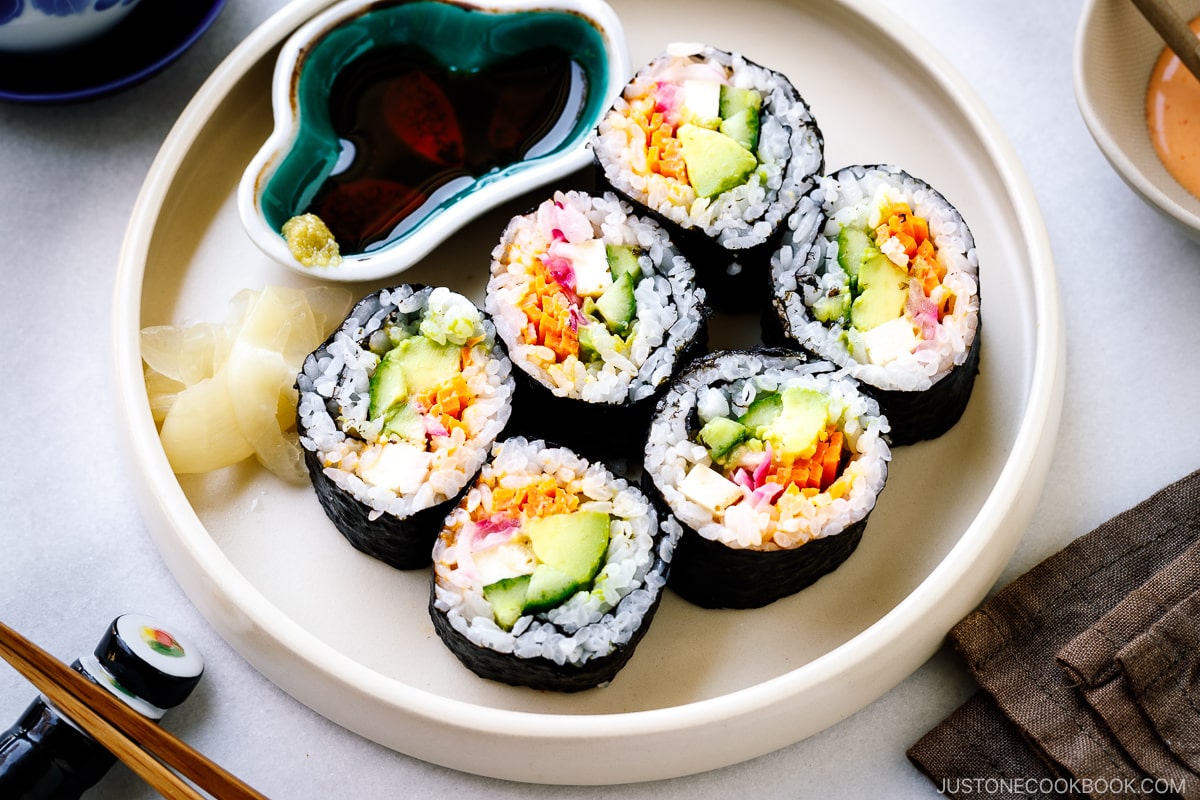
Learn how to make sushi rice perfectly every time with step-by-step pictures and a video tutorial. All you need are simple ingredients such as rice vinegar, sugar, salt, and kombu. Once you master the secret of making the sushi rice, you will be ready to dish up all kinds of mouth-watering sushi recipes!
Perfectly cooked Sushi Rice (酢飯) is fundamental in making any form of sushi. Indeed, the best sushi restaurants in Japan pride themselves not only on the freshest fish or variety but on the technique and quality of the sushi rice. Here, I shared my secrets and techniques on how to make sushi rice the authentic way. Follow along, and you’ll be able to make the best sushi rice at home for all kinds of sushi!
Table of Contents
What is Sushi Rice?
Sushi rice is made by cooking Japanese short-grain rice with kombu (kelp), which is then seasoned with a mixture of rice vinegar, sugar, and salt. In Japanese, sushi rice is also known as sushi-meshi (鮨飯), su-meshi (酢飯), or shari (シャリ). We only use this vinegar-flavored rice when making all kinds of sushi.
It’s worth noting that outside of Japan, Japanese short-grain rice is often called “sushi rice” for marketing purposes. In reality, Japanese rice is typically used in everyday meals and less often in sushi recipes.
You may also notice that Japanese short-grain rice has been incorrectly called “sticky rice.” Sticky rice is actually another name for glutinous rice or short-grain Japanese mochigome. We use this type of glutinous rice to make Mochi, Sekihan, and Okowa.
👉🏼 If you are here looking for a recipe to make plain steamed rice, see my post on How to Make Rice.
👉🏼 To brush up on your knowledge, I highly recommend reading “Everything You Need to Know about Japanese Rice” and “Types of Japanese Rice.“
Why Do We Season the Steamed Rice with Vinegar?
This actually goes back to the origin of sushi. The literal meaning of sushi is “sour flavor.” Historically, the way people stored fish was by wrapping it in fermented rice. When they were ready to enjoy the fish, the fermented rice was tossed away.
Sometime between the 1300s and 1500s, the Japanese slowly stopped using fermented rice and instead added vinegar to the rice to further increase its shelf life. The vinegar ended up improving the flavor of the rice so they started eating the fish and the rice together, which evolved to today’s sushi.
These days with refrigeration, there is no longer a spoilage issue with the fish, but the centuries of flavoring the rice with vinegar have become the mainstay.
Where to Buy Japanese Short-Grain Rice
You can find Japanese short-grain rice, commonly labeled as sushi rice, in major grocery stores these days. Some standard, affordable brands like Kokuho Rose and Nishiki are medium-grain rice.
For premium brands, I recommend Tamaki Gold and Tamanishiki Super Premium Short Grain Rice, which are available in Asian grocery stores.
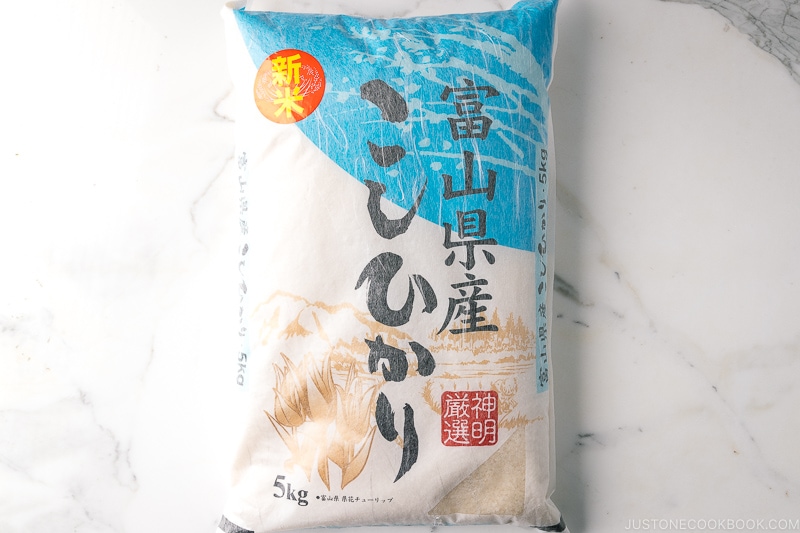
If you’re looking for imported, high-quality rice from Japan, I would recommend the Koshihikari variety, which is available from various brands at Japanese grocery stores. Known for its sweet taste and fragrance, it is the most popular variety in Japan.
My family and I like the Koshihikari rice from Toyama prefecture (see above). Nijiya Market sells it and we think it’s one of the best imported rice available here in the U.S. at this time.
The Right Rice-to-Water Ratio
When cooking rice normally, the Japanese golden ratio for white rice to water is 1 to 1.1 (or 1.2).
However, when making sushi rice (for all kinds of sushi recipes), it is very important to leave room for the sushi vinegar to soak into the cooked rice. For that reason, the amount of water to cook the short-grain rice is slightly moderated.
To make sushi rice, the golden ratio for white rice to water is 1 to 1.
Also, The rice should be cooked slightly harder and the steaming time should be shortened.
How to Make Perfect Sushi Rice
The Ingredients You’ll Need
- Japanese short-grain rice
- Kombu (kelp) – optional, but it infuses your rice with a nice aroma
- Rice vinegar
- Sugar
- Salt
The Cooking Steps
- Cook rice with kombu using your preferred cooking method.
- Make “sushi vinegar” seasoning.
- Transfer cooked rice to a baking sheet lined with parchment paper or a sushi oke or hangiri (traditional method).
- Season the rice with “sushi vinegar.” Then, fluff the rice with a rice paddle using a slicing motion.
- Cover with a damp towel and ready to use.
How Much Rice Do I Need to Cook?
The plastic rice cooker cup that comes with the rice cooker is ¾ cup (180 ml). In Japan, this amount is called ichi go (一合).
- 1 rice cooker cup (180 ml, ¾ cup, 150 g) of uncooked rice
- 2¼ cups or 330 g of cooked rice
- 1 thick sushi rolls
- 2 medium sushi rolls
- 4 thin sushi rolls
- 3 inside-out rolls
- 2¼ cups or 330 g of cooked rice
- 2 rice cooker cups (360 ml, 1½ cups, 300 g) of uncooked rice
- 4⅓ cups, 660 g of cooked rice
- 2 thick sushi rolls
- 4 medium sushi rolls
- 8 thin sushi rolls
- 6 inside-out sushi rolls
- 4⅓ cups, 660 g of cooked rice
- 3 rice cooker cups (540 ml, 2¼ cups, 450 g) of uncooked rice
- 6⅔ cups or 990 g of cooked rice
- 4 thick sushi rolls
- 6 medium sushi rolls
- 12 thin sushi rolls
- 9 inside-out sushi rolls
- 6⅔ cups or 990 g of cooked rice
- 4 rice cooker cups (720 ml, 3 cups, 600 g) of uncooked rice
- 8¾ cups or 1320 g of cooked rice
- 5 thick sushi rolls
- 8 medium sushi rolls
- 16 thin sushi rolls
- 12 inside-out sushi rolls
- 8¾ cups or 1320 g of cooked rice
- 5 rice cooker cups (900 ml, 3¾ cups, 750 g) of uncooked rice
- 11 cups or 1650 g of cooked rice
- 6 thick sushi rolls
- 11 medium sushi rolls
- 20 thin sushi rolls
- 15 inside-out sushi rolls
- 11 cups or 1650 g of cooked rice
Helpful Notes to Remember:
- One thick sushi roll (Futomaki) requires 1⅔ cups (250 g) of sushi rice.
- One medium sushi roll (Chumaki) like Vegetarian Sushi Roll requires 1 cup (150 g) of sushi rice.
- One thin sushi roll (Hosomaki) requires ½ cup (80 g) of sushi rice.
- One inside-out sushi roll (Uramaki) like California Roll requires ¾ cup (110 g) sushi rice.
- One nigiri sushi requires 20 g of sushi rice.
Cooking Tips
- Use Japanese short-grain rice. To achieve an authentic Japanese standard, you want to use only short-grain Japanese rice to make sushi rice. This is because the consistency and flavor of Japanese rice are very different from long-grain rice, jasmine rice, or other types of rice. With a higher content of moisture, Japanese rice is characterized by its unique stickiness and texture, which is attributed to the toothsome bite of authentic sushi. Read more about rice on my pantry page.
- Rinse and soak the rice before cooking. Make sure the rice is washed and rinsed a few times until no more starch comes out from the water. Then let the rice be soaked for at least 20-30 minutes before cooking. This allows the rice grains to yield a better texture.
- Cook the rice with kombu. Kombu (dried kelp) gives a subtle fragrance and umami taste to the sushi rice.
- The rice-to-water ratio is 1:1 (volume). Because we add sushi vinegar to the cooked rice, we use a bit less water than when you cook the rice regularly.
- Make homemade sushi vinegar. Sushi rice is always seasoned with sushi vinegar. It’s made of rice vinegar, sugar, and salt to achieve a balance of sweet, salty, and sour taste. You need to get mild-flavored rice vinegar, not another type of vinegar for this; otherwise, it’s too strong and the flavor is not the same. If you want to save time, you can use a bottle of seasoned vinegar called sushizu (すし酢).
- Transfer cooked rice to a sushi oke (hangiri), a large salad bowl, or a baking sheet lined with parchment paper. You must let the rice cool fast. It’s common to use an electric fan or hand-held fan called uchiwa (うちわ) to cool the rice.
- Add sushi vinegar when the rice is hot. As soon as the rice is taken out of the rice cooker or the cooking pot, you have to season the rice with sushi vinegar.
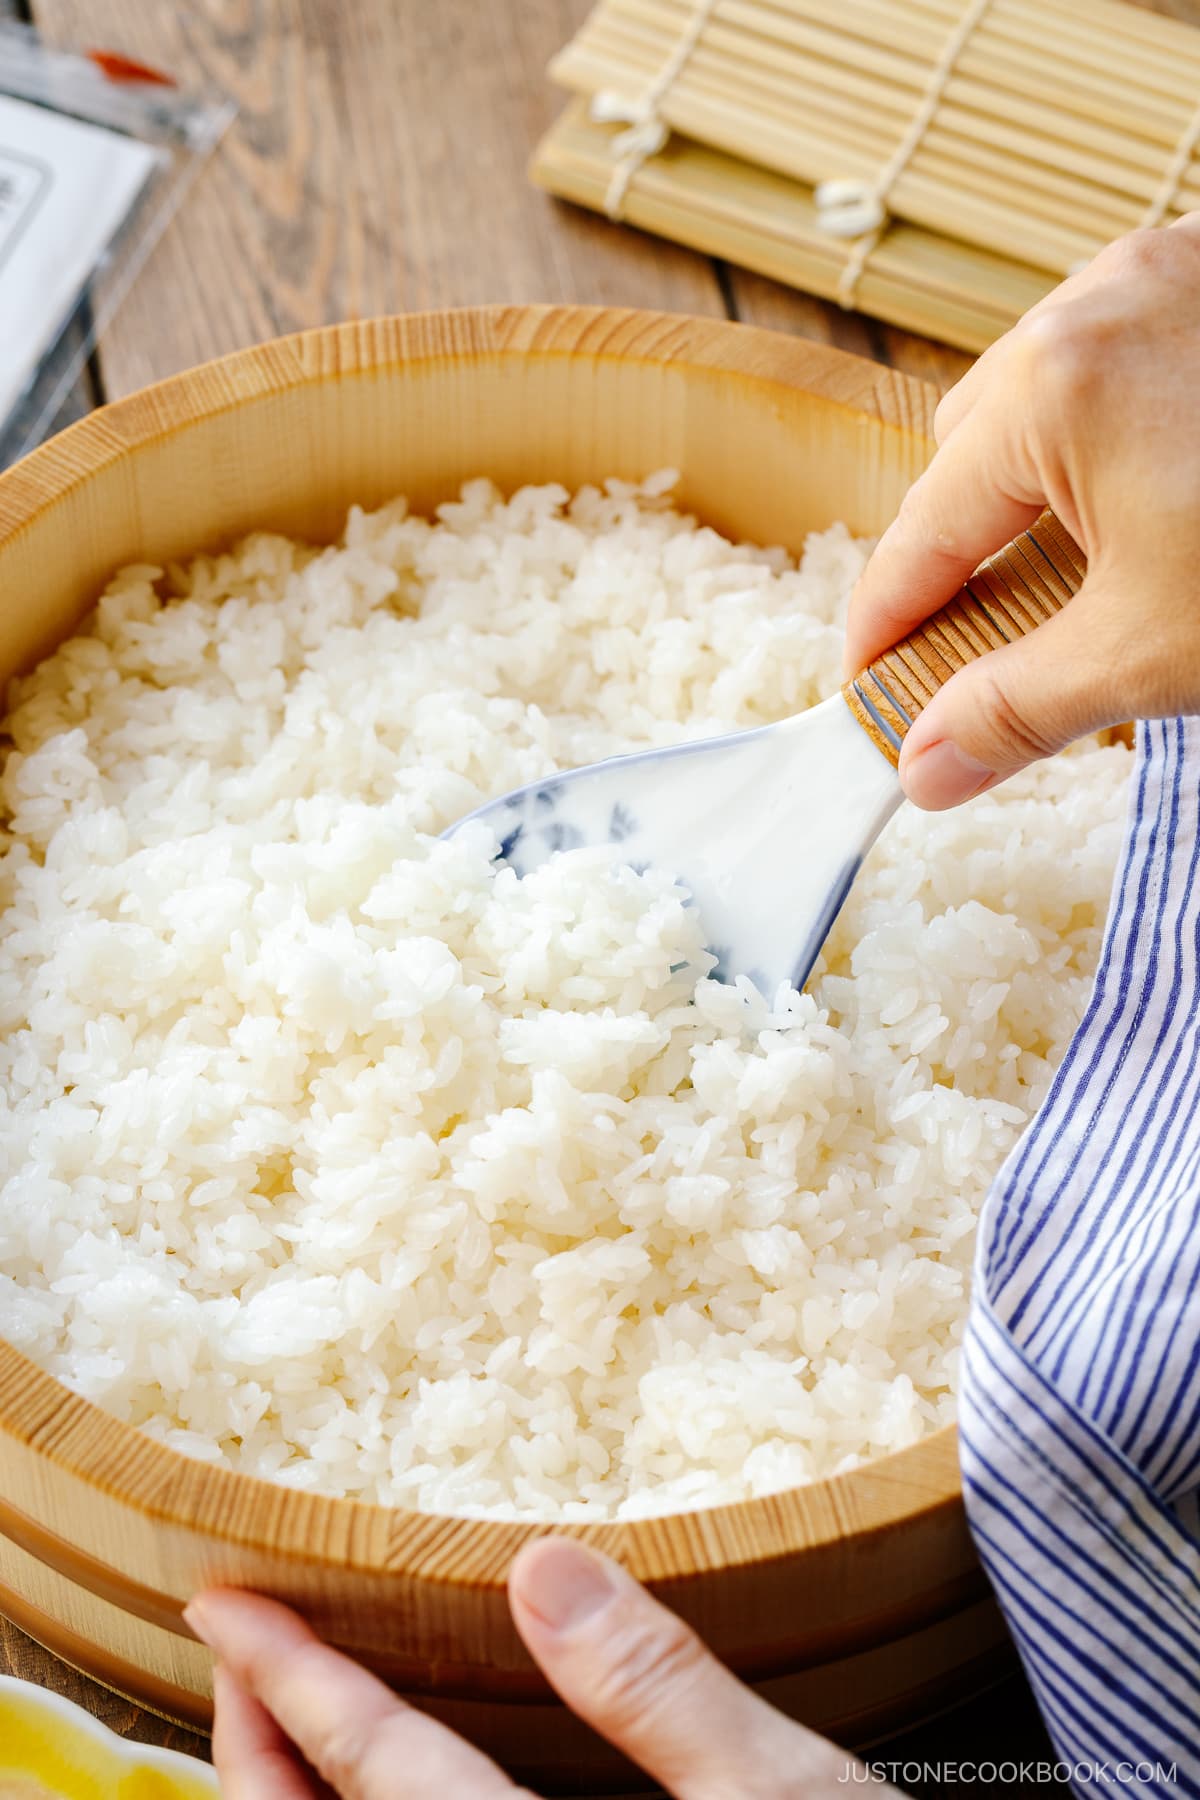
- Fluff the rice in a slicing motion with a rice paddle. Don’t mix or else sushi rice will end up being mushy or smashed. With proper fanning and slicing, your sushi rice becomes shiny!
- Cover with a damp towel and keep it at room temp until you’re ready to make sushi.
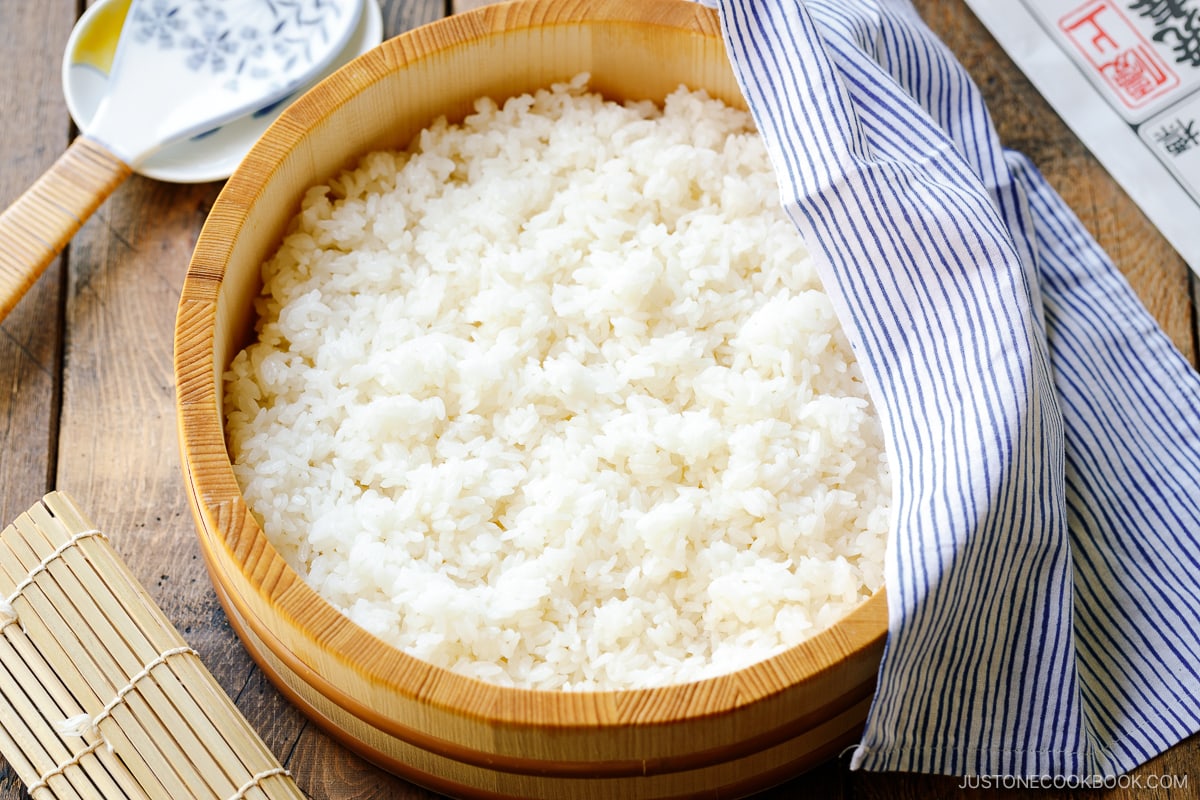
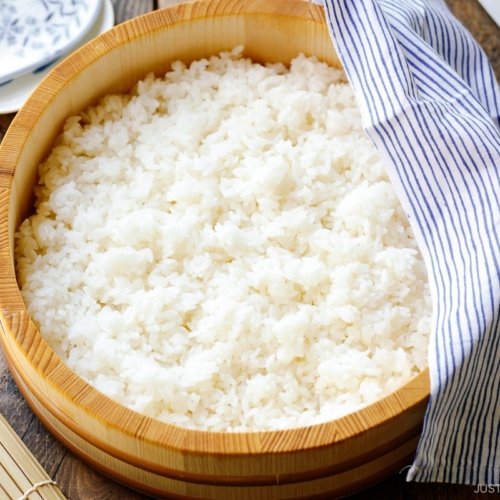
What Does Perfectly Cooked Rice Look Like?
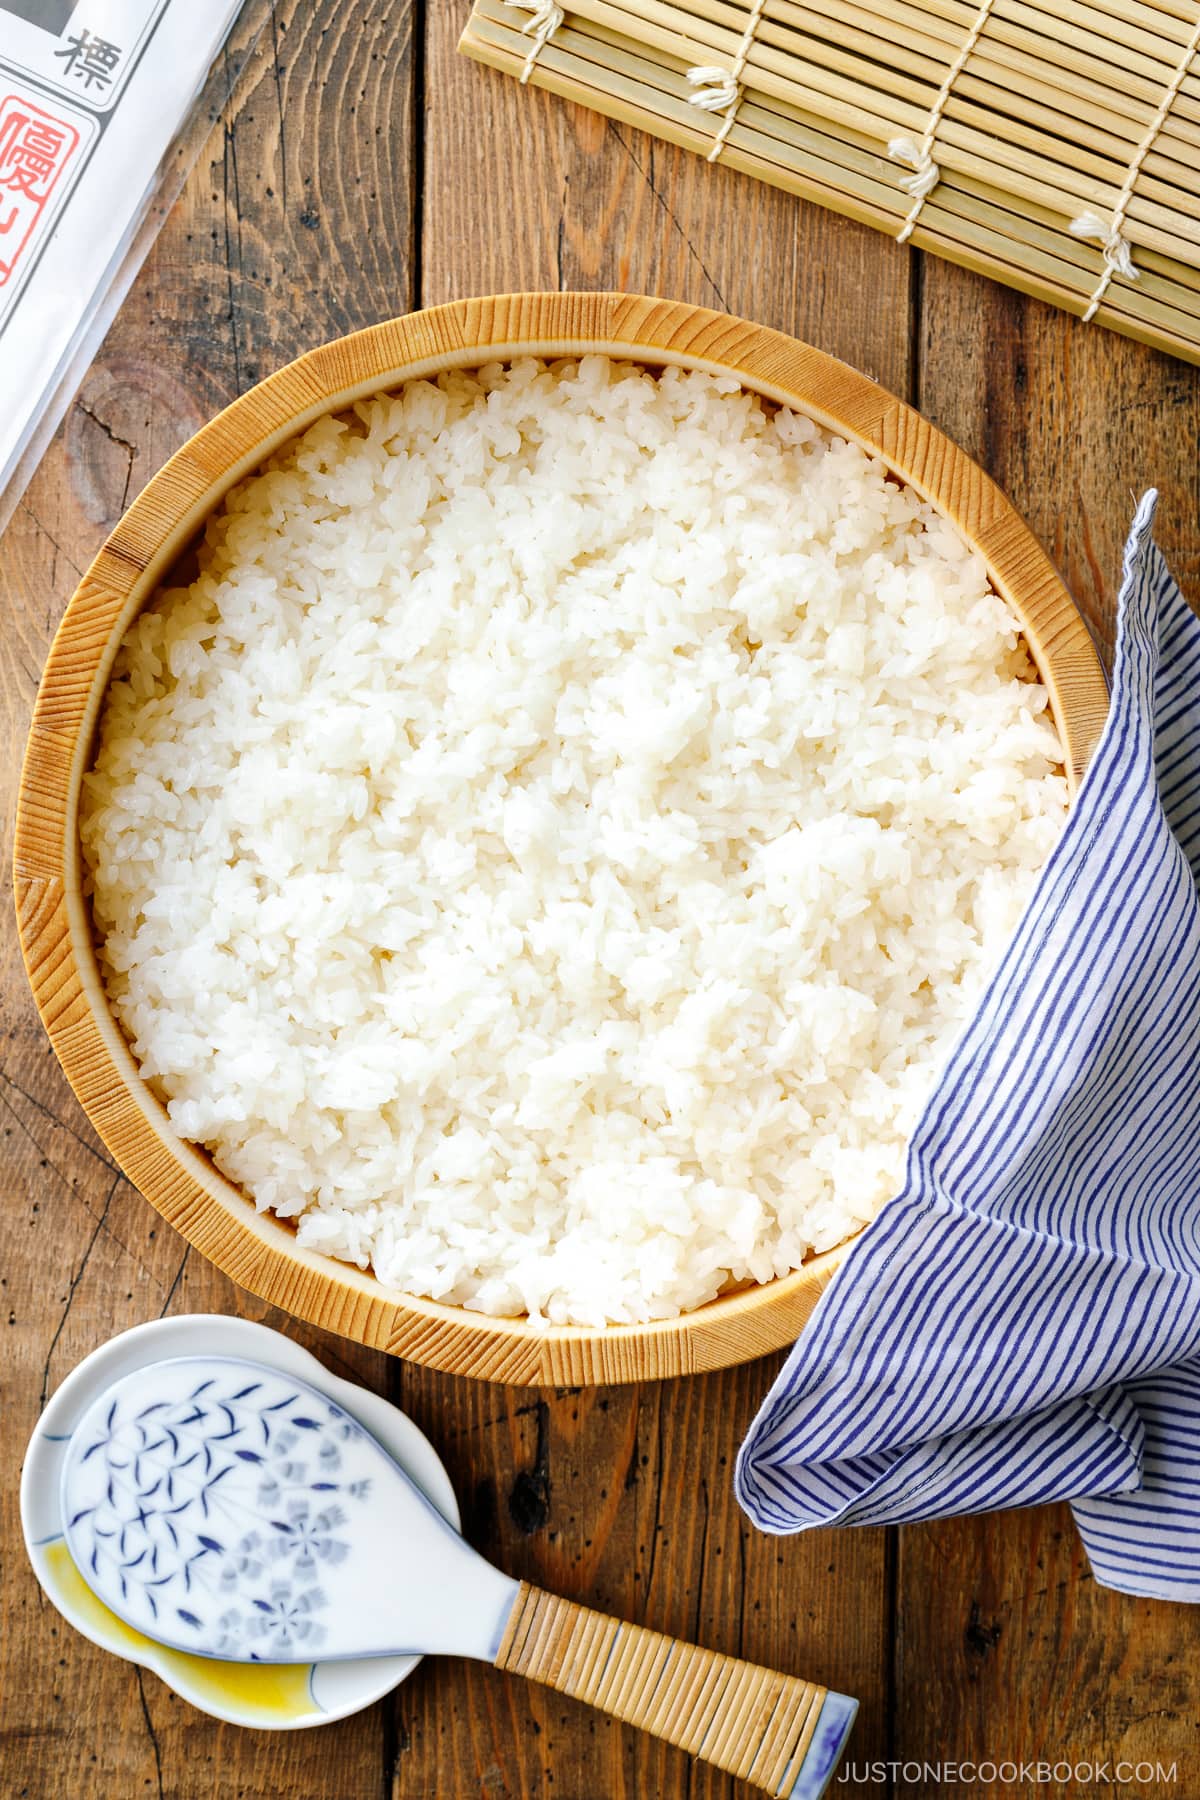
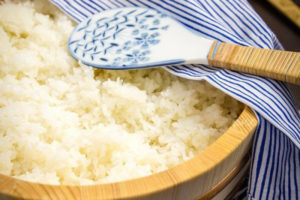
After the rice is steamed, the rice should be shiny and plump. The texture should be fluffy with a firm bite. And each rice grain should be sticky yet retain its shape. Mushy rice means it has too much water or it is overcooked. If the rice is fresh, you will see a nice shiny gloss on the surface of each grain.
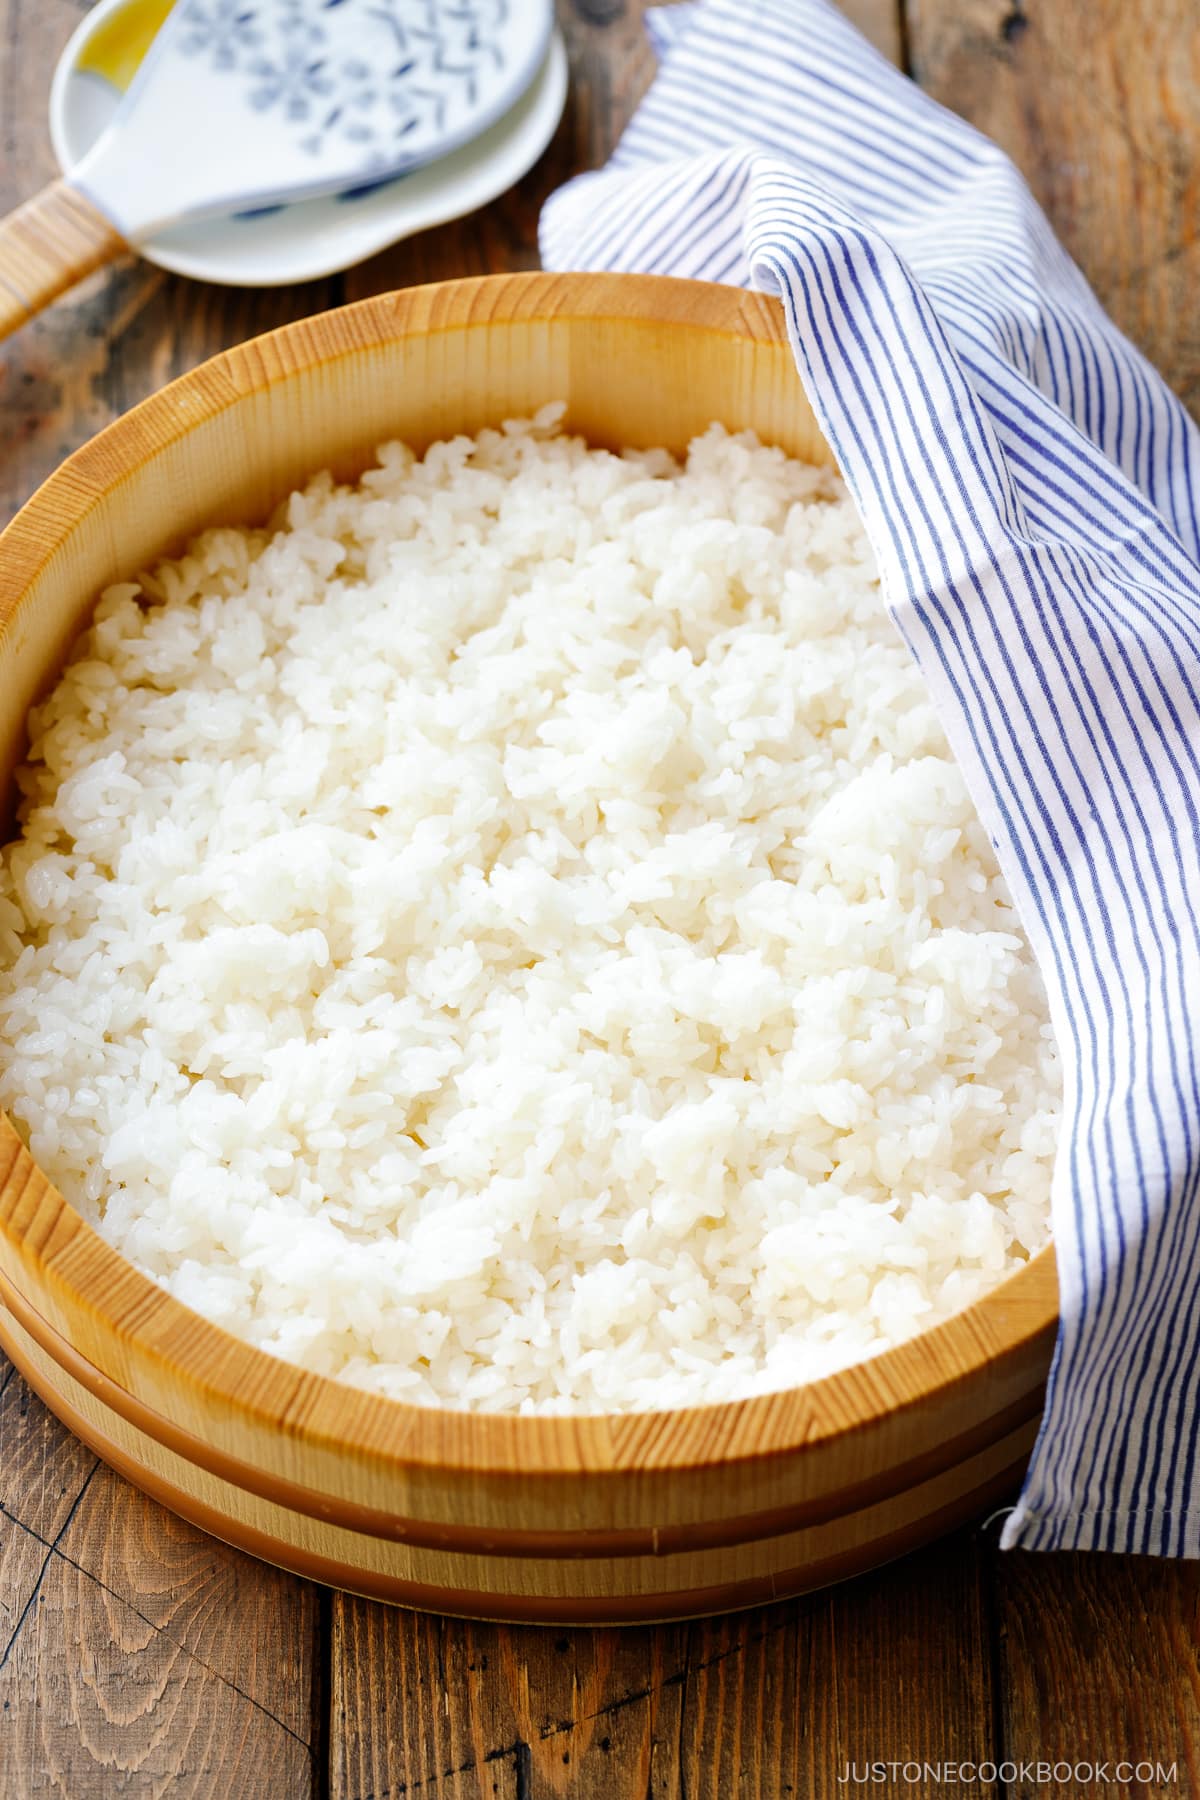
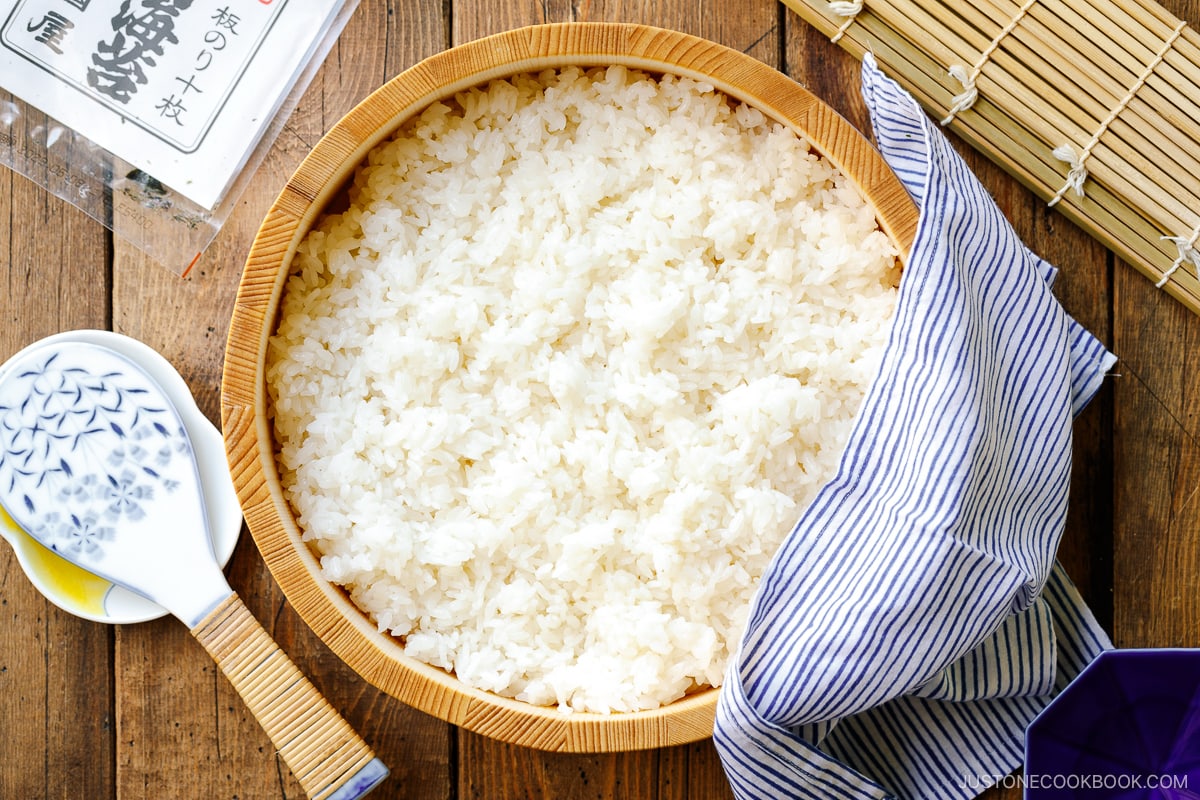
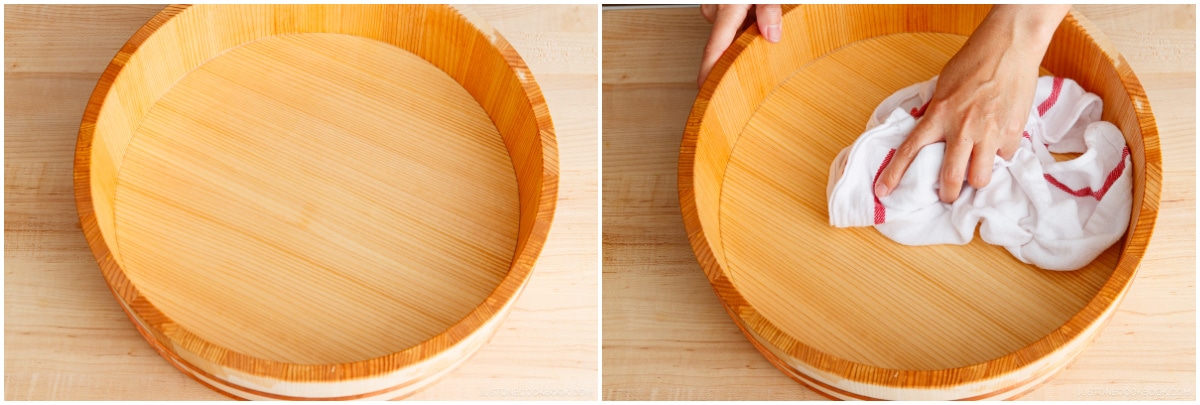
Sushi Oke (Hangiri) – A Wooden Tub
The wooden tub that is used to season, mix, and cool sushi rice is called sushi oke (寿司桶) or hangiri (はんぎり). It has straight edges and a flat bottom, which assists in spreading hot rice and allowing it to cool after adding sushi seasoning. The Hinoki cypress absorbs excess moisture.
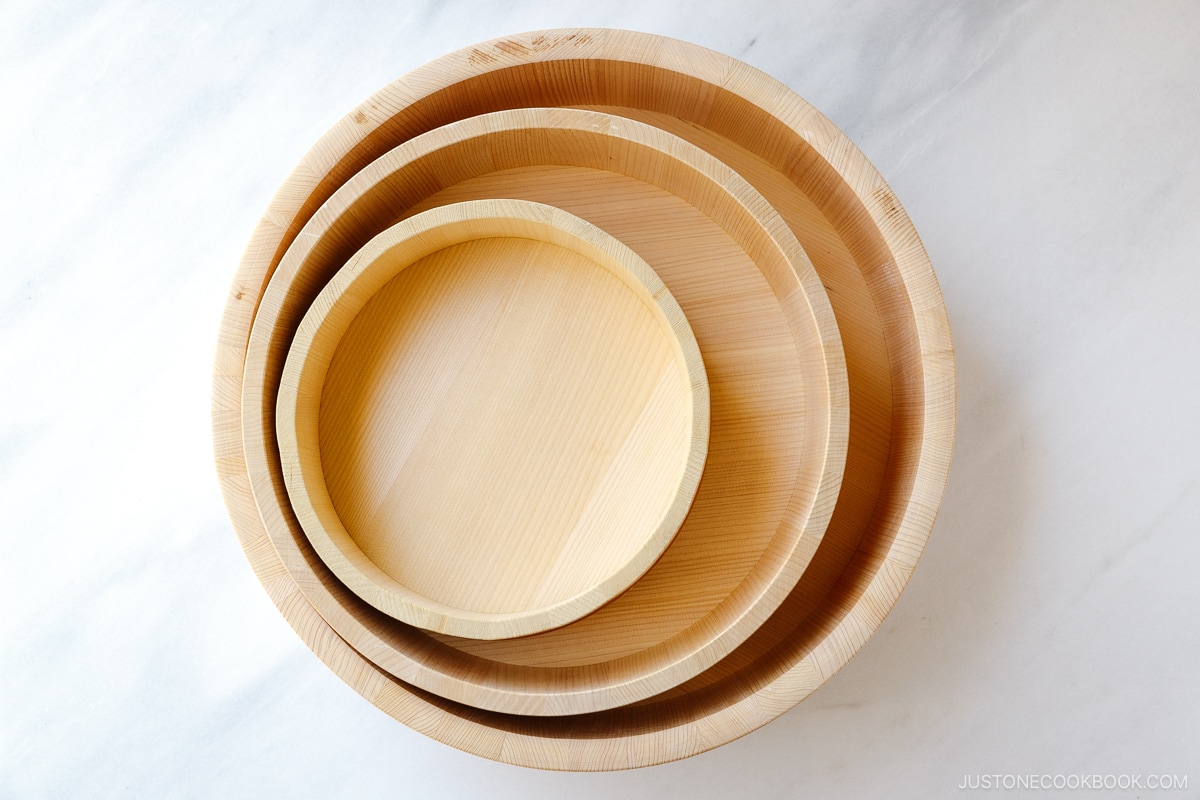
- 17 inch – MTC Kitchen (Use JOC10 to get 10% off)
- 14 inch – Amazon
- 10 inch – Amazon
Best Way to Store Cooked Rice
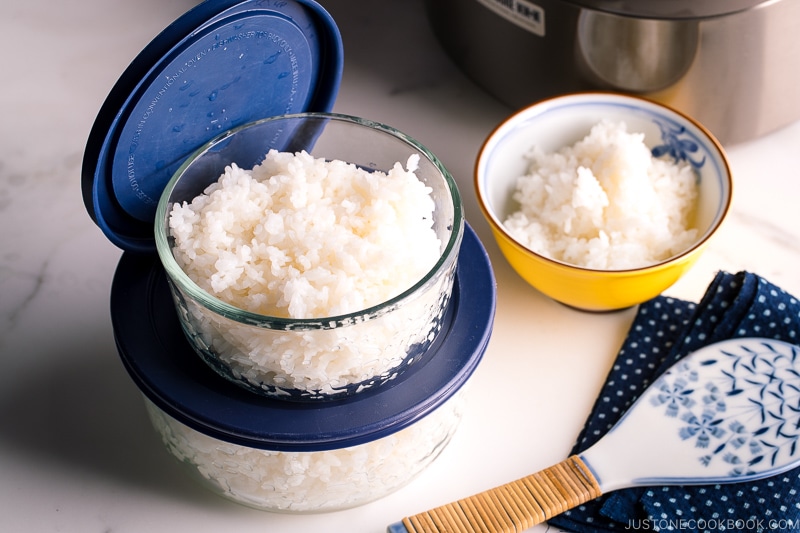
What’s the best method to store cooked sushi rice? Simply freeze the sushi rice in airtight containers and bring it back to room temperature when you need it to make sushi! This is by far the best approach to keeping your sushi rice fresh and moist. Do not refrigerate it!
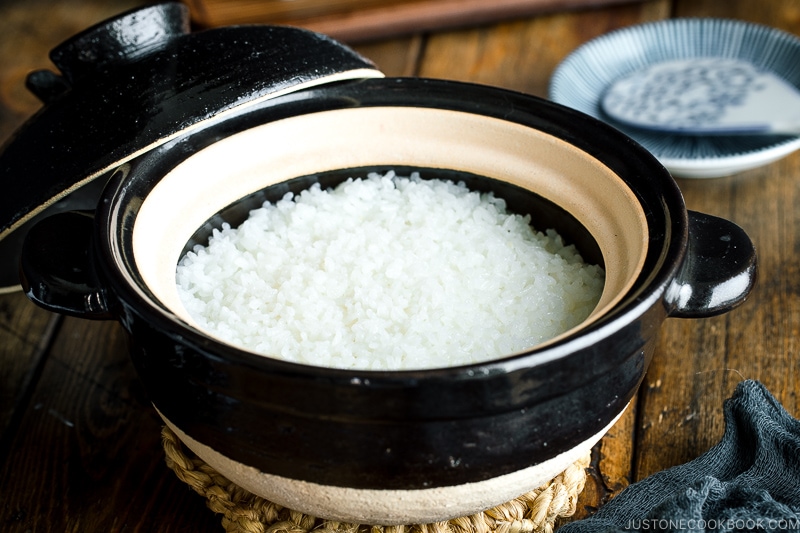
Other Methods of Cooking Japanese Rice
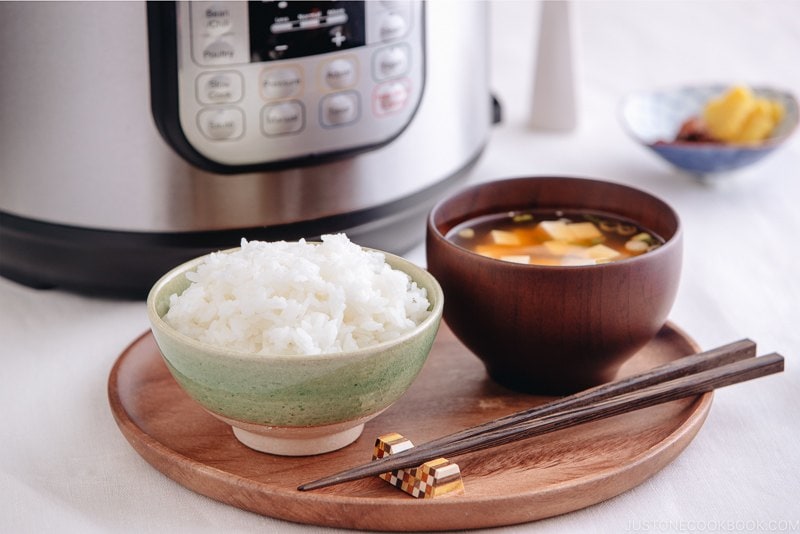
You can cook the rice using a pot over the stove, but the most convenient way is to cook sushi rice using an electric rice cooker. In my Japanese home kitchen, my trusted rice cooker brand is Zojirushi Rice Cooker. Because I cook sushi rice often, this rice cooker has a ‘sushi’ option, which makes it really easy to ensure the rice is cooked perfectly. Here are my recipes for different cooking options.
- How to Cook Rice in a Rice Cooker
- How to Cook Rice in a Pot over the Stovetop
- How to Cook Rice in an Instant Pot
- How to Cook Rice in a Donabe
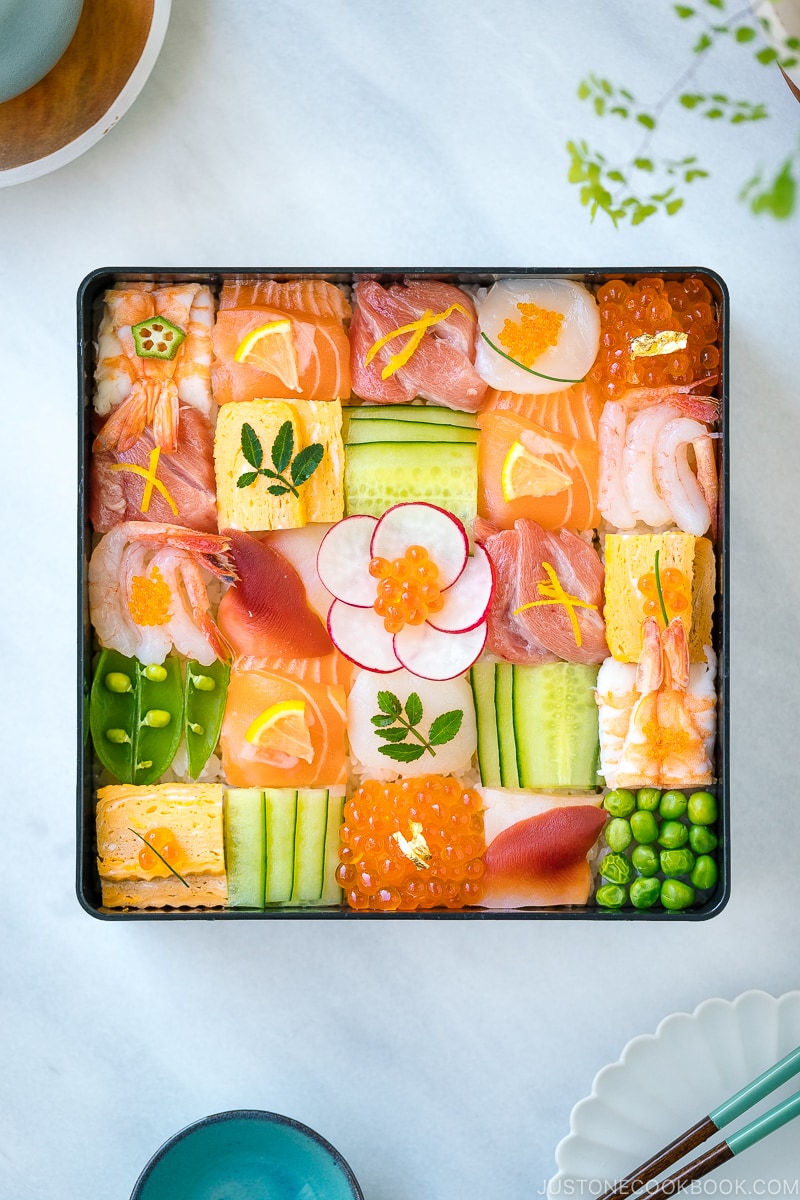
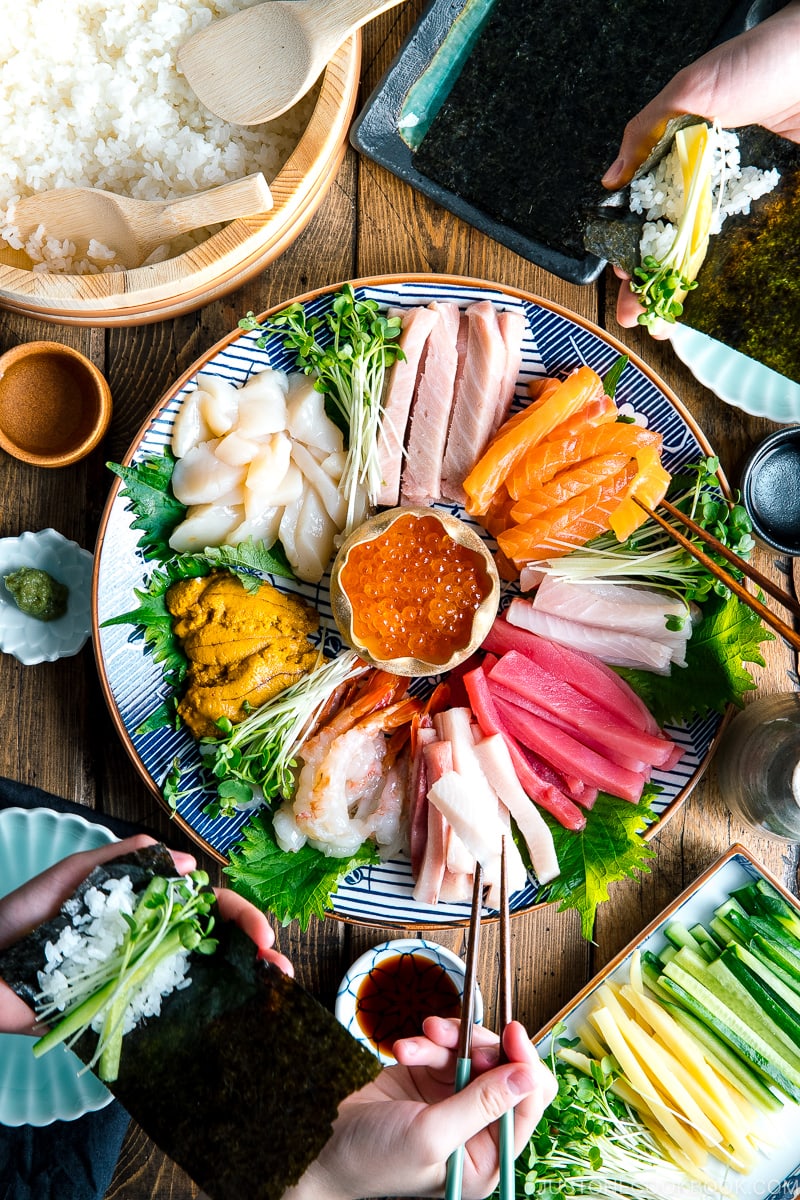
Delicious Sushi Recipes
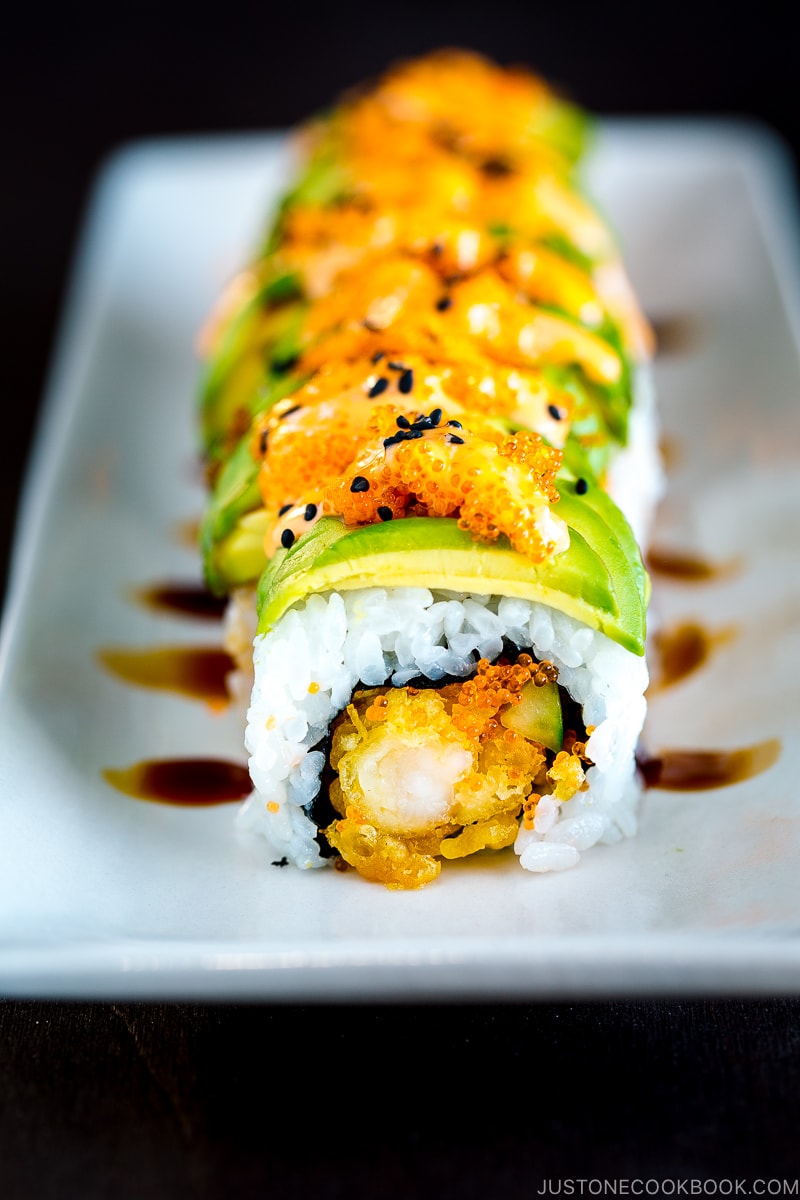
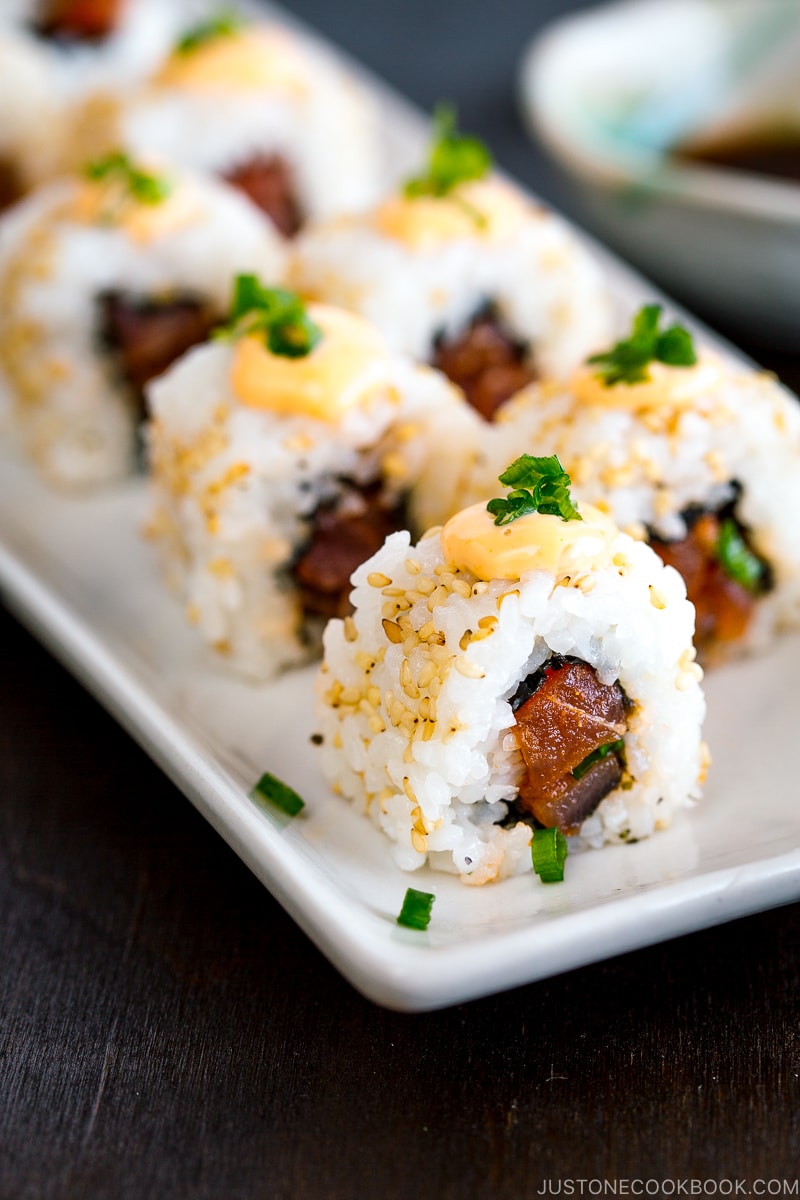
Now with perfectly cooked sushi rice, you can make all kinds of sushi recipes! If you are interested in learning more, check out my post Learning at Sushi Skills Seminar in San Francisco.
- California Roll
- Dragon Roll
- Spicy Tuna Roll
- Yellowtail Tuna Roll (Negihama Maki)
- Hosomaki (Thin Sushi Roll)
- Futomaki (Thick Sushi Roll)
- Chirashi Sushi
- Saba Oshizushi (Mackerel Pressed Sushi)
- Inari Sushi
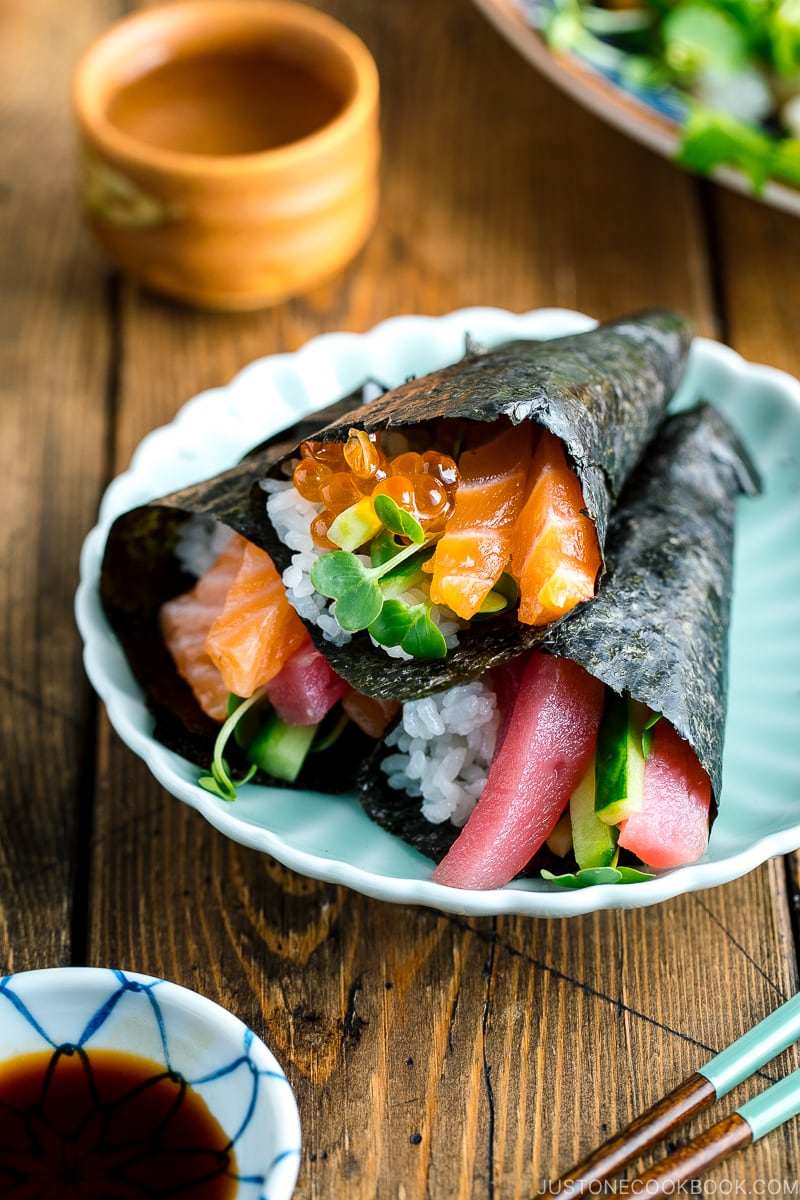
- Temaki Sushi (Hand Roll)
- Temari Sushi
- Mosaic Sushi
Wish to learn more about Japanese cooking? Sign up for our free newsletter to receive cooking tips & recipe updates! And stay in touch with me on Facebook, Pinterest, YouTube, and Instagram.
How to Make Sushi Rice (for Sushi Recipes)
Video
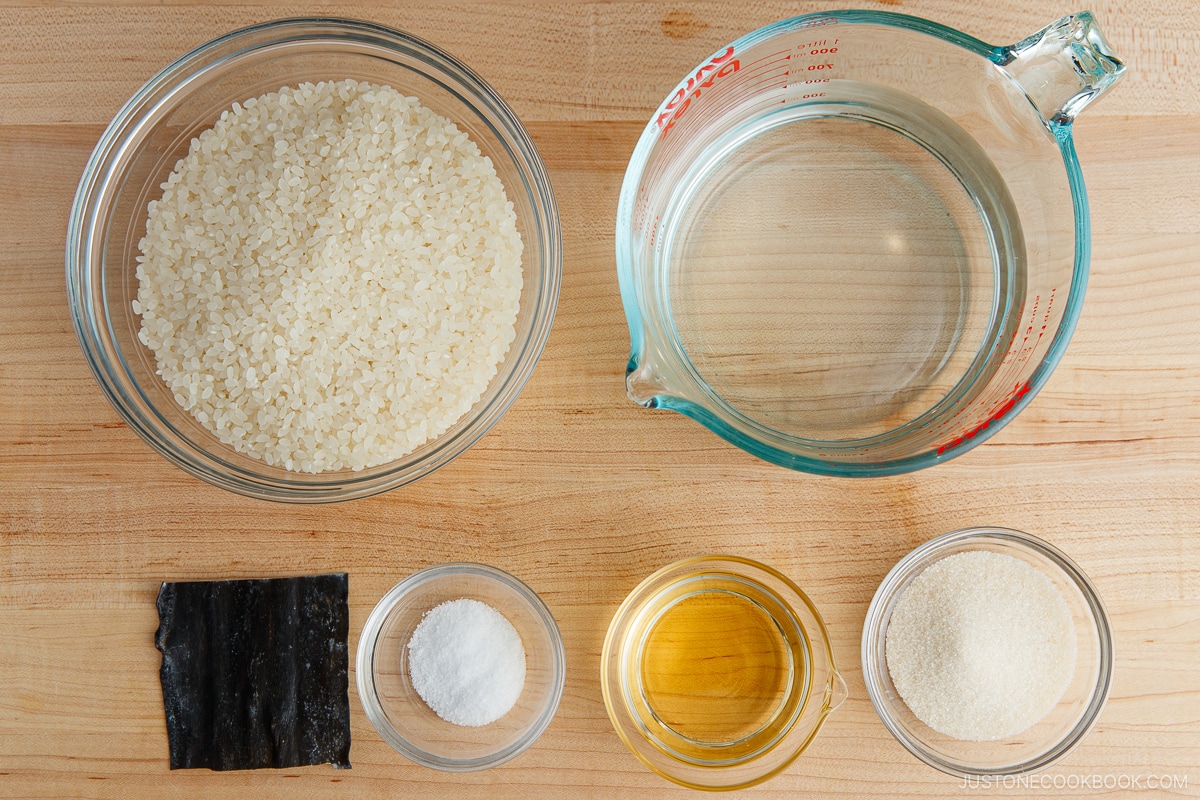
Ingredients
★ For 5–6 Servings (Makes 6 Medium Sushi Rolls)
- 2¼ cups uncooked Japanese short-grain white rice (3 rice cooker cups; 540 ml; yields 6⅔ cups or 990 g of cooked rice)
- 2¼ cups water (540 ml)
- 1 piece kombu (dried kelp) (5 g per piece; 2 x 2 inches, 5 x 5 cm; optional, for a nice aroma!)
- ⅓ cup seasoned rice vinegar (sushi vinegar) (or make the homemade recipe below)
Homemade Sushi Vinegar (optional; for 5–6 servings above)
- ⅓ cup rice vinegar (unseasoned)
- 3 Tbsp sugar
- 1½ tsp Diamond Crystal kosher salt
★ For 3–4 Servings (Makes 4 Medium Sushi Rolls)
- 1½ cups uncooked Japanese short-grain white rice (2 rice cooker cups; 360 ml; yields 4⅓ cups or 660 g of cooked rice)
- 1½ cups water (360 ml)
- 1 piece kombu (dried kelp) (5 g per piece; 2 x 2 inches, 5 x 5 cm; optional, for a nice aroma!)
- 4 Tbsp seasoned rice vinegar (sushi vinegar) (or make the homemade recipe below)
Homemade Sushi Vinegar (optional; for 3–4 servings above)
- 4 Tbsp rice vinegar (unseasoned)
- 2 Tbsp sugar
- 1 tsp Diamond Crystal kosher salt
Instructions
Before You Start…
- One thick sushi roll (Futomaki) requires 1⅔ cups (250 g) of sushi rice. One medium sushi roll (Chumaki) like Vegetarian Sushi Roll requires 1 cup (150 g) of sushi rice. One thin sushi roll (Hosomaki) requires ½ cup (80 g) of sushi rice. One inside-out sushi roll (Uramaki) like California Roll requires ¾ cup (110 g) sushi rice. One nigiri sushi requires 20 g of sushi rice.

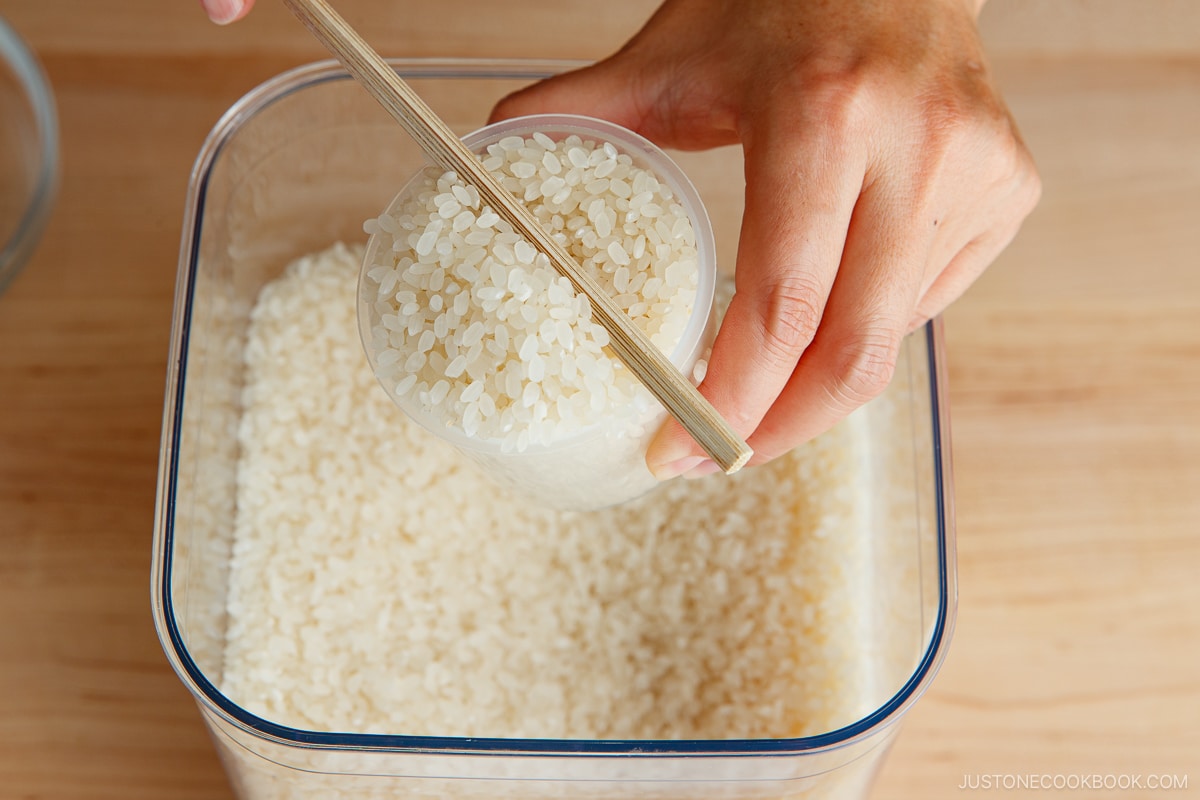
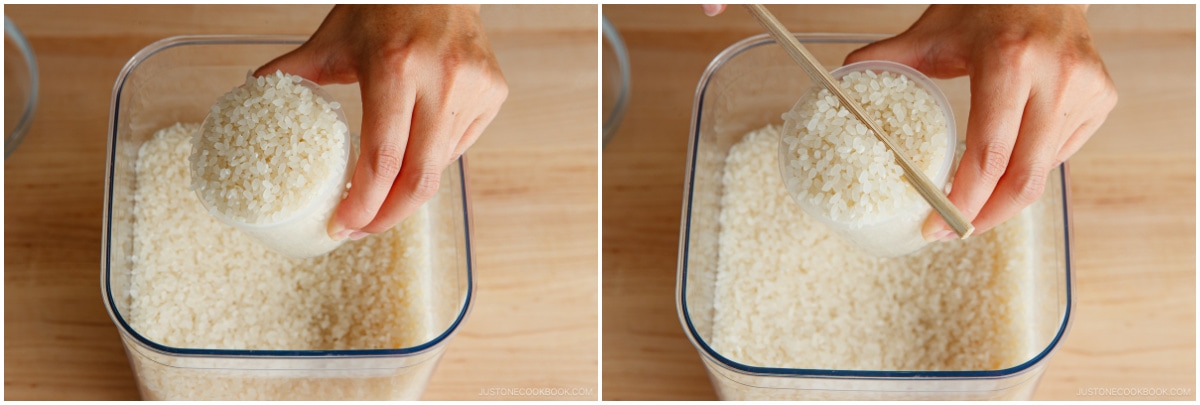
- How to Measure: Overfill a ¾ cup measure or a plastic rice cooker cup with uncooked short-grain white rice and level it off. Put the rice in a large bowl. Repeat until you have the amount needed. Tip: You must use Japanese short-grain white rice or your sushi will fall apart. Please note that 2¼ cups (450 g, 3 rice cooker cups) of uncooked Japanese short-grain rice yield 6⅔ cups (990 g) of cooked rice.

- Gather all the ingredients.
To Wash and Cook the Rice
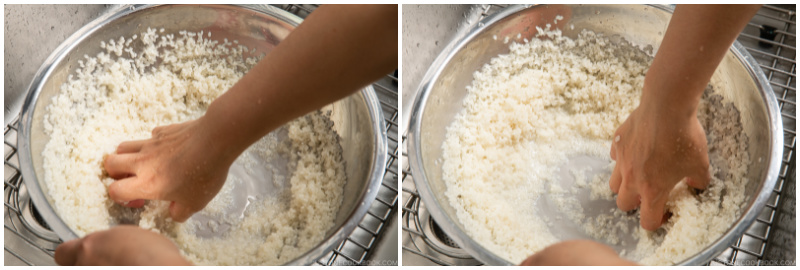
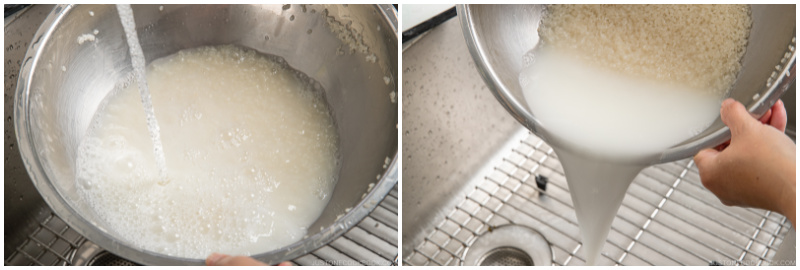
- Quick Rinse: Add just enough water to submerge all the rice. Then, discard the water immediately. Tip: Rice absorbs water very quickly when you start rinsing, so this step helps remove impurities from the rice and prevent it from absorbing the first few rounds of milky water.

- Wash: Next, use your fingers to gently agitate the wet rice grains in a circular motion for 10-15 seconds. Using very little water allows the grains to rub against each other. It also reduces the absorption of impurities from the milky water.
- Rinse: Add water and immediately discard the cloudy water. Repeat Wash and Rinse (steps 2 and 3) two more times.
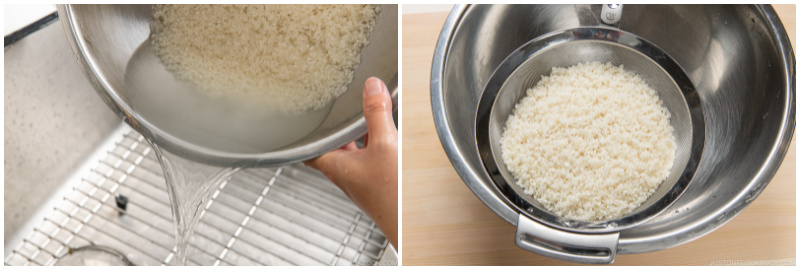
- Drain: When the water is almost clear, drain the rice very well. Tip: Use a fine-mesh sieve to drain and shake off any excess water.
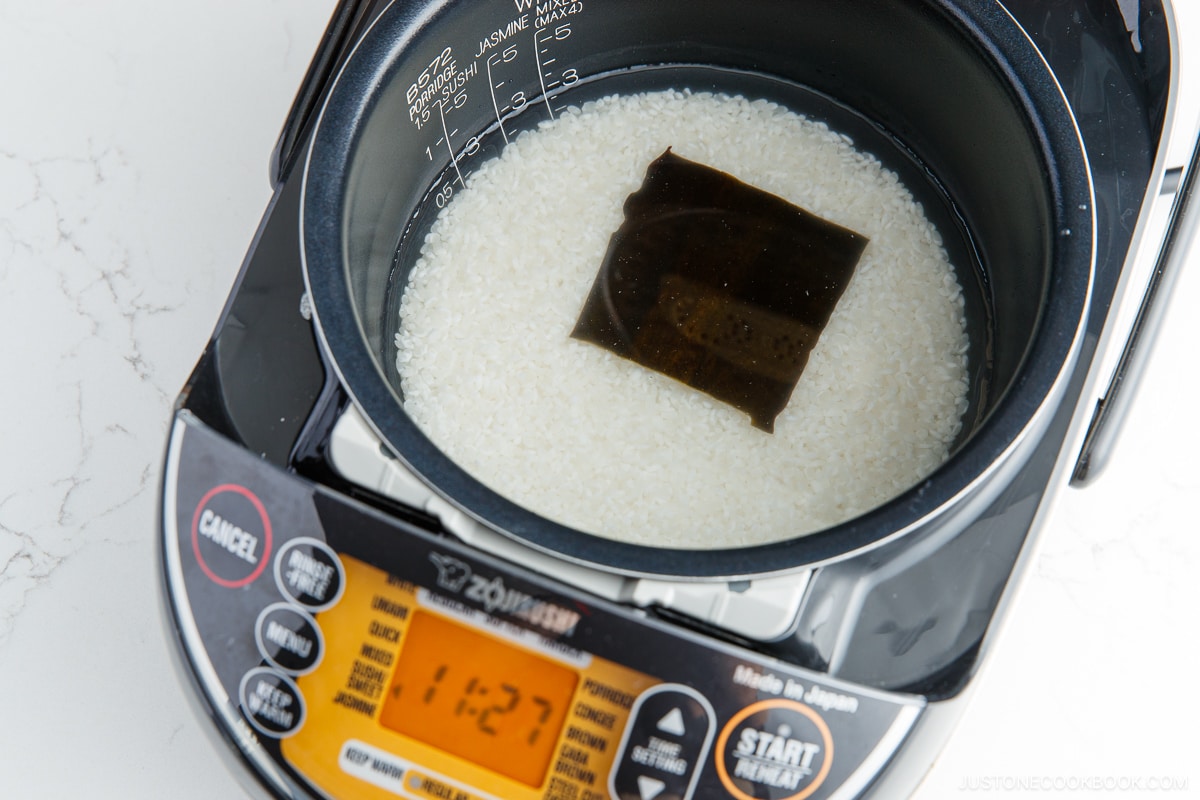
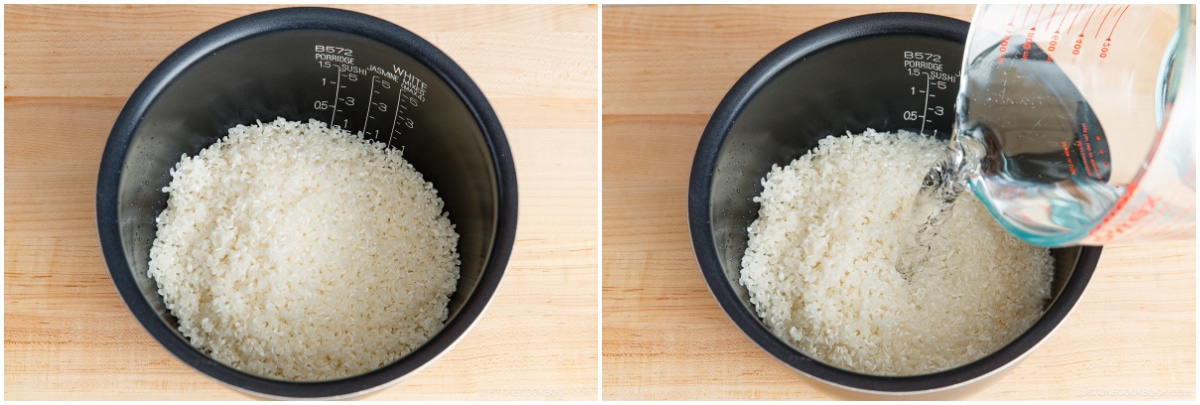
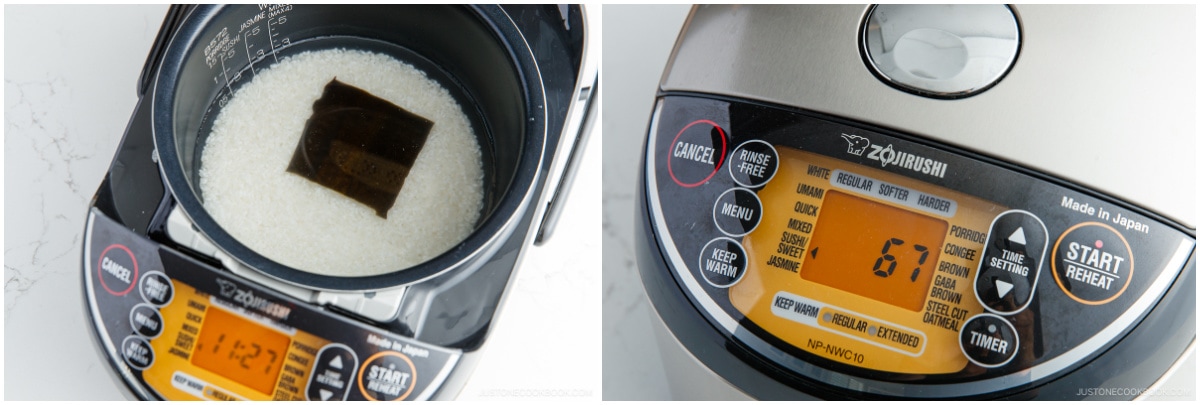
- Put the well-drained rice in the inner pot of the rice cooker and add the measured water. If your rice cooker has a Sushi Rice mode, add water up to that line. If not, add water to just under the 3-rice-cooker-cup line for White Rice (for 2¼ US cups of uncooked rice). Tip: For sushi rice, the ratio of short-grain white rice to water is only 1 to 1 by volume—less liquid than for regular steamed rice—to account for the seasoned sushi vinegar that we add to the cooked rice.
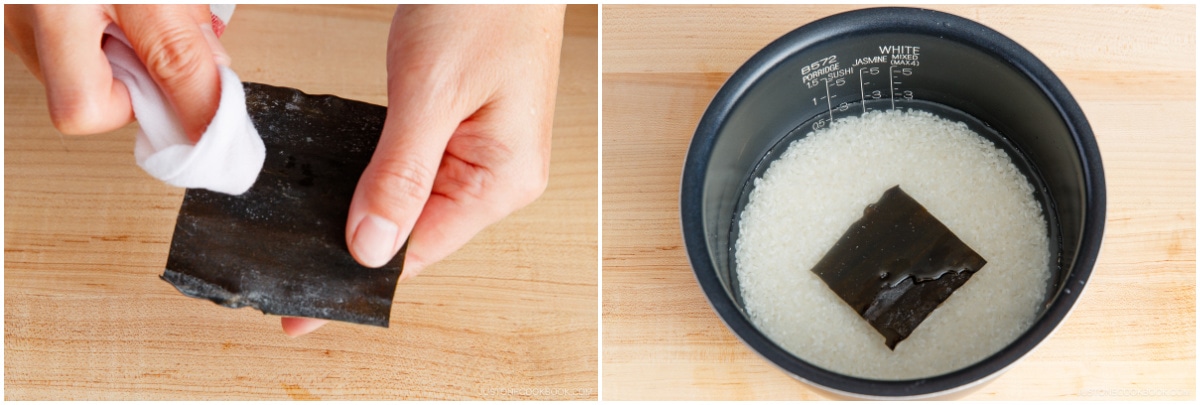
- Check the kombu to see if there are any dirt particles. If needed, gently wipe it off with a damp cloth (it‘s a traditional method but these days kombu is pretty clean). Do not wipe off the white powdery substance, which contributes to the umami flavor. NEVER wash the kombu! Now, place the kombu on top of the rice in the rice cooker bowl.
- Soak and Cook: Let the rice soak in the water for 20–30 minutes. Then, start cooking. If you don‘t have a rice cooker, cook the rice in a pot over the stove, Instant Pot, or donabe with the amount of water I specified in this recipe.

To Make the Homemade Sushi Vinegar (Optional)
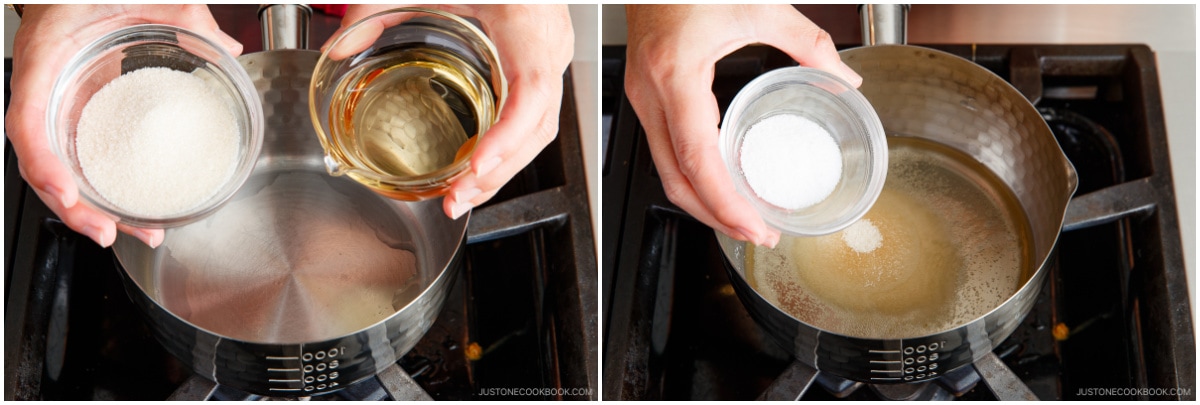
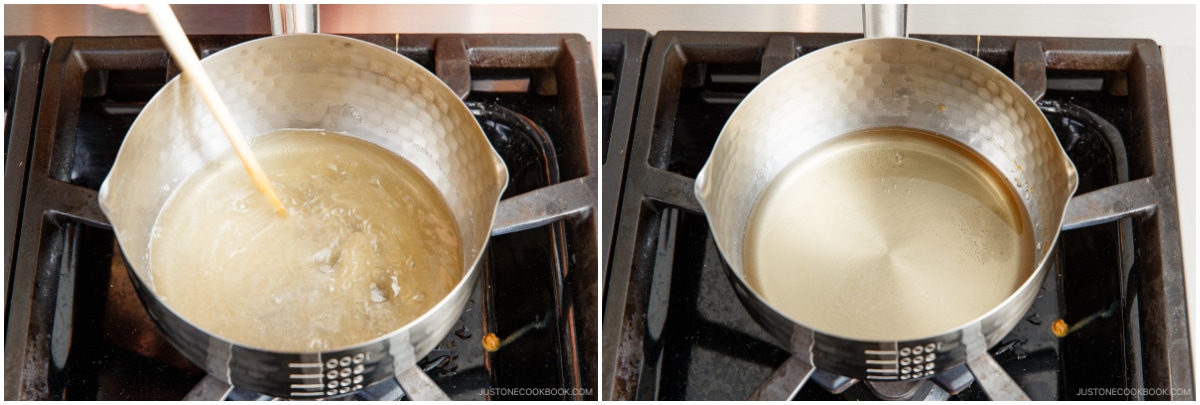
- If you are not using a store-bought bottle of sushi vinegar (seasoned rice vinegar), follow this step. Combine the rice vinegar, sugar, and salt in a small saucepan.
- Bring it to almost simmer over medium-high heat. Whisk until the sugar is completely dissolved. You can also put the ingredients in a microwave-safe bowl and microwave for 1 minute, or until the sugar is dissolved. Set aside to let it cool.
To Make the Sushi Rice
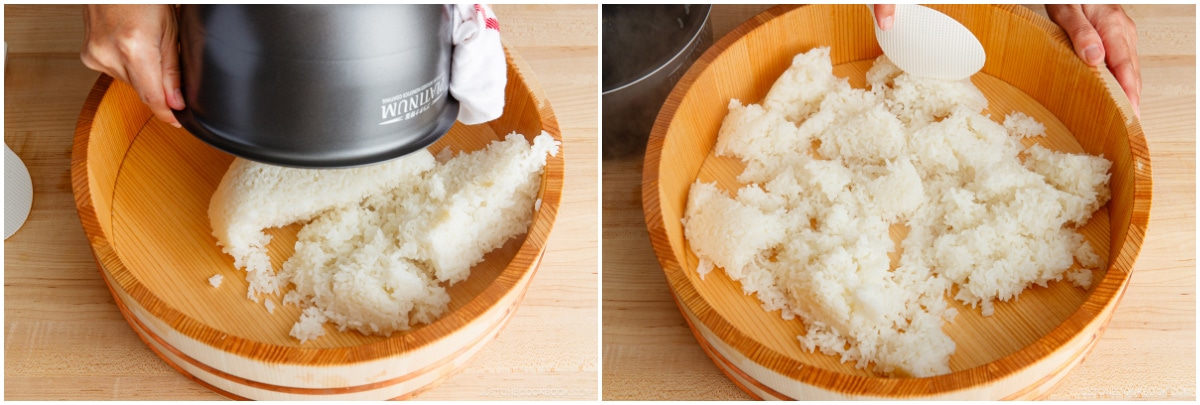
- If using a wooden sushi oke (also called hangiri), moisten it by running water over it, drain well, and dry it with a clean towel. You can also use a large salad bowl or baking sheet lined with parchment paper. Tip: This wooden tub helps absorb excess moisture while a ceramic bowl can't.
- When the rice is cooked, discard the used kombu (or repurpose it to make simmered kombu).
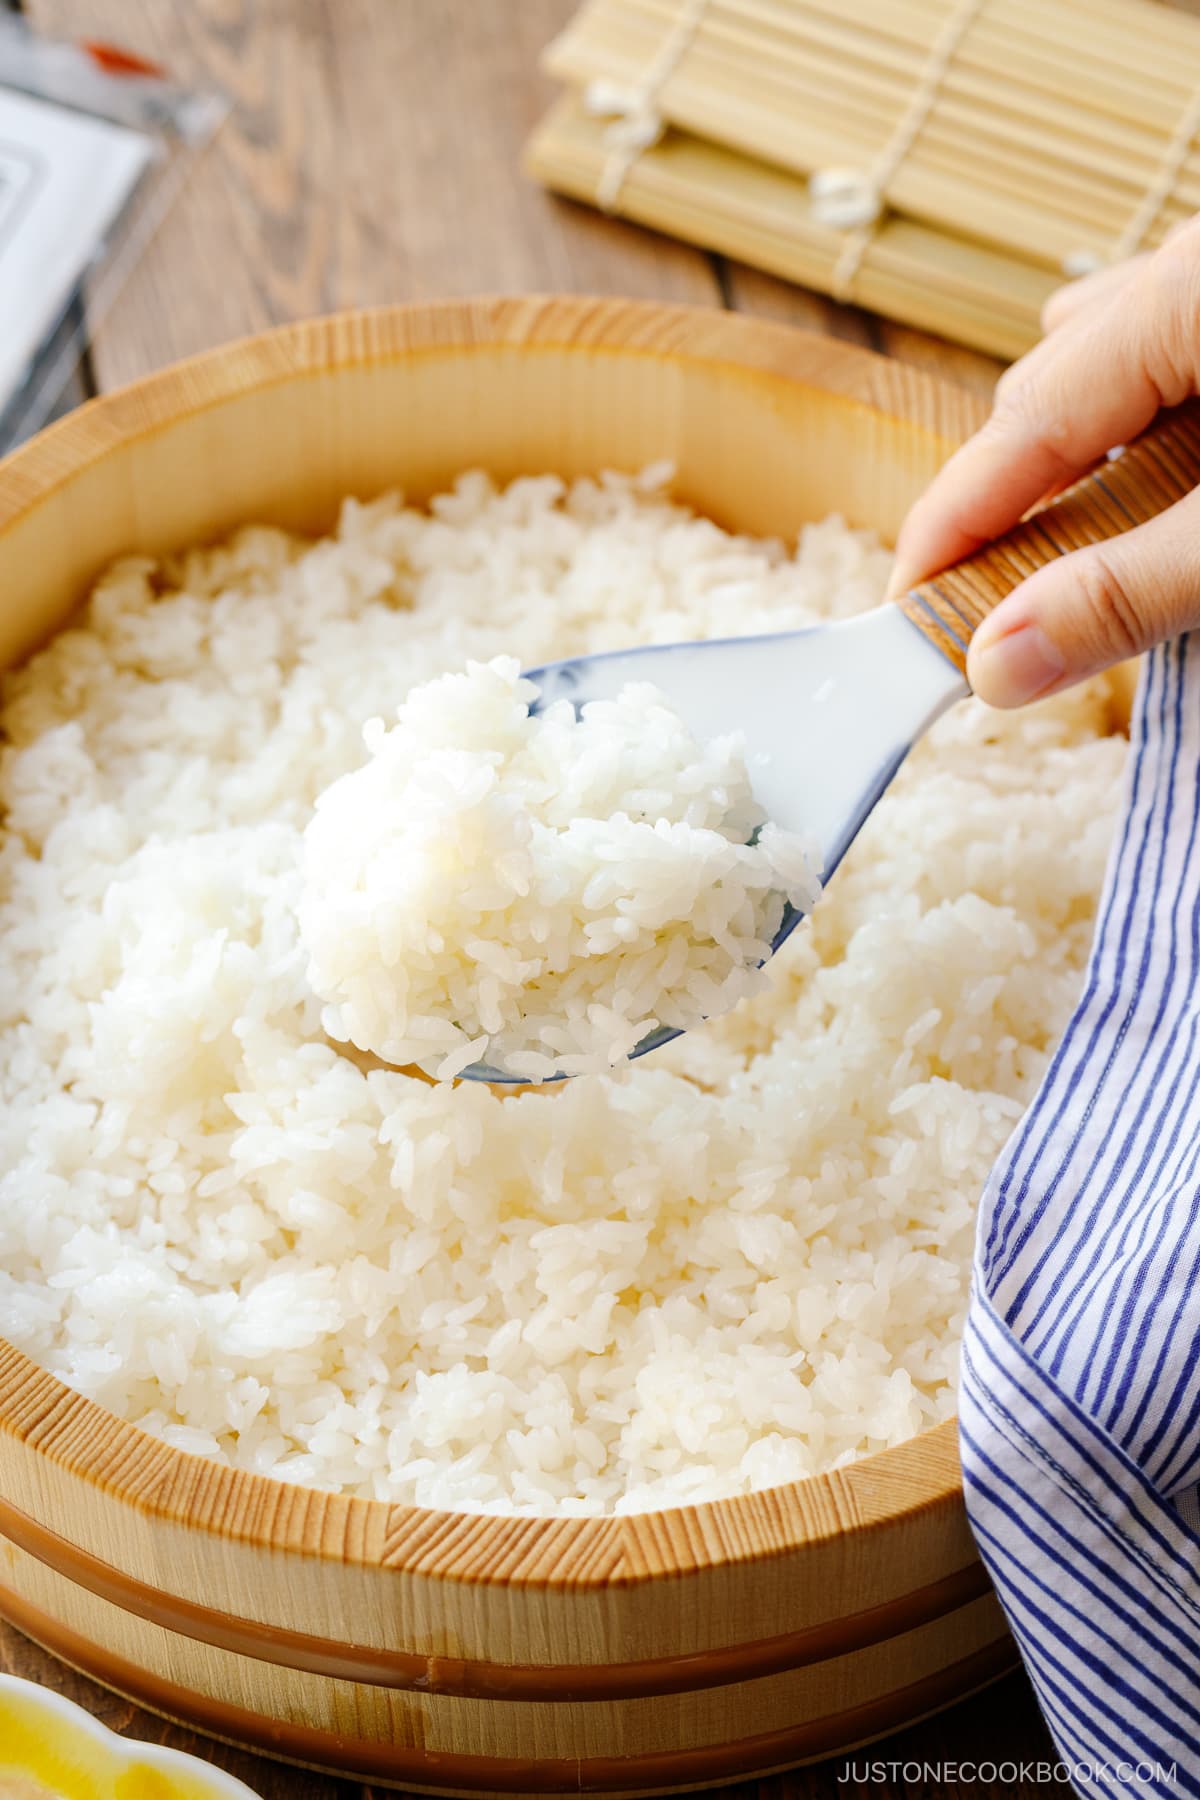
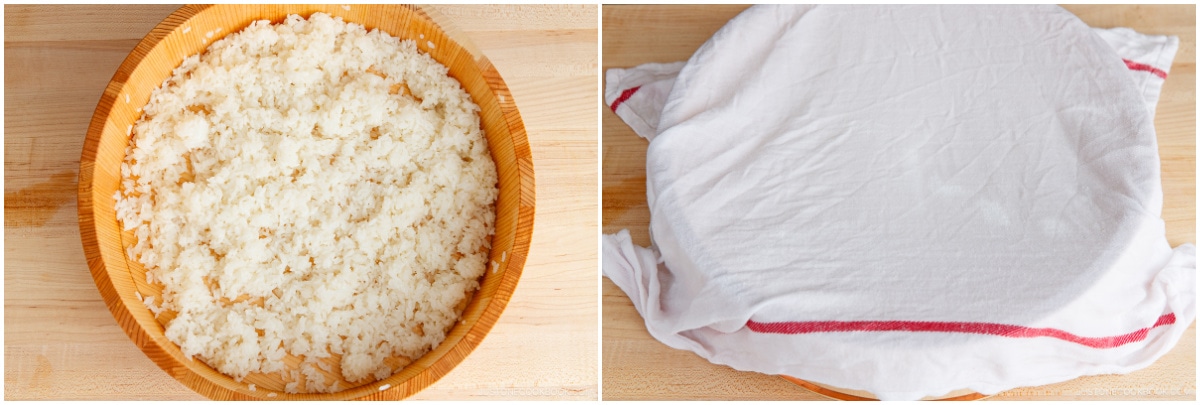
- Transfer the cooked rice into the sushi oke. Spread out the rice evenly so it will cool faster.
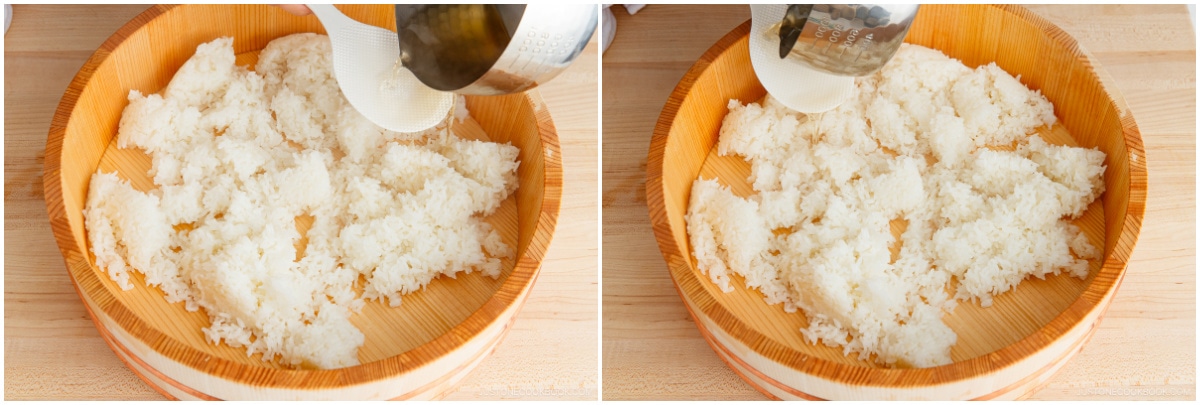
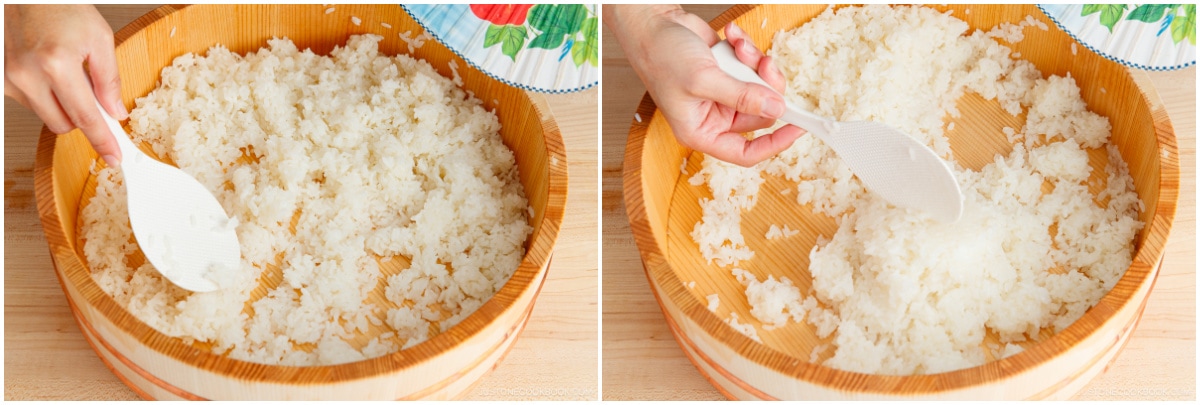
- While it’s hot, pour the sushi vinegar over the rice.
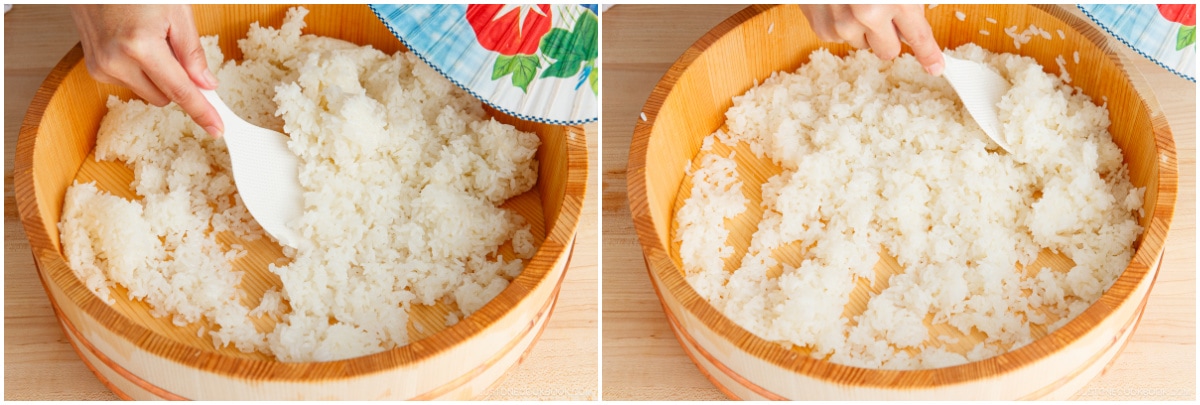
- With a rice paddle, gently “slice” the rice at a 45-degree angle to incorporate the sushi vinegar mixture and separate the chunks of rice. Do not stir or mix the rice because the grains may break and the rice will become mushy. While using this slicing motion, vigorously fan the rice with a paddle fan or another type of fan. Fanning takes away the excess moisture and makes the rice shine.
- Then, gently flip the rice in between slices.
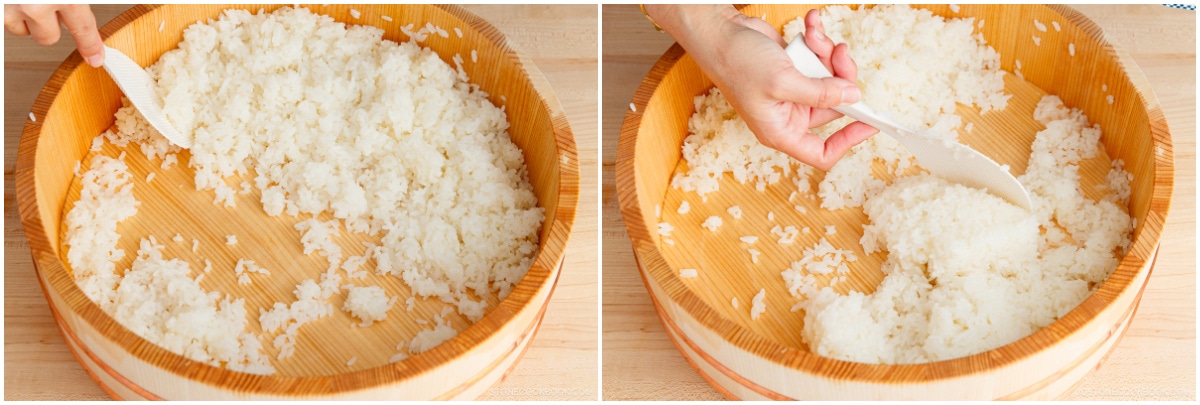
- Repeat this process until the rice is cooled to the temperature of human skin. Your Sushi Rice is now ready to use in your favorite sushi recipes.

To Keep
- Keep the sushi rice covered with a damp towel (or paper towel) for a few hours at room temperature. To keep it for a longer time, see below.
To Store
- Rice gets hard and dry in the refrigerator. My recommendation is to put the sushi rice in an airtight container and store it in the freezer for up to a month. You can defrost it overnight in the fridge, and then microwave to room temperature (not hot). If you really want to refrigerate it, cover the container with a thick kitchen towel, so the rice will stay cool but not become cold.
Nutrition
Editor’s Note: This post was originally published on Aug 18, 2011. It was republished with new images, a new video, and more helpful content on January 19, 2024.


Okay I need that rice paddle!!
Hi Wendy! Thank you very much for reading Nami’s post!
The rice paddle in this photo was a gift from Nami’s grandmother many years ago, and not sure if it still around for sale.
We hope you can find a similar rice paddle one someday.🙂
Hello Namiko, I followed the link to buy the rice cooker but the link doesn’t show, please let me k now one that cook 5 cups cos expensive I don’t want buy wrong one thank you for sharing your great revipe
Hi Ai, Thank you for bringing this to our attention.
We had made the necessary changes to the link. Thank you very much for reading Nami’s post!
Thanks a lot for this recipe. Thanks to this recipe I was able to cook perfect sushi rice. The recipe on the box is really different and does not work. I can recommend it.
Hi Kateřina Plevoá! We are glad to hear your Sushi rice turned out perfect with Nami’s recipe!
Thank you very much for your kind feedback.🙂
I appreciate you for educating me on Japanese short grain rice and providing the links to be able to purchase the recipe items through Amazon. That’s definitely a time-saver when I’m unable to go to the grocery store during busy work weeks at the hospital. It also reminds me to make sure I purchase the correct item since all ingredients aren’t made equal 😉
Hi Russell, Thank you very much for your kind feedback!
We are so happy to hear our site worked out very well for your needs! 😊
do i soak the uncooked rice 2x for 30min each time? once after rinsing the rice and 2nd time in the rice cooker w the kombu in it? do i take out the kombu before cooking the rice or after the rice is cooked?
Hi jaime, Thank you for trying this recipe!
You only need to soak the rice once at step 8. After 20~30 minutes of soaking, you can start cooking with Kombu in it. When rice is cooked, you will take out the Kombu. We hope this helps!
tqvm naomi. the recipe is good. i was twitching the ingredients for 4.5cups of rice. didn’t realise making nigiri uses loads of rice… but all turned out great.
Hi, jaime! Awesome! We are so happy to hear it turned out great!
Hi,
Can i prepare sushi rice the night before? So that i dont have to cook n wait for it to cool. I can just roll it straight away.
Hi Sherilyn, We do not recommend preparing the sushi rice the night before. The rice texture will change and lose flavor. Instead, you can spread out the cooked rice on a large plate or Suhi Oke and use a fan or hand fan to let it cool. We hope this helps!
Very accurate, good forum
Hi Lyd! Thank you very much for your kind feedback!
Is kombu the same as seaweed? Will seaweed work?
Hi Gail,
The Kombu and seaweed (Wakame) are different.
Here is the link about Kombu: https://www.justonecookbook.com/kombu/
Here is the link about wakame seaweed: https://www.justonecookbook.com/wakame-dried-seaweed/
We hope this is helpful, and you can see the difference!😊
Konnichiwa, just wanted to ask if I have sushi vinegar do I still need to add the salt & sugar? Also if I don’t have a sushi oke, what’s a good alternative?
Thank you for all your simple/easy to follow recipes! My family enjoys it a lot!
Konnichiwa Janet!
Thank you very much for trying many of Nami’s recipe!
The sushi vinegar is made with Vinegar, sugar, and salt, so you do not need to add anything. However, if you like to adjust the sweetness, you can add more sugar.
As for Sushi Oke, you may use a large bowl or a large cooking dish, etc.
We hope this is helpful!
Hello! This is very helpful. Is it necessary to have an oke or would a bowl be okay?
Hi Courtney,
The Sushi Oke/Hangiri help absorb the moisture from vinegared rice and let the rice get cool faster so that the Sushi rice will be shiny and not mushy.
You can not get the same effect from other containers, but you may use the large bowl as a substitute.
Please use the fan and follow Nami’s mixing technic to get a better result.🙂
Could you please let me know your favorite brand of short grain rice (available in the US)? I love your site, and use your recipes all the time!
Hi Lucy!
Here is the post link that Nami mentions about her favorite brands;
https://www.justonecookbook.com/premium-japanese-short-grain-rice/
We hope you enjoy it.🙂
Thanks so much for your sushi rice recipe! I have a question about the vinegar. I have ‘seasoned rice vinegar’. Is that correct to use in the recipe or is the vinegar all set to mix with sushi rice?
Hi Natalie!
The seasoned rice vinegar is preseasoned rice vinegar that contained vinegar, sugar, and salt. (some brand includes extra seasonings.) So if you like the premixed taste, yes, you may use it for this recipe and skip sugar and salt. You can also add sugar to the seasoned rice vinegar to adjust your liking’s sweetness before you pour over the rice. If you do that, please follow the recipe (To Make Sushi Vinegar Step 1) and make sure to mix well until the sugar is completely dissolved.
We hope this is helpful.😊
Nami:
I have an Instant Pot. Can I make Shushi in an Instant Pot?
Love your blogs and visits to Japan. One of these days I’ll get there.
Susan
Hi Dr. Fairchild!
You can make steamed rice in the instant pot, then transfer the cooked rice to a baking sheet or a large bowl to make sushi rice in it. Sushi rice is basically steamed rice + seasonings, so you can make rice in the IP and then season afterward.
Here is the recipe “How to Make Rice in an Instant Pot” https://www.justonecookbook.com/instant-pot-rice/
We hope this helps!
This is amazing, I am definitely going to try these recipes, my family is very fond of Japanese cuisine, I will try and hope to get the best of it. Thank you.
Hi Surraya,
Great! They are so many recipes to try out using this Sushi Rice.
Please visit; https://www.justonecookbook.com/search/?q=sushi
Enjoy!☺️
Its awesome my family loved it. Love the fact you gave out recipe for 2 cups of rice. Just simply perfect ❤
Hi Debra!
Thank you very much for trying this recipe and for your kind feedback!
We are happy to hear that you and your family enjoyed this sushi rice!